
|
|
|
Your donations help keep this valuable resource free and growing. Thank you.
|
Basic AMC V8 Rebuild by SC397 |
Post Reply 
|
Page <1 45678 11> |
| Author | |
SC397 
AMC Addicted 

Joined: Apr/30/2009 Location: Michigan Status: Offline Points: 5476 |
 Post Options Post Options
") Thanks(1) Thanks(1)
 Quote Reply Quote Reply
 Posted: Jul/30/2021 at 8:21pm Posted: Jul/30/2021 at 8:21pm |
|
Intake Manifold Installation:
This one is a pure stock engine so we will be using the original intake manifold. I wonder what lurks under that PCV valve baffle... I end up just chiseling the rivets off to remove baffle and it is a good I did. I wouldn't want this crud getting to my engine. I took this one in to the machine shop to get hot tanked and bead blasted. Then I drilled new rivet holes as close o the original ones as possible. I get the rivets from McMaster Car. Before I install the thermostat I test it first on the stove then I drill a 1/8" hole in it to help burp the air out. I always use a steel valley pan gasket with rubber end seals. I coat all the steel gasket surfaces making sure that there is good coverage at the coolant ports.
Edited by SC397 - Jul/30/2021 at 9:13pm |
|
 |
|
|
SC397
AMC Addicted
Joined: Apr/30/2009 Location: Michigan Status: Offline Points: 5476 |
Post Options
Thanks(0)
Quote Reply
Posted: Jul/30/2021 at 9:00pm |
|
Paint & Body:
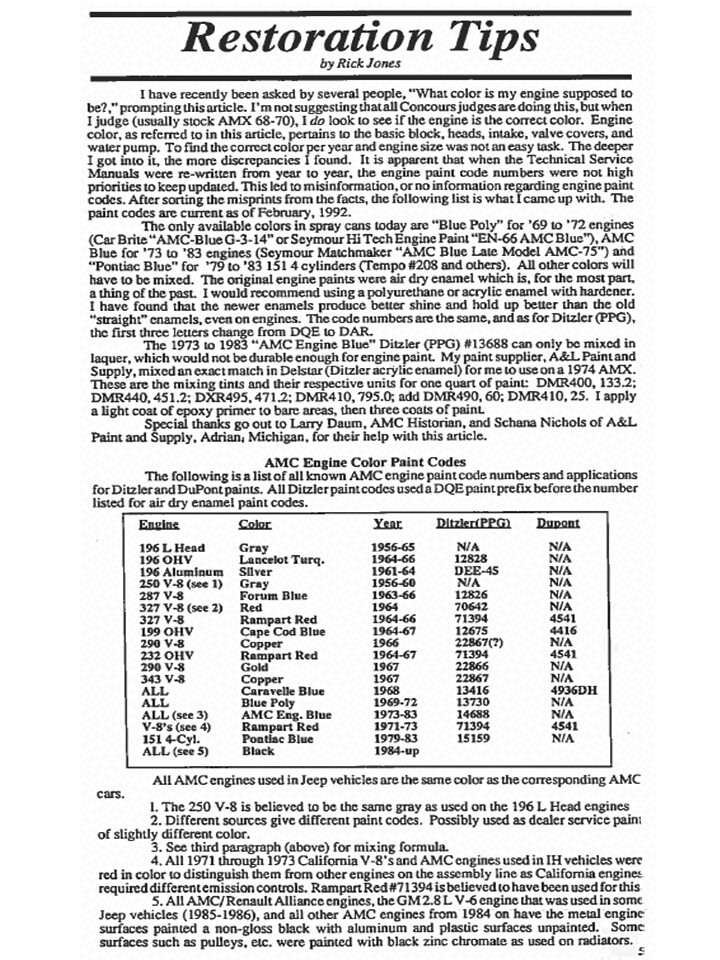
Normally I like to paint them upside down first then flip them over and give them another coat right side up. This one is a pure stock engine so I have to paint it with the intake manifold and rocker arm covers installed. Here is a little trick for sandblasting bolts and washers. I tapped holes in a nylon bar to hold them. The alternator bracket gets painted engine color too but I panted them separate. Here is the list of engine paint colors.
Edited by SC397 - Jul/30/2021 at 9:48pm |
|
|
|
|
SC397
AMC Addicted
Joined: Apr/30/2009 Location: Michigan Status: Offline Points: 5476 |
Post Options
Thanks(0)
Quote Reply
Posted: Jul/30/2021 at 9:09pm |
|
Priming the Oil Pump:
I have a tool made out of a distributor shaft to prime the oil pump. If I am building a engine that will be getting an aluminum intake manifold I prime the pump before I install the intake manifold like the one pictured. Don't forget to plug the oil sending unit port. Basically I spin the drill until I see oil at some of the rocker arms. Then I rotate the crank at 1/4 turn increments and run the drill untill I get oil pressure at each rocker arm. (Pictured is NOT the Rozwell 343 engine)
Edited by SC397 - Aug/03/2021 at 7:26am |
|
|
|
|
SC397
AMC Addicted
Joined: Apr/30/2009 Location: Michigan Status: Offline Points: 5476 |
Post Options
Thanks(1)
Quote Reply
Posted: Jul/30/2021 at 9:41pm |
|
Starting Procedure:
When I install the flex plate or flywheel I mark the position so it will be easier for the customer to install. The engines from 1966 to 1971 are nice because the pilot bushing is the same weather it is a automatic or stick shift car. The pilot bushing should stick out of the crank 1/8" All flex plates should be installed with the reinforcing ring. Once I have the engine mounted in my starting stand I fill the radiator with water for the first couple of brake in runs to help clean the block out. I install fuel pump, fuel lines, carb, plug wires but leave the spark plugs out. I stet the timing at 10 degrees advanced by running the starter and turning the engine over. By the time I have the timing set I have oil pressure registered on the gauge. If I don't have oil pressure I run the starter until I do. I give it check over for gas or any other kind of leaks then install the spark plugs. Once it is up and running I crank it up to about 2500 rpm and run it until it reaches 200 degrees. Then I cool it down, drain the water and put clean water in and run it again. I repeat with water until it doesn't come out brown then I replace the water with Antifreeze and rust preventer. Once the engine is broke in I re-torque the head bolts and put the pretty rocker arm covers on. Here are a couple of videos of it running. Edited by SC397 - Jul/30/2021 at 9:43pm |
|
|
|
|
PHAT69AMX
AMC Addicted

Joined: Jul/07/2007 Location: West Virginia Status: Offline Points: 5919 |
Post Options
Thanks(1)
Quote Reply
Posted: Jul/30/2021 at 10:24pm |
|
Back at it, still swingin' there SC397

|
|
|
|
|
sweatlock
AMC Addicted

Joined: Apr/28/2014 Location: Largo, FL Status: Offline Points: 3313 |
Post Options
Thanks(1)
Quote Reply
Posted: Jul/31/2021 at 8:57am |
|
A lot of excellent info here, thank you
I'm taking notes! Edited by sweatlock - Jul/31/2021 at 9:59am |
|
|
|
|
Rozwell
AMC Apprentice 
Joined: Apr/05/2020 Location: Cincinnati Ohio Status: Offline Points: 103 |
Post Options
Thanks(0)
Quote Reply
Posted: Jul/31/2021 at 6:46pm |
|
Nice work and great pictures. Excellent tip on removing the heat shield. What type of sealer do you use on the steel intake gasket and do you use sealer around the head ports also?
|
|
|
|
|
Ramzilla
AMC Nut

Joined: Jan/28/2019 Location: arizona Status: Offline Points: 354 |
Post Options
Thanks(0)
Quote Reply
Posted: Jul/31/2021 at 7:02pm |
|
SC397
Thank-you very much that was a lot of work posting that info. Larry
|
|
|
SC Rambler
|
|
|
|
|
WesternRed
AMC Addicted

Joined: Aug/03/2010 Location: Australia Status: Offline Points: 5799 |
Post Options
Thanks(1)
Quote Reply
Posted: Aug/01/2021 at 6:22am |
|
I'm most impressed by the priming drill.
|
|
|
I've finally given up drinking for good...........now I only drink for evil.
|
|
|
|
|
SC397
AMC Addicted
Joined: Apr/30/2009 Location: Michigan Status: Offline Points: 5476 |
Post Options
Thanks(0)
Quote Reply
Posted: Aug/01/2021 at 7:29am |
I just use normal gray or black RTV sealer. If I feel frisky and I have some, I put high temp RTV at the exhaust heat cross over. I will post up some pictures in that thread when I do another one.
|
|
|
|
|
Post Reply
|
Page <1 45678 11> |
 Tweet
Tweet
|
| Forum Jump | Forum Permissions You cannot post new topics in this forum You cannot reply to topics in this forum You cannot delete your posts in this forum You cannot edit your posts in this forum You cannot create polls in this forum You cannot vote in polls in this forum |


 Click for TheAMCForum Rules
 Topic Options


 Rozwell wrote: