
|
|
|
Your donations help keep this valuable resource free and growing. Thank you.
|
Basic AMC V8 Rebuild by SC397 |
Post Reply 
|
Page <1 23456 11> |
| Author | |
SC397 
AMC Addicted 

Joined: Apr/30/2009 Location: Michigan Status: Offline Points: 5479 |
 Post Options Post Options
") Thanks(1) Thanks(1)
 Quote Reply Quote Reply
 Posted: Jul/13/2021 at 5:12pm Posted: Jul/13/2021 at 5:12pm |
|
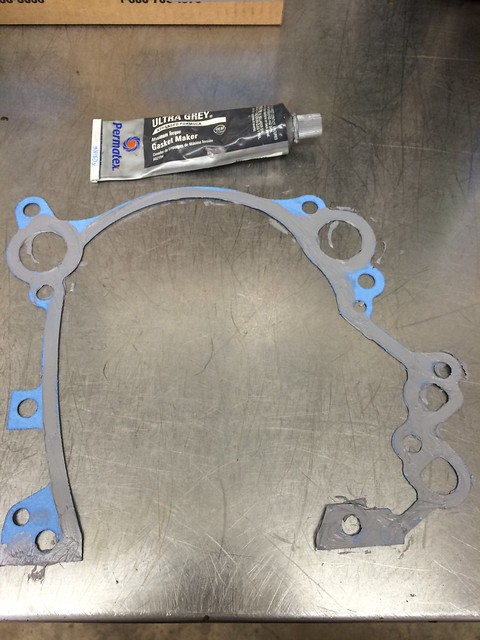
Timing Cover install:
First I press the vibration Damper seal in place with a arbor press. Then I round up replace or clean all of the water pump bolts and timing cover bolts to make sure that they are the right length. I coat both sides of the water pump gasket with RTV and install the water pump to the timing cover with the bolts just snug. Then I coat the engine side of the timing cover gasket and stick it to the engine. I put a coat of RTV on the timing cover and install it with the bolts snug but not fully tight. After I install the timing cover, I roll the engine over and trim the excess gasket material. 24 hours later or so, I finish tightening the water pump and Timing Cover bolts. Now is a good time to install the rear cam bearing core plug. I coat the outside edge of the core plug with RTV before I drive it in. I had a driver machined to fit the inside of the core plug and I have to cut a "V" in all of my engine stands so that I can get the driver in there and straight. I probably should have mentioned this part before we even started the tear-down process.
Edited by SC397 - Jul/15/2021 at 7:47am |
|
 |
|
|
SC397
AMC Addicted
Joined: Apr/30/2009 Location: Michigan Status: Offline Points: 5479 |
Post Options
Thanks(0)
Quote Reply
Posted: Jul/14/2021 at 6:50am |
|
Oil Pick-Up Screen and Oil Pan install:
I took the oil Pan as well as the intake manifold in to the machine shop to be hot tanked. I had to do some body work on this oil pan so I bumped the dents out the best I could and filled the pits and imperfections with JB Weld. Sanded it down and sprayed some zinc primer on it. My method for installing the oil pick up screen button is to use a 1/4"-20 x 3/8" bolt and nut with Loc Tite on the threads. I put a little RTV on the threads and install the pick up screen in the block. When it is tight, I usually have to go around one more turn. I like to test fit the oil pan without a gasket. If the pan doesn't fit tight to the block without a gasket, I tighten the oil pick up screen until it doesn't hold the pan up. After the oil pick up screen is install the oil pan with both sides of the side rail coated with RTV. I coat the outside edge of the rubber end seals with RTV as well. I install the oil pan with the bolts just snug. I go back 24 hours or so later and tighten the bolts.
Edited by SC397 - Jul/14/2021 at 12:59pm |
|
|
|
|
SC397
AMC Addicted
Joined: Apr/30/2009 Location: Michigan Status: Offline Points: 5479 |
Post Options
Thanks(0)
Quote Reply
Posted: Jul/14/2021 at 12:48pm |
|
Oil Pump Install:
There is only one manufacture for AMC V8 oil pumps and it is Melling (K85). Melling sells the K85 oil pump to other suppliers to be re-boxed with different part numbers. So I buy the ones who will sell them to me at the least cost. To help lubricate the shaft I drill a 1/8" hole in the driven gear. It might be overkill but I have seen one shaft that was wore to the point of causing a bind. This particular oil pump cover is a after market one having no part numbers or date code marked on it. I will re-surface it by hand using a series of finer grit sand paper mounted to a flat steel surface. The first grit is 80 to get it down to 90% cleaned up with the oil pump witness marks. The second grit is 150. The third grit is 320. At this point the oil pump witness marks are gone and the finish is pretty close to the original factory finish. And finally I hand lap it on oiled 500 grit. Once the oil pump cover is ready I pack the oil pump housing full of Petroleum Jelly then put the gears in and clean all of the excess off of the gasket surface. I spray both sides of the gasket with Copper Coat before installing the oil pump cover. As a matter of interest, cryco changed the oil filter adapter fitting in 1990 for the Grand Wagoneer to a metric size which is really close to the SAE size. 1966-1989 on the left, 1990-1991 on the right  IMG_3919 by Rick Jones, on Flickr IMG_3919 by Rick Jones, on FlickrIf you don't know any better, the early filter will thread right on to the metric thread and and will be snug until you crank the engine up to about 2500 rpm to break the cam in. Then, the filter will blow off like a shot gun and spew about a gallon of oil all over your shop before you realize it and can shut the engine off. Ask me how I know.. Here are the 3 types of oil filters that I use. B9 is the full quart size for the V8 that fits the full size Jeeps and AMC cars 1966-1989 B39 is the shorter one that fits all V8 Jeeps and small AMC cars 1966-1989. B141 fits the V8 with the metric thread 1990-1991 They all have the anti-drain back feature in them. Edited by SC397 - Aug/09/2021 at 6:59pm |
|
|
|
|
SC397
AMC Addicted
Joined: Apr/30/2009 Location: Michigan Status: Offline Points: 5479 |
Post Options
Thanks(0)
Quote Reply
Posted: Jul/19/2021 at 8:04am |
|
Cylinder Heads Install:
Chase all of the threaded holes with a Tap even the Spark Plug holes. Clean all surfaces. Spray each side of the Head Gasket with Copper Coat. I like Fel Pro brand head gaskets. I apply a very small amount of ARP thread lube to the threads and under the hex head. Torque head bolts in sequence per the TSM with one exception. I have never had a issue with cracking heads at the corners but I have changed my sequence to the attached. I actually tighten the two bottom corners that have the locating dowels first via speed wrench and hand tight. I torque them in 5 iterations the first one being hand tight with a speed wrench then 50#/ft, 70#/ft. 85#/ft, 95#/ft for the flanged 7/16" bolts. The final torque is at the nominal of the spec. After the engine is broke in, I retorque the head bolts. The TSM tells you to install one of the head bolts with RTV. This is in case one of the head bolt holes is tapped through into the water jacket. I have only seen 1966 and a couple but not all 1967 engines that have this condition. It is best to stick a screwdriver down the hole to make sure but I do not coat the bolt with RTV unless it goes into the water jacket. 1966 & 1967 Non-Flanged Head Bolt Torque Spec. 72-77 #/ft. (7/16" Head Bolts) 1968 & 1969 Head Bolt Torque Spec. 90-100 #/ft. (7/16" Flanged Head Bolts) My assumption is that when the 390 came out in 1968 they changed the head bolts for all of the V8 engines to the flanged type and bumped up the torque. This picture shows the two different styles of 7/16" Head Bolts. The machined down version of the oil pump plunger came out of a very early 1966 290. Any AMC V8 built in 1970 and later all used 1/2" Flanged Head bolts. Those all get torqued to 105-115 #/lb.
Edited by SC397 - Jul/27/2021 at 1:38pm |
|
|
|
|
mbwicz
Supporter of TheAMCForum 
Joined: Feb/20/2019 Location: Buffalo, NY Status: Offline Points: 2001 |
Post Options
Thanks(0)
Quote Reply
Posted: Jul/19/2021 at 8:27am |
|
I've seen other threads to revise the head bolt torque sequence because of concerns with the bottom 'corner' of the head cracking due to the sharp inside corner near the head bolt. You continue to have good luck using the TSM sequence?
Thanks for the good info and great details. Mike
|
|
|
1970 AMX, one step forward, one step back. Both steps cost time and money.
|
|
|
|
|
easydean
Supporter of TheAMCForum

Joined: Sep/26/2010 Location: West Fargo, ND Status: Offline Points: 1591 |
Post Options
Thanks(0)
Quote Reply
Posted: Jul/19/2021 at 9:03am |
|
PM sent
|
|
|
|
|
SC397
AMC Addicted
Joined: Apr/30/2009 Location: Michigan Status: Offline Points: 5479 |
Post Options
Thanks(0)
Quote Reply
Posted: Jul/19/2021 at 10:26am |
Thanks for asking the question. I added more info to the post. I have never had a problem with torquing per the TSM but I have changed in the last couple of years just because I thought that I should. I also used to torque to the max of the specification but now I go to the nominal and then re-torque after the engine is broke in. Sometimes it takes up to 30 degrees to achieve torque after brake in believe it or not.
|
|
|
|
|
bigbad69
Supporter of TheAMCForum

Joined: Jul/02/2007 Location: Ottawa, Ont. Status: Offline Points: 6685 |
Post Options
Thanks(0)
Quote Reply
Posted: Jul/19/2021 at 3:20pm |
|
That's an interesting detail on the filter adapter. Do you know if it's the same with the 4.0? I used one of those to convert to the FL-1A. So far it's held for me.
|
|
|
69 Javelin SST BBO 390 T10
|
|
|
|
|
SC397
AMC Addicted
Joined: Apr/30/2009 Location: Michigan Status: Offline Points: 5479 |
Post Options
Thanks(0)
Quote Reply
Posted: Jul/19/2021 at 5:13pm |
According to the usage yes, it is the same as the 4L and has a M20 x 1.5 thread. The same filter is used on the AMC 4L engines and the 1990-1991 6L AMC engine. According to the info that I could find the FL-1A has a 3/4"-16 thread. My luck wasn't as good as yours. |
|
|
|
|
Steve_P
AMC Addicted

Charter Member Joined: Jun/28/2007 Status: Offline Points: 3809 |
Post Options
Thanks(0)
Quote Reply
Posted: Jul/19/2021 at 6:40pm |
|
I agree with the revised torque sequence- tighten the outside lower corners last.
The head bolt torque was revised in 1968 due to head gasket failures. And they also revised the head gasket. The revised torque is above the recommended 7/16 UNC grade 8 torque, so this is why the bolts break.
|
|
|
|
|
Post Reply
|
Page <1 23456 11> |
 Tweet
Tweet
|
| Forum Jump | Forum Permissions You cannot post new topics in this forum You cannot reply to topics in this forum You cannot delete your posts in this forum You cannot edit your posts in this forum You cannot create polls in this forum You cannot vote in polls in this forum |


 Click for TheAMCForum Rules
 Topic Options


 mbwicz wrote: