|
|
|
Your donations help keep this valuable resource free and growing. Thank you.
|
Basic AMC V8 Rebuild by SC397 |
Post Reply 
|
Page <1234 11> |
| Author | |
SC397 
AMC Addicted 

Joined: Apr/30/2009 Location: Michigan Status: Online Points: 5476 |
 Post Options Post Options
") Thanks(3) Thanks(3)
 Quote Reply Quote Reply
 Posted: Jun/22/2021 at 11:56am Posted: Jun/22/2021 at 11:56am |
|
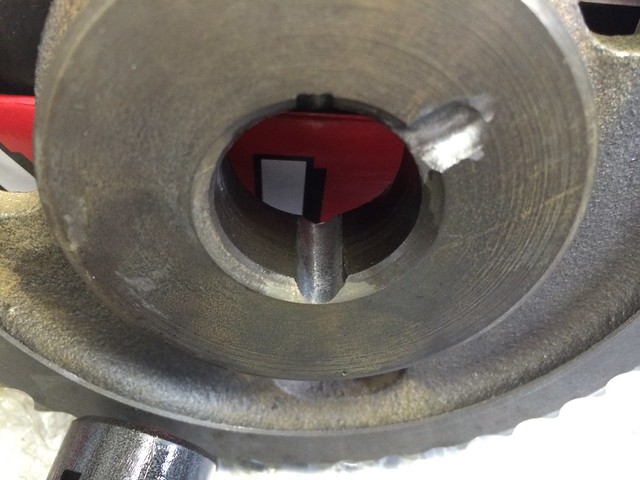
Timing Set Rework: I am using a Summit Brand SUM-G6508 timing set which is made by SA gear like most of them are. The first thing I do is install the woodruff keys in the cam and put my oil passage indicator in the cam oil hole to see how far off the cavity in the timing gear is. I have seen some off as far as 30 degrees. This one is better than most but I will make it better.I also clean out the oil passage to the distributor gear. I have seen these completely closed before. Then it goes in to my Easy-Bake oven at max temp for 45 min. The reason for baking is so that I can braze the slots closed on the front side of the timing gear. I braze them all except for the one at the keyway. Edited by SC397 - Aug/01/2021 at 8:02am |
|
 |
|
|
mbwicz
Supporter of TheAMCForum 
Joined: Feb/20/2019 Location: Buffalo, NY Status: Offline Points: 1991 |
Post Options
Thanks(0)
Quote Reply
Posted: Jun/22/2021 at 11:57am |
|
For the core plugs, do you put a little sealant on both surfaces? I'm thinking that if its in the block, it will create a nice 'chamfer' of sealant between the round edge of the plug, but I'm not sure if that would come off and plug the radiator.
|
|
|
1970 AMX, one step forward, one step back. Both steps cost time and money.
|
|
|
|
|
SC397
AMC Addicted
Joined: Apr/30/2009 Location: Michigan Status: Online Points: 5476 |
Post Options
Thanks(0)
Quote Reply
Posted: Jun/22/2021 at 12:30pm |
|
I coat the block with RTV but not the core plug itself. I have the same mentality that you do on it. Most of the blocks that I deal with are really rusty hence the reason for the deep core plugs plus the RTV.
|
|
|
|
|
SC397
AMC Addicted
Joined: Apr/30/2009 Location: Michigan Status: Online Points: 5476 |
Post Options
Thanks(1)
Quote Reply
Posted: Jun/22/2021 at 1:23pm |
|
Engine Balancing: This was a good question from Rozwell so I figured that I would post it up:Greetings, Rick. I’ve been thinking about the incorrect balancer on my engine and externally balanced engines in general. I have mostly had internally balanced engines but I have had 4 400 sm block chevys and have 1 now in my Nova. I have changed several cars from manual transmissions to automatic and from automatic to manuals. It was always a simple exchange of parts, even the the externally balanced 400 Chevy. My question is, is that a problem on AMC engines? If someone would want to change a AMC V8 from an automatic to a 4 speed, would the flywheel have to be balanced to the particular engine or would just using the correct type engine specific flywheel work? I usually start every answer like this: It is not like a chevy engine... Each AMC engine was balanced individually. Yes it is a problem changing from a manual transmission on to a automatic on a AMC engine unless you match balance the replacement manual flywheel to the original flex plate. Here is where I posted up the SAE papers describing how AMC balanced their engines. I marked in yellow where the machinist removed metal to balance the engine. It wouldn't have taken so much if we would have had the correct vibration damper. The one on the left is a correct 343 vibration damper. The one on the right is actually a 290 vibration damper (notice the little window in the mass at the bottom). We had to take 30 grams out of the opposite side of the mass to balance it to the 343 rotating assembly.
Edited by SC397 - Jun/30/2021 at 8:57am |
|
|
|
|
PHAT69AMX
AMC Addicted

Joined: Jul/07/2007 Location: West Virginia Status: Offline Points: 5918 |
Post Options
Thanks(0)
Quote Reply
Posted: Jun/22/2021 at 4:02pm |
|
If someone is looking to get socket head pipe plugs "Dry Seal" & "Level Seal" are believed to be the magic words that will locate the two different kinds, tall & short, are they not ?
|
|
|
|
|
SC397
AMC Addicted
Joined: Apr/30/2009 Location: Michigan Status: Online Points: 5476 |
Post Options
Thanks(0)
Quote Reply
Posted: Jun/22/2021 at 4:37pm |
|
You are probably right but I just buy the cheap ones from McMaster Carr and grind them down for the front two oil passages. I probably wouldn't have to because most timing gears wouldn't hit them if they did stick out a little.
|
|
|
|
|
SC397
AMC Addicted
Joined: Apr/30/2009 Location: Michigan Status: Online Points: 5476 |
Post Options
Thanks(1)
Quote Reply
Posted: Jun/22/2021 at 5:10pm |
|
Camshaft Installation: The next step is to install the cam. It is less messy for me to coat the lobes with the cam in the block. I normally use whatever the cam manufacturer recommends for lobe lube and oil. There was no lube provided with this one so I used Sta-Lube engine assembly lube. It is a nice thick grease that actually sticks to the lobes. It identical in color and consistency to Isky Cam's lube. The Comp-Cam and others that are basically thick oil just runs off and drips all over the place.
Edited by SC397 - Jun/30/2021 at 8:57am |
|
|
|
|
SC397
AMC Addicted
Joined: Apr/30/2009 Location: Michigan Status: Online Points: 5476 |
Post Options
Thanks(1)
Quote Reply
Posted: Jun/27/2021 at 2:28pm |
|
Main Bearings, Rear Main Seal, Crankshaft install:
After I install of the bearing halves in the block, I give them a little Lubriplate 105 making sure that I also coat the thrust surfaces on #3 bearing. I have been using SCE brand rear main seals due to past issues. I coat the outside corner of the seal with RTV before I press it in the block. After the seal is seated, I clean off all of the excess RTV paying close attention to the lip seal itself. Then I give the lip seal a generous coating of Assemblee Goo. Before laying the Crankshaft in I clean out all of the oil passages and clean the whole thing the best that I can. This crank has been turned and polished to -0.010"/0.010". One thing to look for when they turn a crank is to make sure that all of the oil feed holes have been at least de-burred or chamfered. I have seen them skip this important step before causing a sharp edge. After I lay the crank in I use a screwdriver to seat all of the bearings flush in the block. I repeat the same rear main seal procedure on the lower half of the rear main bearing cap. Once all of main bearing cap screws are torqued to specification I tuck the rear main seal tabs back in to position. I do not use lubricant on the bolts and I torque the main bearing caps at 4 iterations. Hand tight, 60#/ft, 85#/ft, 105#/ft. I spin it by hand like this vid at every interval.
Edited by SC397 - Jun/27/2021 at 2:40pm |
|
|
|
|
SC397
AMC Addicted
Joined: Apr/30/2009 Location: Michigan Status: Online Points: 5476 |
Post Options
Thanks(0)
Quote Reply
Posted: Jun/30/2021 at 7:45am |
|
Installing the Timing Set:
This is a simple non-adjustable timing set so there is only one keyway in each gear which makes it more simple. I have seen the multiple slot gears lined up incorrectly and the engine will still actually start and run. Not run good mind you and usually there are a few bent push rods to go along with that. The TSM shows you all of this if I don't explain it well enough.
Position the cam to the key at about in the 10 0-clock position and the crank at about the 2 0-clock position. Bench assemble the upper and lower timing gears in the chain with the dots matching each other. Slide the timing set on both the cam and crank at the same time. They will have to be tunked all the way on with your trusty engine hammer. The reason I don't put the rear cam core plug in is because at this point I have to keep pushing the cam forward as I tunk the gears on. Once the gears are seated, double check to make sure the dots line up and you spin the crank around a couple of times. Don't forget to put the Oil Slinger on at the crank snout! I usually put a drop of Loc Tite on the cam bolt and clean any burrs off of the cam washer. I normally flip the cam washer over because they are usually concaved. Some are worse than others depending on if someone else has over tightened the bolt. Once the cam Bolt is torqued to 35#/ft, I use a small screwdriver and clean all of the burrs off of the washer that were caused by the bolt head. Before the timing cover goes on I coat the distributor gear with CRC Sta-Lube if it is a used gear and Lucas if it is a new MSD gear. Edited by SC397 - Jun/30/2021 at 8:47am |
|
|
|
|
amcenthusiast
AMC Addicted
Joined: Jul/02/2012 Location: SW Atlanta GA Status: Offline Points: 1778 |
Post Options
Thanks(0)
Quote Reply
Posted: Jul/02/2021 at 11:07pm |
|
-Enjoying this thread.
-makes me chuckle to notice your attention to detail. Please insist to only use lifters that have a Parkerized lobe face. EPA forces a company like Enginetech to Parkerize in Mexico. (The Enginetech HT2011 is a direct replacement for the old school Sealed Power HT2011) By using original spec. Parkerized face lifters, this maintains correct cam lobe taper in order to maintain 'cam thrust right' (where the designed cam lobe taper forces the cam into the rear of the block) NOTE that under actual running condition, the .904" diameter lifter will spin super fast as it rides up/climbs the tapered cam lobe. The spinning action of the lifter constantly draws in fresh cool oil to lubricate the lifter to cam lobe interface area. What we don't want is a new school Chinese made Sealed Power lifter with no Parkerized lifter face. -This will kill the cam.
|
|
|
443 XRV8 Gremlin YouTube video: https://www.youtube.com/watch?reload=9&v=2DmFOKRuzUc
XRV8 Race Parts website: http://amcramblermarlin.1colony.com/ |
|
|
|
|
Post Reply
|
Page <1234 11> |
 Tweet
Tweet
|
| Forum Jump | Forum Permissions You cannot post new topics in this forum You cannot reply to topics in this forum You cannot delete your posts in this forum You cannot edit your posts in this forum You cannot create polls in this forum You cannot vote in polls in this forum |


 Click for TheAMCForum Rules
 Topic Options