
|
|
|
Your donations help keep this valuable resource free and growing. Thank you.
|
71 - 74 AMX Mesh Grill Modding |
Post Reply 
|
Page 12> |
| Author | |
304-dude 
AMC Addicted 

Joined: Sep/29/2008 Location: Virginia Status: Offline Points: 9134 |
 Post Options Post Options
") Thanks(0) Thanks(0)
 Quote Reply Quote Reply
 Topic: 71 - 74 AMX Mesh Grill Modding Topic: 71 - 74 AMX Mesh Grill ModdingPosted: Jul/01/2013 at 8:03am |
|
OK,
July seems to be my part of the year for doing small jobs. Not that a mesh grill is small, just look at the prices for them now these days. I have had a request on a grill and thought it would be fun to make a modded grill out of the left over parts that nobody wants, especially on their car. So, I am customizing for my own use. Until you go questing out for a mesh grill on your own, you'll find yourself getting at least one more than what you need. The reason being, every grill that sells less than $120 US is not compete or damaged in some sort of way. Even the $200 on up grills need work here and there, let alone adding a complete badge that is not pitted as well. Though they are available as repro items for a decent price. As everyone knows trim seems to sell the car as well as the paint job. But it is the small items that are over looked that makes good become great. The picture below is a lay out of all the parts required to assemble a mesh grill. Note: I have yet to find my lot of misc grill parts, so I pictured the mesh grill parts I am working on for now. I kept the rivets that are not shown, in a bag, since I wanted to show the major parts and their placement for completing this type of job.  I guess the grill is bigger than I thought... Well the parts are small so identifying them is kind of sketchy for someone who has never seen one up close. So, I will explain further. On the back right and left vertical sides, an aluminum washer is in place for each aluminum rivet. You can barely see them pictured on the left side next to the trim. On the bottom, aluminum strips are used to reinforce the structure and to keep the mesh grill in place. The holding pins break off first. Very few ebay mesh grills have all the pins, so expect at least a couple to be missing. There are a set of 4 identical strips to complete the bottom. Though two strips are flipped over during installation so that when mounted the pin is nearest to the center of the grill assembly. If you do not have a pin, just look for a notched area on the strip, and you'll see the remnants of the pin's base. The bottom center strip will reinforce the mating center trim piece that holds the two trim halves together. The center trim pieces are identical so the only issue is making sure you have the taller side facing outer edge of the left and right trim. What to do about the missing pins... If that is the only thing that is required, just get some good quality fencing wire and cut 3/4" length allowing about 1/4" or so out and epoxy in place. Mask and paint the pin to keep from rusting. Trim rings, are identical and have a large mounting washer that is tricky to remove and install as well. Since the mounting washer is not split, you have to carefully twist and lift away a split side to the trim ring. As for the wire mesh, some times you find a wire or two broken. If you are lucky to have a 72 to 74 AMX, you can simply epoxy the broken ends together and trim with a small file and sand paper. When you paint, the repaired break should not be noticeable. For the 71 guys, the extra mesh grill will be sacrificial. Just carefully remove a wire long enough to make the repair. If you look carefully one of the circles on the mesh pictured has a wee section that can be repaired, it is too small to deal with as the trim ring covers the area. As for rivets, they are 50/50 to be loose or missing. Again an extra mesh grill may be needed. Now for the top... There are 4 identical mounting tabs, two on each side. Actually there are only 2 identical tabs, as during the mounting procedure, the mounting hole became larger. So, only one hole was used in riveting. Yes, they should be loose from wear and just like the bottom mounting pins, you may find one or more missing. You can get scrap sheet metal to make your own replacement. But if you are needing factory correct, the sacrificial grill will become handy. To finish the upper portion, the same center trim piece is riveted in place along with a top center mounting tab. Since there are two rivets there is a good chance the mounting plate is intact. Though you never know until you have it in front of you. The mounting tab will be a bit of work to fabricate on your own, if wanting a factory look, but it can be done. I will post pictures of left, right and center top mounting tabs for reference as I go... for now it is a bit of an introduction and reference, as for when I start there will be a few interesting things I will add as well. Edited by 304-dude - Jul/01/2013 at 8:23am |
|
 |
|
|
304-dude
AMC Addicted
Joined: Sep/29/2008 Location: Virginia Status: Offline Points: 9134 |
Post Options
Thanks(0)
Quote Reply
Posted: Jul/01/2013 at 8:21am |
|
Below is a few pictures of how the mesh is attached. Note that one of the rivets is missing near the upper corner. On the bottom picture, each bottom section has a rounded notch (bottom center). The notch is for the pin placement. So if installing a replacement strip, you can easily align your pin to the notch.
  |
|
|
|
|
304-dude
AMC Addicted
Joined: Sep/29/2008 Location: Virginia Status: Offline Points: 9134 |
Post Options
Thanks(0)
Quote Reply
Posted: Jul/01/2013 at 8:58am |
|
OK,
I installed the good trim rings to the mesh screen so I can spray with paint remover or just use MEK with a rag. Note, the area I questioned was completely covered by the trim ring. I carefully judged it was a factory cut during the manufacturing process. Once I strip the old paint off, I will determine if the wire needs to be swapped out. 
|
|
|
|
|
304-dude
AMC Addicted
Joined: Sep/29/2008 Location: Virginia Status: Offline Points: 9134 |
Post Options
Thanks(0)
Quote Reply
Posted: Jul/01/2013 at 9:11am |
|
OK, now for the messed up junk parts!
There are scrapes, gouges and drilled holes to deal with. What am I going to do? Well this is going to be a modded mesh grill. So, lets give J B Weld and some creative ideas a try!  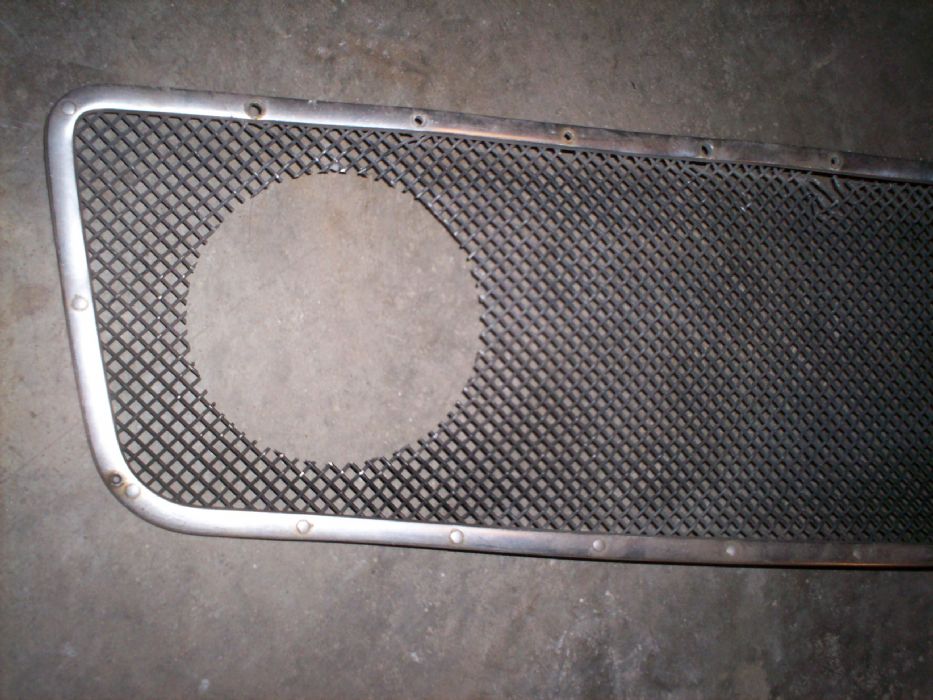   |
|
|
|
|
304-dude
AMC Addicted
Joined: Sep/29/2008 Location: Virginia Status: Offline Points: 9134 |
Post Options
Thanks(0)
Quote Reply
Posted: Jul/02/2013 at 1:40pm |
|
I had some time to take some pictures of both mesh grills I am working on.
The first few are of the standard one I have started. I replaced a few items, like a few wires that were cut a wee short or damaged, and a trim ring that had a dent, along with a few rivets that were struck oddly or just not as uniform as the rest of the group. I still need to clean up the wire mesh a bit more, for some reason the coating on the wire mesh for the standard grill was a bit more difficult to strip than all the other grills including the wire mesh I am using from my parts collection. So I will have to use a bit more elbow grease before I am done. For now I am about ready to mount the mesh to the frame along with the rest of the components.   Below is the scrap frame all bent up and what not. This is what I will start off with my custom grill. Since some of the holes are larger than stock, I may go with using 8-32 stainless steel allen head fasteners. As for mesh screen there is everything from stainless steel to carbon fiber. So, once I get down and dirty with cleaning up the messed up frame, we'll see what I come up with.  |
|
|
|
|
AmeriMan
AMC Addicted
Joined: Jul/30/2008 Location: Joliet, IL Status: Offline Points: 565 |
Post Options
Thanks(0)
Quote Reply
Posted: Jul/02/2013 at 3:57pm |
|
For those who may not be aware, the metal mesh that is used in the AMX grille screens is available from McMaster-Carr (www.mcmaster.com). It is listed under "wire cloth" and is available in steel, stainless steel or aluminum.
I haven't actually ordered a sample but it looks as though the following info is what most closely matches the original mesh: Mesh opening size: .187" Mesh size: 4 x 4 (Four openings vertically and horizontally in a 1" square section of the mesh. Wire diameter: .063" A 36" x 48" section is listed below in three available materials: Steel: 9219T149 $63.36 Stainless steel: 85385T26 $191.33 Aluminum: 9227T53 $72.11
|
|
|
larue390@comcast.net
|
|
|
|
|
amcglass
AMC Addicted

Joined: Dec/11/2011 Location: NW Ohio Status: Offline Points: 2700 |
Post Options
Thanks(0)
Quote Reply
Posted: Jul/03/2013 at 6:37am |
|
very interesting I have a pair of these screens, that I feel are fairly easy fixers I may just grab em out and start on them to use on cars that are in need of a good looking screen
|
|
|
Javmanpres
BBG Mark Donohue 401 74 Jav/AMX 71 Matador 2dr sedan delivery wagon 1902 Rambler Runabout 70 T/A Javelin |
|
|
|
|
AmeriMan
AMC Addicted
Joined: Jul/30/2008 Location: Joliet, IL Status: Offline Points: 565 |
Post Options
Thanks(0)
Quote Reply
Posted: Jul/03/2013 at 5:20pm |
|
Tell me about those lower grille bracket pieces, the ones with the broken mounting tabs. Are they aluminum? if not then what are they made of?
|
|
|
larue390@comcast.net
|
|
|
|
|
304-dude
AMC Addicted
Joined: Sep/29/2008 Location: Virginia Status: Offline Points: 9134 |
Post Options
Thanks(0)
Quote Reply
Posted: Jul/04/2013 at 2:08am |
The overall job is easy, but it takes time and patience. You can get 3/16 aluminum rivets that are very close to OEM. They are mandatory for assembly if you want to be a full restoration. Note: when taking the trim rings off, you may need to bend the beveled lip up on backside, that holds the retaining ring. It will assist in allowing the retaining ring to pop out and back in from the split end of the trim ring. |
|
|
|
|
304-dude
AMC Addicted
Joined: Sep/29/2008 Location: Virginia Status: Offline Points: 9134 |
Post Options
Thanks(0)
Quote Reply
Posted: Jul/04/2013 at 2:15am |
All the parts to the grill are aluminum, minus the "AMX"badge assembly. The lower bracket strips are simple, if you have your mesh screen secure, then you don't need to bother with them. As for loose parts, then it is about aligning the pin to the lower part of the trim. There are 2 crescent cut outs along the bottom outer edge of each trim piece. Your strips may not have a pin as they break off fairly easy. Though with careful observation, you can identify where the pin broke on the strip. All the strips that do not have pins, are clean cut on the edges. The strips that have pins have a small notch on the edge where the pin was located. |
|
|
|
|
Post Reply
|
Page 12> |
 Tweet
Tweet
|
| Forum Jump | Forum Permissions You cannot post new topics in this forum You cannot reply to topics in this forum You cannot delete your posts in this forum You cannot edit your posts in this forum You cannot create polls in this forum You cannot vote in polls in this forum |


 Click for TheAMCForum Rules
 Topic Options
 amcglass wrote: