Aussie Gremlin
Printed From: TheAMCForum.com
Category: The Lounge Area
Forum Name: General AMC Chat Australian Edition
Forum Description: There are some things mostly of interest to Aussies - this is their AMC Chat spot
URL: https://theamcforum.com/forum/forum_posts.asp?TID=75533
Printed Date: Apr/18/2024 at 8:06am
Software Version: Web Wiz Forums 12.03 - http://www.webwizforums.com
Topic: Aussie Gremlin
Posted By: WesternRed
Subject: Aussie Gremlin
Date Posted: Dec/13/2015 at 9:09pm
I few people already know about my recent purchase so here are the details, the first sensible hatchback car I have ever owned: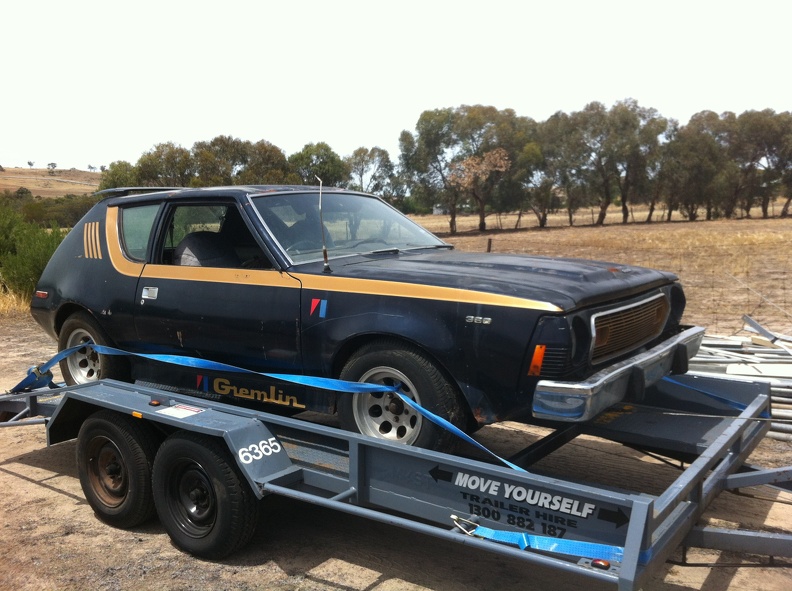
|
Replies:
Posted By: BrotherBamc
Date Posted: Dec/13/2015 at 9:55pm
|
Right on! It was my very first car too and I still got it. It don't run right now, but I'm working on it! Congrats! ------------- 77 CJ5 360 73 Gremlin 401 4 speed 2006 Dodge Magnum R/T AWD http://www.lxforums.com/board/garage.php?do=user_garage_view&id=19745" rel="nofollow - My Garage |
Posted By: tyrodtom
Date Posted: Dec/13/2015 at 10:03pm
|
Is that Gremlin tied down the way it looks ? It looks like the strap is looped around the spokes of the aluminum wheels. You'd be surprised how easy you can cut those straps with a edge when they're tight. I don't think I would risk that again. ------------- 66 American SW, 66 American 2dr, 82 J10, 70 Hornet, Pound, Va. |
Posted By: Aus69Jav
Date Posted: Dec/13/2015 at 11:14pm
|
Looks like a solid car. What are your plans for this one? Congrats on the new addition. |
Posted By: RSX 401
Date Posted: Dec/14/2015 at 7:14am
|
Nice looking Gremlin. Can we assume the badge is correct and there's a 360 under the hood? I'd like to see more photos, especially one showing the rear spoiler since it doesn't look "factory". Gremlins Rule....... ------------- I'll follow these lines a little ways more, Until I can find what I'm looking for. With the pedal to the metal, I'm gaining my speed. Riding down low in my AMC..... |
Posted By: WesternRed
Date Posted: Dec/14/2015 at 8:59am
|
Few more details. As far as the wheels go, I had to give them back, the previous owner wanted to keep them and I didn't have a problem with that, not my cup of tea. Now sporting something slightly more appropriate: 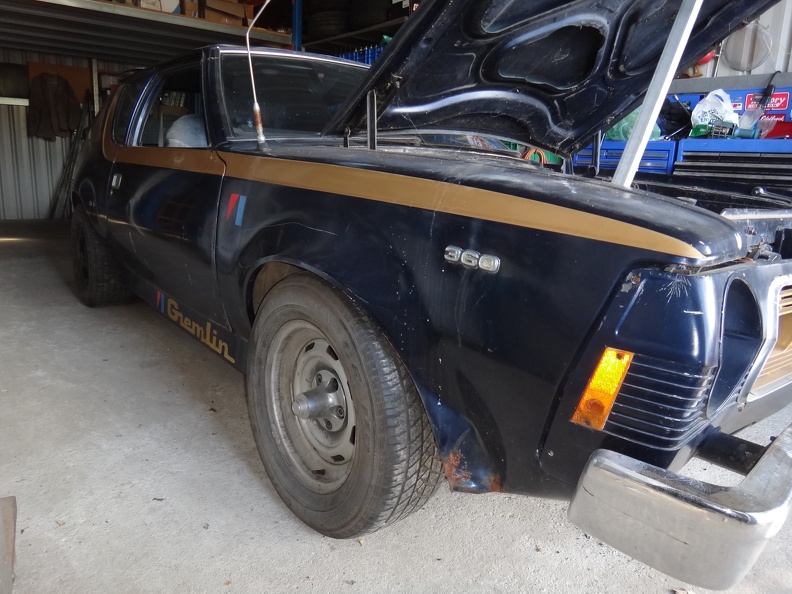 Yes, those are 360 badges on the front guards: 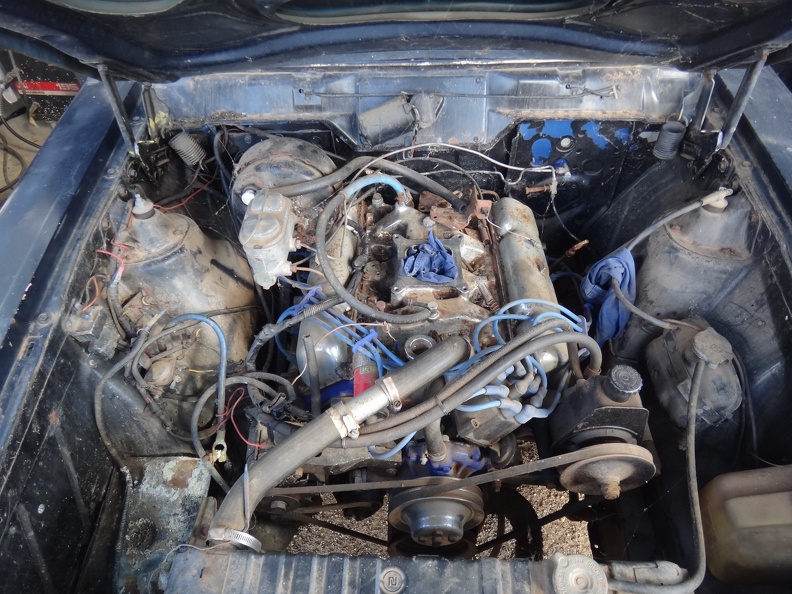 Not all good though as it isn't running but it does turn over by hand. Does have some period touches like the chrome plated cast iron factory 4 barrel intake and chrome plated free flow exhaust manifolds. At least it's clean inside and not full of sludge (inside the engine that is): 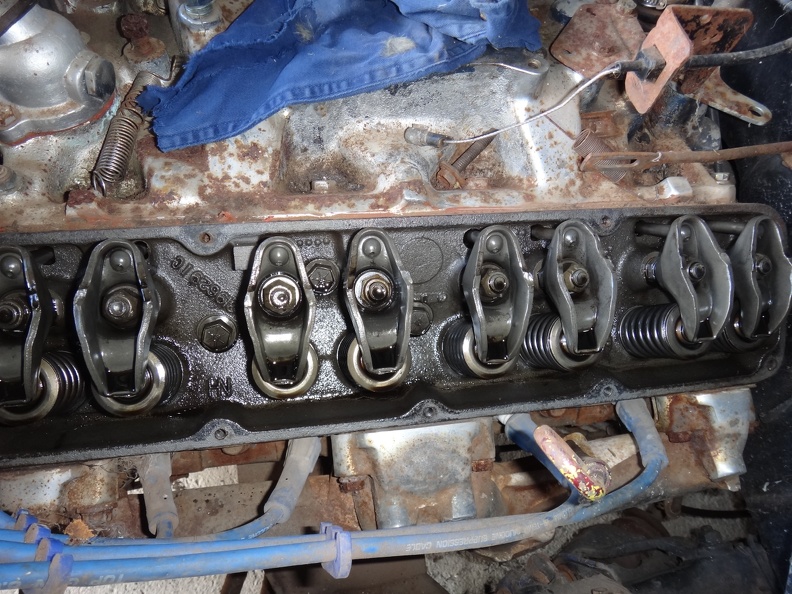 291C heads, nice choice: 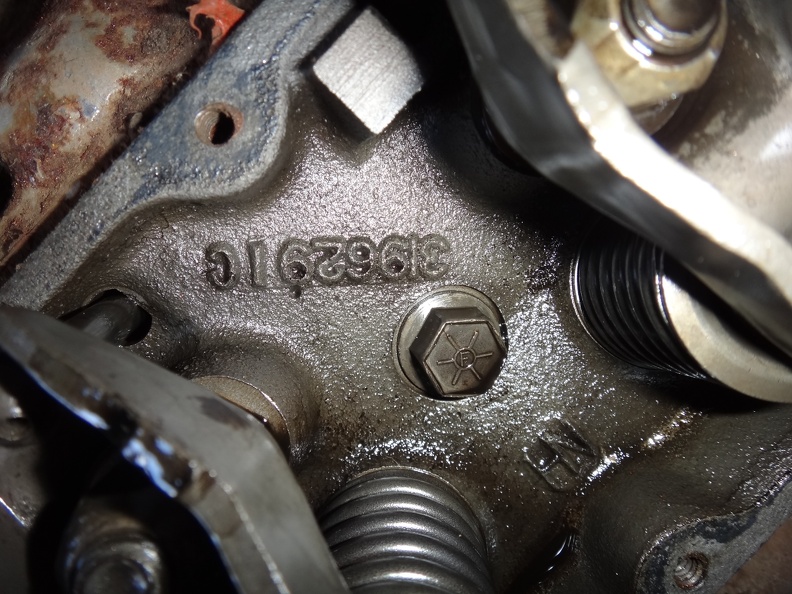 The other inside, notice the roof mounted tacho: 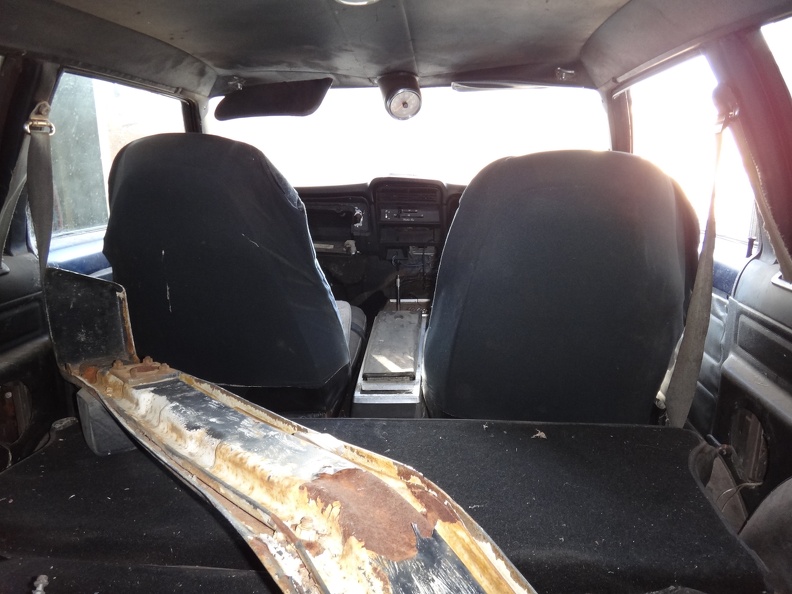 Back end is a little the worse for wear, at least the hatch works: 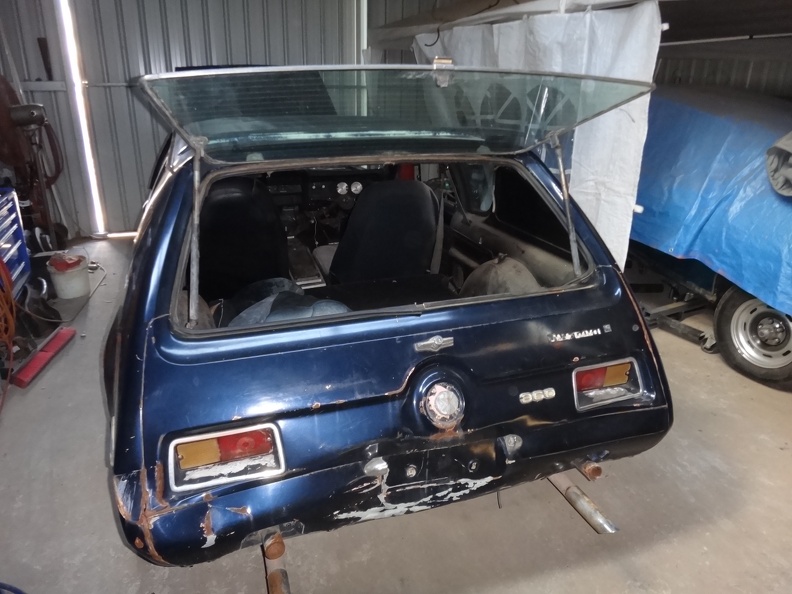 Fortunately it looks like the bumper did it's job and took most of the impact: 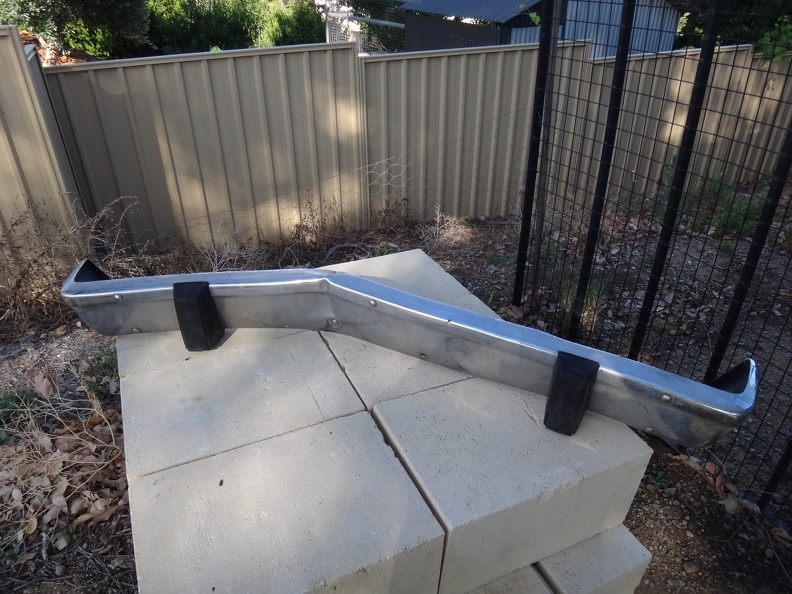 More to come. |
Posted By: WesternRed
Date Posted: Dec/16/2015 at 7:13pm
First parts order: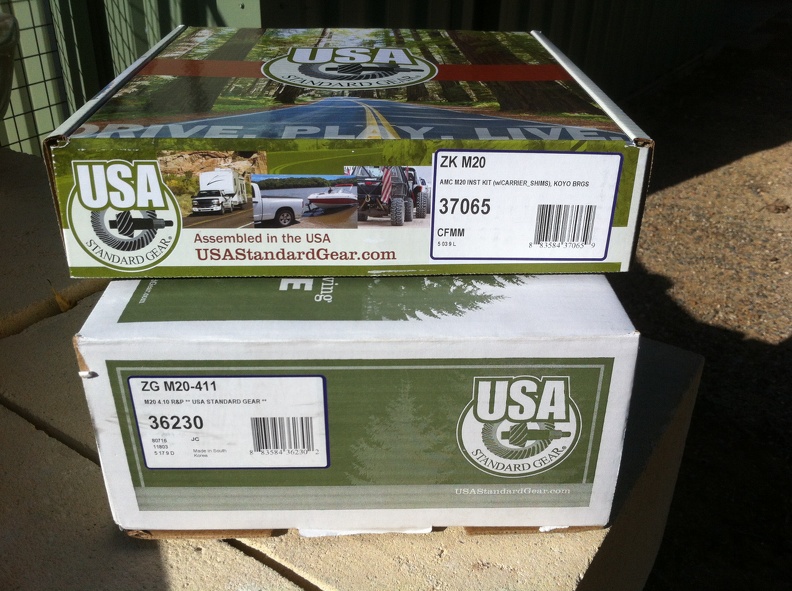 Shame about our banana republic Aussie dollar exchange rate these days. |
Posted By: WesternRed
Date Posted: Dec/17/2015 at 8:01am
|
Back from the dead: https://youtu.be/BZPmFi142oU" rel="nofollow - https://youtu.be/BZPmFi142oU |
Posted By: 70Hornet
Date Posted: Dec/17/2015 at 7:09pm
|
Watched the Youtube clip. The motor sounds fairly sweet considering I gather it probably hasnt been started for awhile. Cool little cars |
Posted By: WesternRed
Date Posted: Dec/18/2015 at 2:58pm
Little bit of history of the car, article from a 1991 Rambler Club of WA newsletter.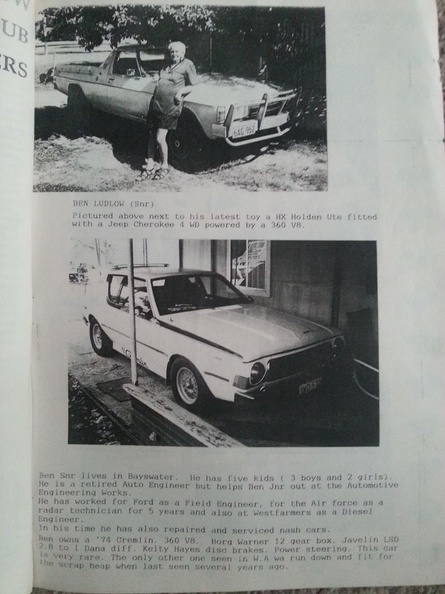 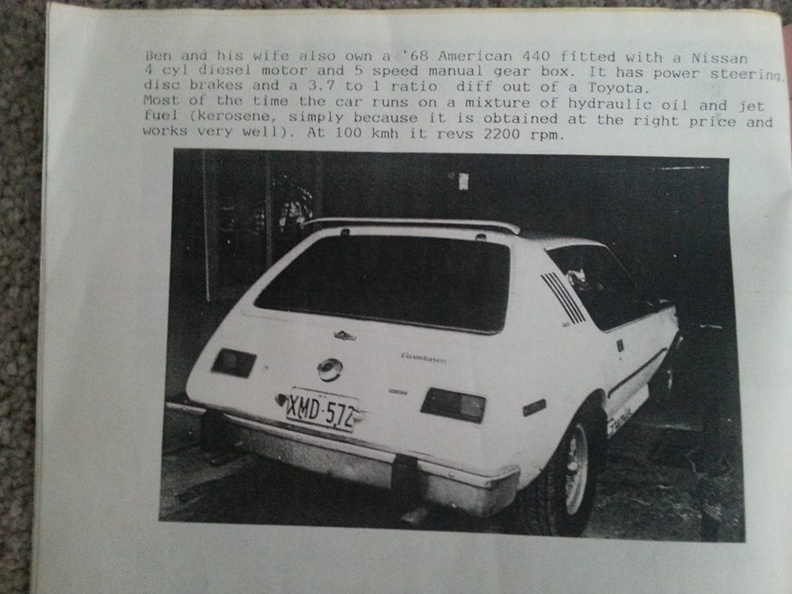 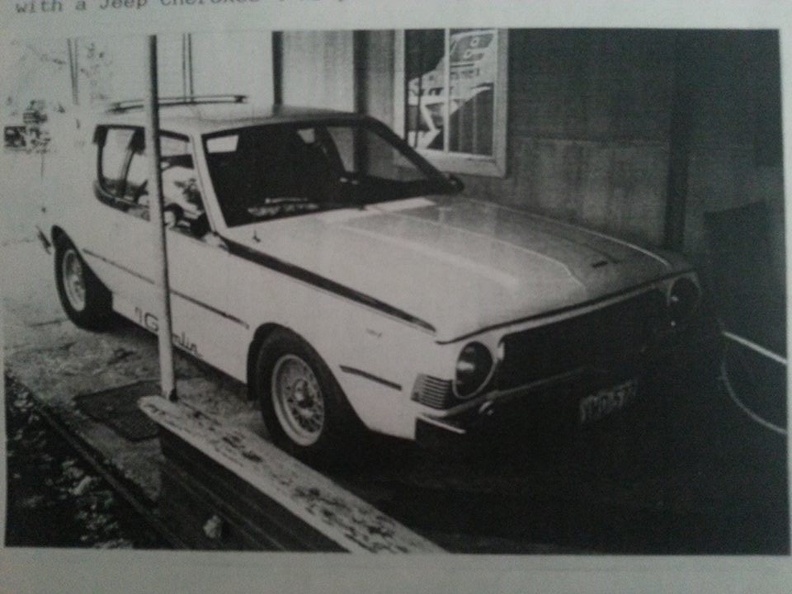 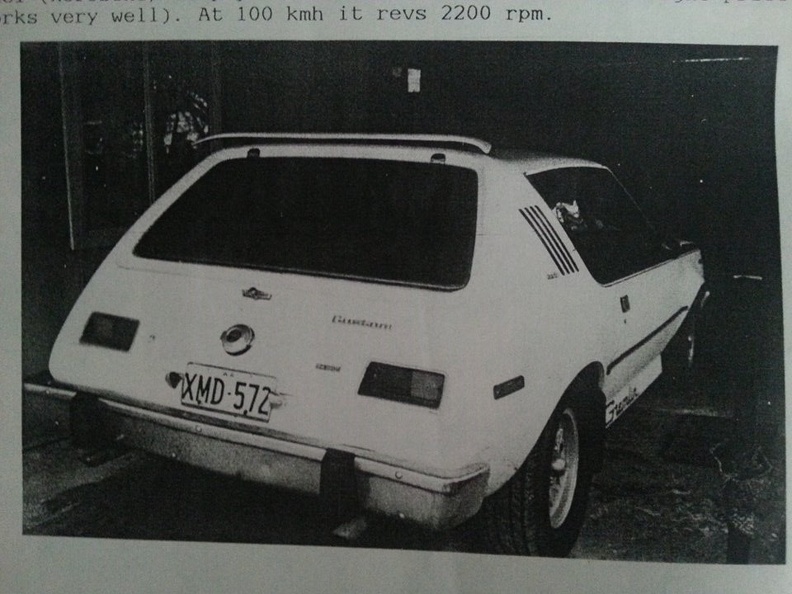 So it seems it was Snr's car, I'm told he sold it to a guy by the name of Garry Dickson and after that a couple of young guys had it. Looks like the driveline as well as the colour has changed a couple of times as it's now running a 360 and 727 combo, not the 360 and BW auto from back in 1991. From the way the engine runs it seems it is pretty stock, certainly not one of Ludlow's ex-speedway engines or something crazy like that. The guy I got it off kept the LSD for himself, so I have to sort that out too, hence the gears ordered and probably a Detroit Truetrac to go with them. |
Posted By: WesternRed
Date Posted: Dec/19/2015 at 12:30am
Found my transmission problem: Good thing I have accumulated a couple of spares. Also found a modified convertor to allow the 727 to bolt up to the earlier BW crank engine: 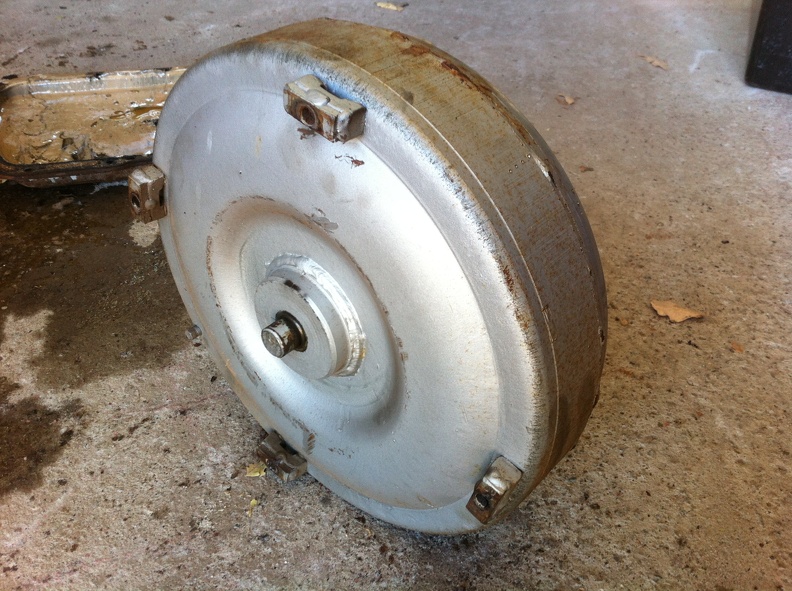  So most likely it is the same engine, just a different transmission from 1991. |
Posted By: WesternRed
Date Posted: Dec/29/2015 at 1:45am
|
I think the transmission will live again, just need to order some new parts, no major damage done. In the meantime I've bee working on the steering conversion, it was a bit agricultural to say the least: 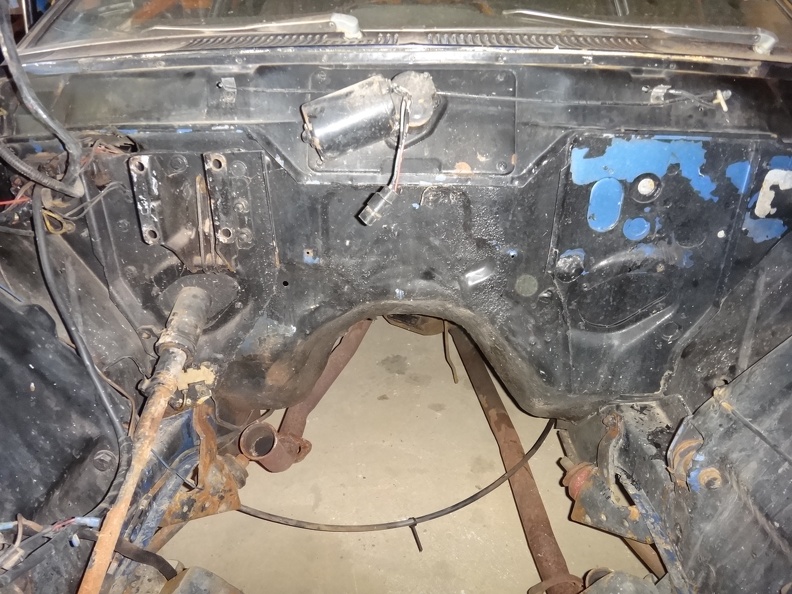 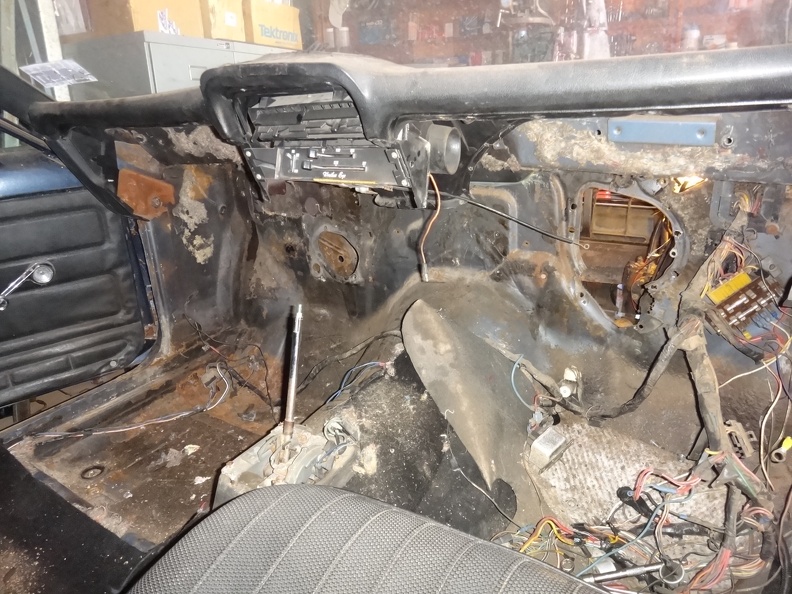 Good thing the original LHD bits of the firewall were still intact, so the best option is to put things back as the factory intended: 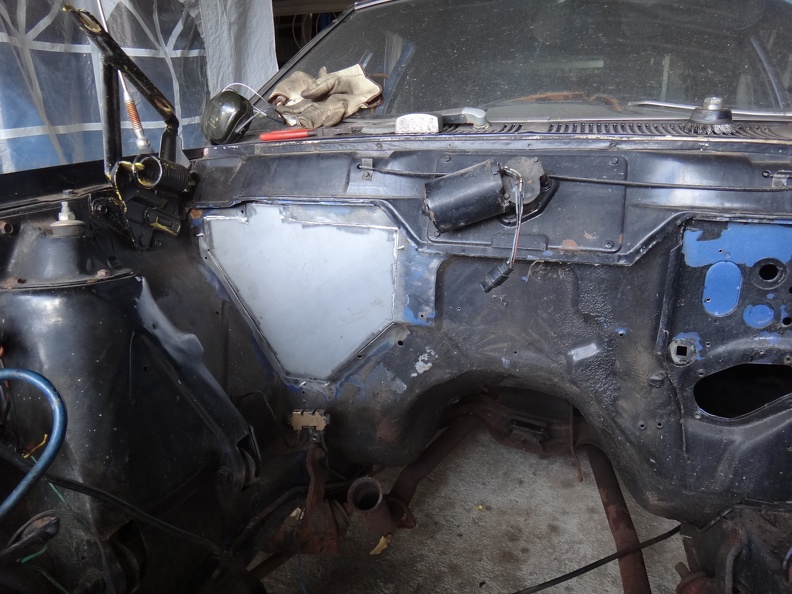 Welded, just needs the obligatory skim of bog: 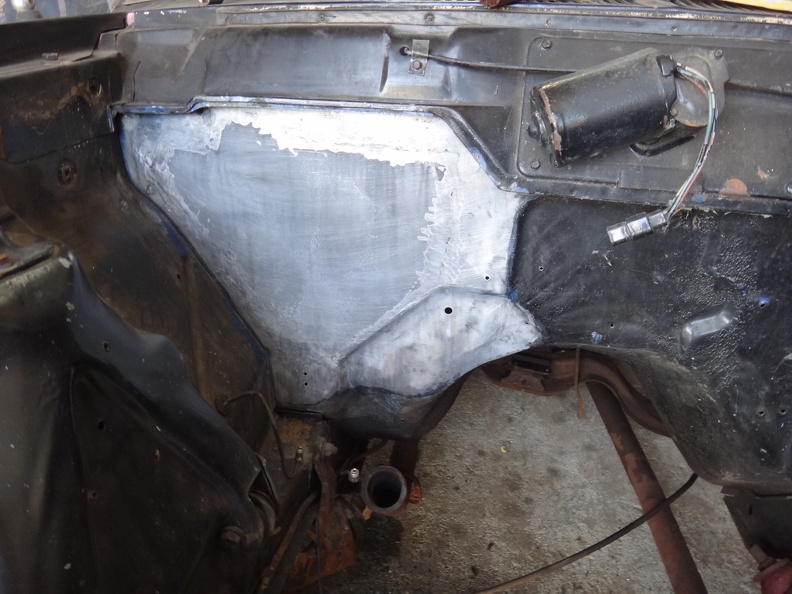 Going for the clean look so I've deleted the blower motor and other heater control openings. |
Posted By: RSX 401
Date Posted: Dec/29/2015 at 5:18pm
|
A lot of progress here. At this rate it will be on the road before long. Keep the photos coming. ------------- I'll follow these lines a little ways more, Until I can find what I'm looking for. With the pedal to the metal, I'm gaining my speed. Riding down low in my AMC..... |
Posted By: WesternRed
Date Posted: Jan/03/2016 at 7:22am
|
Despite the stinking hot summer weather over the last few days, I have finally managed to finish getting the engine bay stripped. Had to do a bit of rust repair behind one of the hood hinges, but that was pretty much it, the rest is nice and solid: 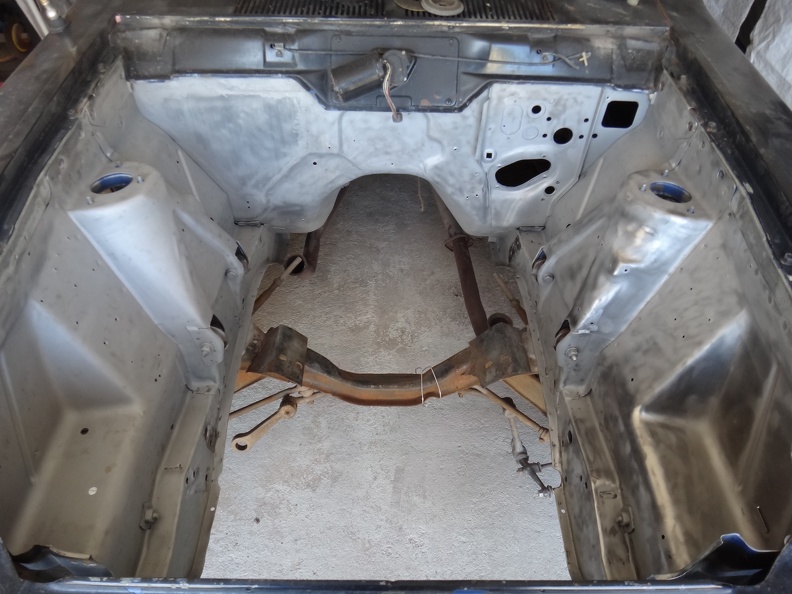
|
Posted By: Craigie
Date Posted: Jan/03/2016 at 8:57pm
|
Cool little car ! I'm over on the East coast in Brisbane and enjoying seeing the Gremlin restoration. |
Posted By: 74gremx
Date Posted: Jan/03/2016 at 9:09pm
 It's great working from a clean base. (Mine just starting he rebuild) ------------- 1970 Javelin 360/727 1974 Levis Gremlin X 304/904 1964 American Convertible 1974 Matador wagon (parts) 2016 Holden Cruze Equipe 2014 Holden Colorado "Don't mistake activity for achievement". |
Posted By: Craigie
Date Posted: Jan/03/2016 at 9:40pm
|
Yes very nice 74GREMX ! Is the V8 going back in ? Great work guys !! |
Posted By: WesternRed
Date Posted: Jan/03/2016 at 10:30pm
| Yes, might as well give it a coat of paint while everything is out then put everything back in fresh. V8 will be going back in, might not be the same one as I have another 360 I might end up using instead. |
Posted By: 74gremx
Date Posted: Jan/04/2016 at 3:37am
Here's your goal..... (mine, with a small degree of pride)..or....  ------------- 1970 Javelin 360/727 1974 Levis Gremlin X 304/904 1964 American Convertible 1974 Matador wagon (parts) 2016 Holden Cruze Equipe 2014 Holden Colorado "Don't mistake activity for achievement". |
Posted By: WesternRed
Date Posted: Jan/04/2016 at 5:09am
|
Very nice on both counts, I doubt mine will ever be that nice, the rest of the car is going for the "just saved from the wrecking yard look", which is pretty much the case. |
Posted By: WesternRed
Date Posted: Jan/04/2016 at 6:31am
One more piece of the puzzle: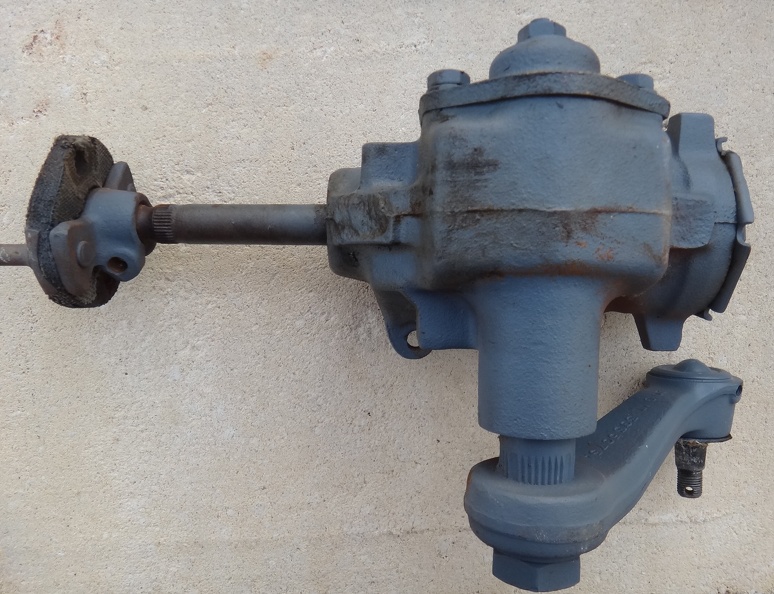
|
Posted By: Craigie
Date Posted: Jan/04/2016 at 8:53pm
| YES, stunning either way ! |
Posted By: 70Hornet
Date Posted: Jan/10/2016 at 3:15am
|
 WesternRed wrote:
Posted By: WesternRed
Date Posted: Jan/25/2016 at 6:48am
Managed to get some epoxy primer on the engine bay today: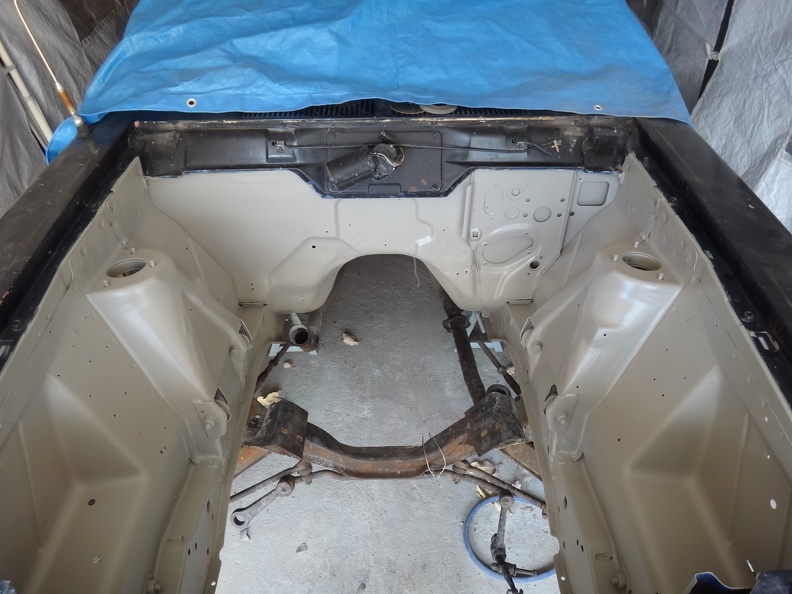
|
Posted By: BrotherBamc
Date Posted: Jan/25/2016 at 12:47pm
|
Looking Good!! ------------- 77 CJ5 360 73 Gremlin 401 4 speed 2006 Dodge Magnum R/T AWD http://www.lxforums.com/board/garage.php?do=user_garage_view&id=19745" rel="nofollow - My Garage |
Posted By: WesternRed
Date Posted: Feb/07/2016 at 8:41am
Early start this morning to beat the heat and get it done before heading off for the Club Sprint series in the Beemer, managed to get some colour (or perhaps more correctly lack thereof) on the bay. Did end up with one run in a fairly conspicuous spot and a little bit of crap in the paint, but otherwise I think it went reasonably well for my first crack at 2 pack. With +40C temps forecast for the next couple of days it will get a good baking in the shed.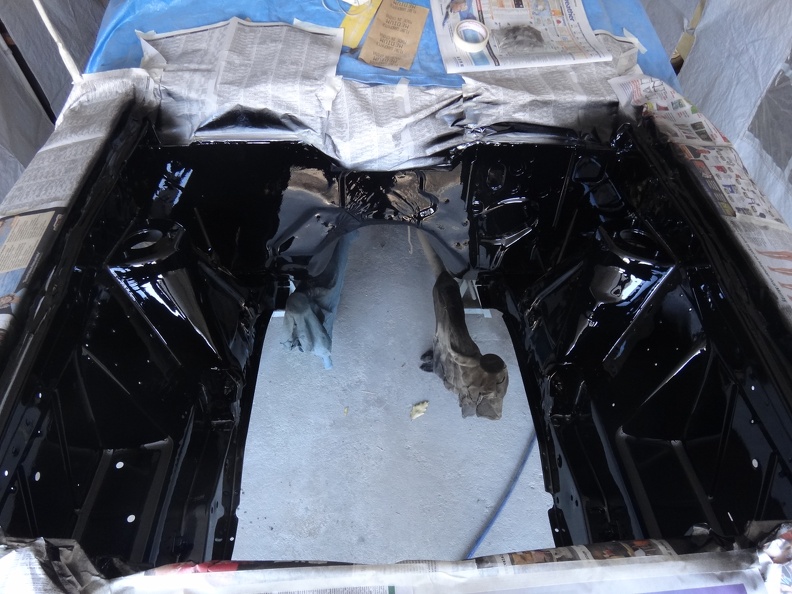
|
Posted By: RSX 401
Date Posted: Feb/07/2016 at 9:48am
|
Absolutely beautiful...... ------------- I'll follow these lines a little ways more, Until I can find what I'm looking for. With the pedal to the metal, I'm gaining my speed. Riding down low in my AMC..... |
Posted By: WesternRed
Date Posted: Mar/03/2016 at 6:32am
Slightly different puzzle this week, picked this up: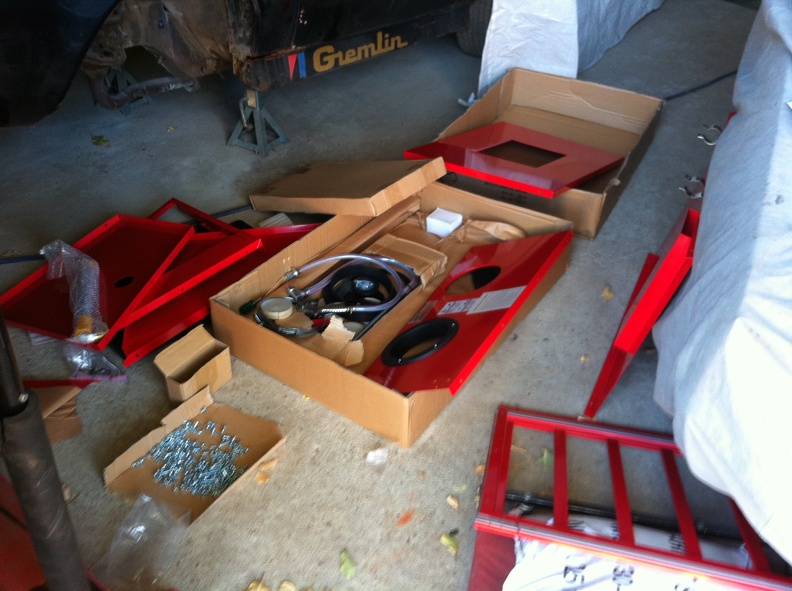 Some assembly required: 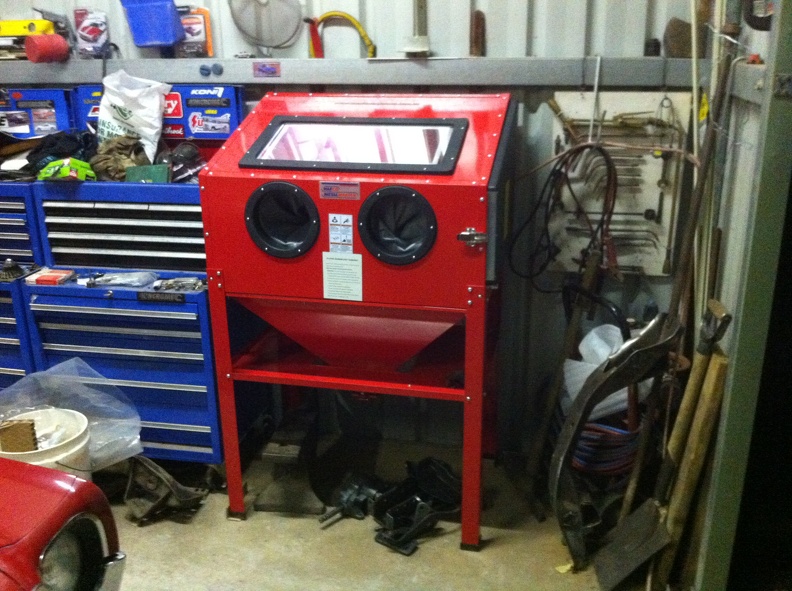 Now I can start cleaning up some of the bits and pieces and putting them back on. |
Posted By: WesternRed
Date Posted: Apr/04/2016 at 7:56am
Been on a mission building wind chimes in the shed for the last couple of weekends: 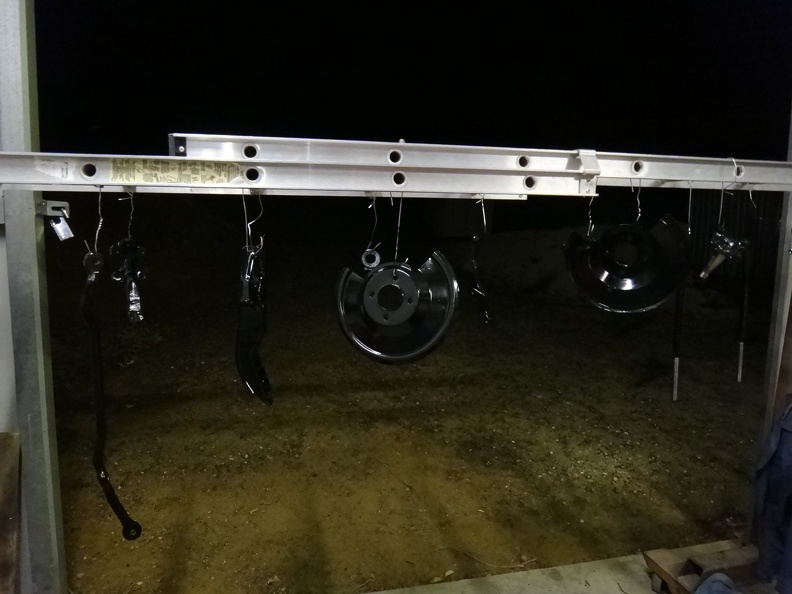 The recently acquired sand blasting cabinet is a bit tedious, but it does get the job done in the end. Paint finish is brush applied KBS Rust Seal in satin black. Not 100% happy with the brush finish, comes up really well on the cast iron bits that have a bit of surface texture, but you can definitely see brush marks on the smoother bits like the brake backing plates and cross member, might have to bite the bullet and spray these bits next time. Not aiming for show or concourse finish so it will have to do this time around. |
Posted By: WesternRed
Date Posted: Apr/05/2016 at 9:51am
And so the re-assembly begins (it's hard taking decent photos when everything is black):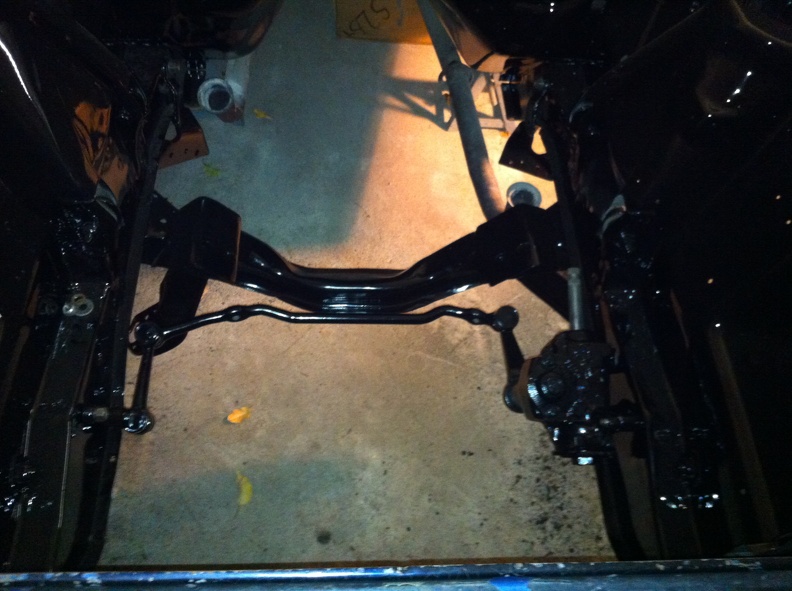 Struck a little problem with one of the upper ball joints when I opened the box: 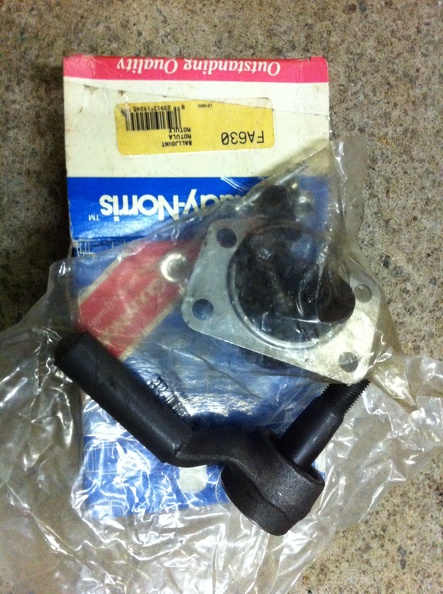
|
Posted By: 70Hornet
Date Posted: Apr/05/2016 at 10:06pm
|
Engine bay looking good Yeah that ball joint looks funny. Wonder what trainee packed that box late one friday arvo
|
Posted By: WesternRed
Date Posted: Apr/10/2016 at 8:17am
Few more bits bolted back on, don't look too hard at the upper control arm, you might see where I drew the line on the restoration: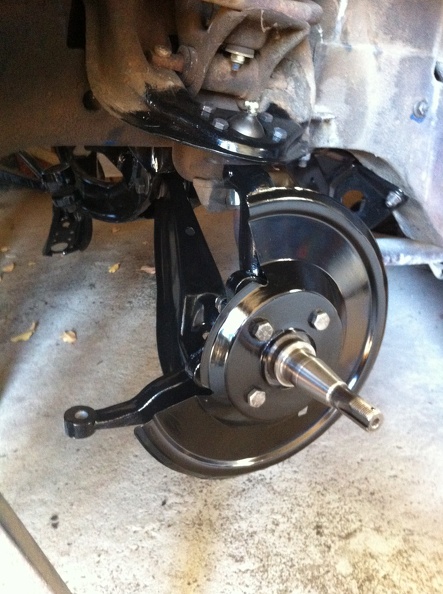
|
Posted By: 70Hornet
Date Posted: Apr/10/2016 at 6:03pm
|
"Drawing the line". Literally THE hardest thing to do for any restoration. Your Gremlin going to be a nice tidy driver which is all my aim is with my Hornet. Thats IF I can be strong enough to "Draw the line" |
Posted By: 74gremx
Date Posted: Apr/10/2016 at 6:12pm
|
You will forever wish you had gone the extra mile and finished that off properly. Come on. Do it right. Everything else is. ------------- 1970 Javelin 360/727 1974 Levis Gremlin X 304/904 1964 American Convertible 1974 Matador wagon (parts) 2016 Holden Cruze Equipe 2014 Holden Colorado "Don't mistake activity for achievement". |
Posted By: RSX 401
Date Posted: Apr/10/2016 at 6:24pm
|
For items painted with a brush, the pieces sure look good.
------------- I'll follow these lines a little ways more, Until I can find what I'm looking for. With the pedal to the metal, I'm gaining my speed. Riding down low in my AMC..... |
Posted By: WesternRed
Date Posted: Apr/10/2016 at 7:26pm
| I may come back to it, but at this stage the plan is to get it driving ASAP and there are no plans to restore the rest of the body, not at this stage anyway. I am aiming for the sleeper/beater look on the outside and will only be doing rust repairs that are absolutely necessary for the time being. |
Posted By: Lucas660
Date Posted: Apr/10/2016 at 10:33pm
| Spray can of satin black and bobs your uncle! |
Posted By: WesternRed
Date Posted: Apr/23/2016 at 5:05pm
Got the rotors cleaned up and reinstalled: Little bit of fun in the sun, first time it's been mobile for about 4 months:  Another engine bay shot, still a bit of work to go on in there: 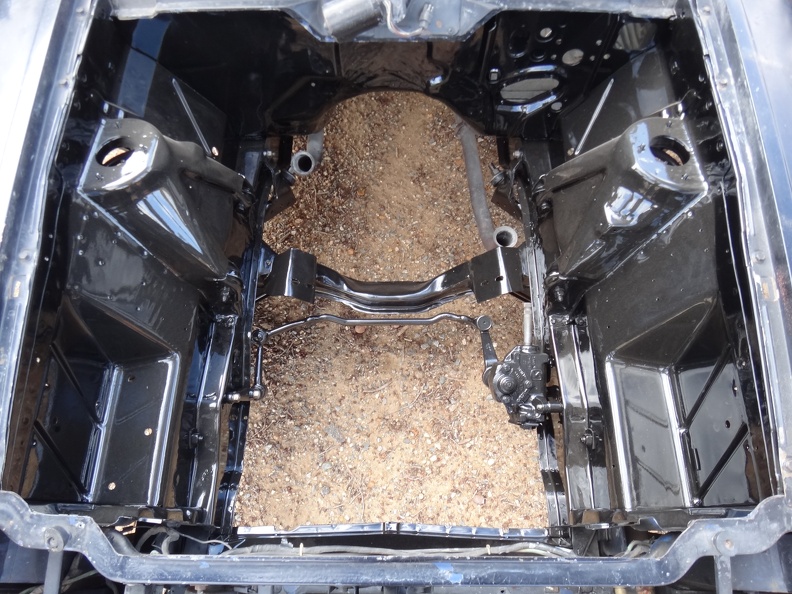
|
Posted By: WesternRed
Date Posted: Oct/01/2016 at 3:56pm
Been a while between updates/progress, spent yesterday cleaning up the inside of the firewall: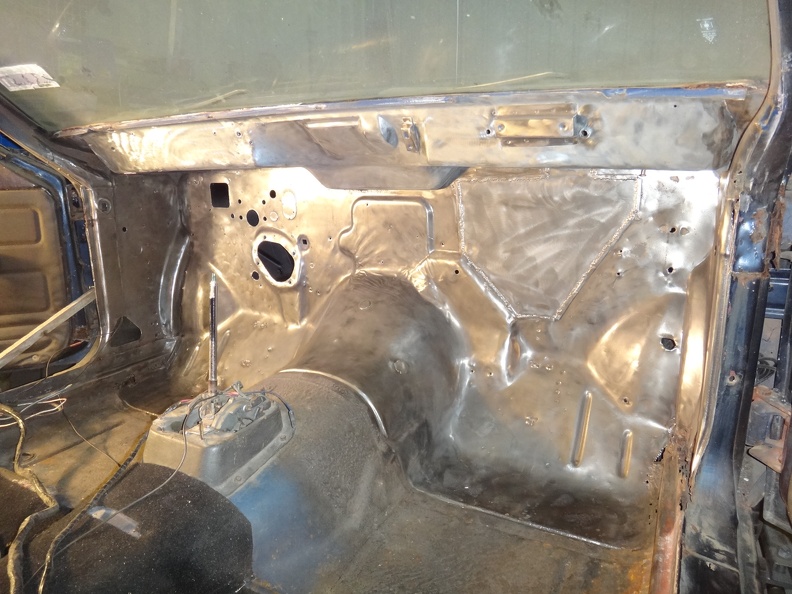
|
Posted By: WesternRed
Date Posted: Oct/02/2016 at 7:49am
After a couple of coats of KBS Rust Seal: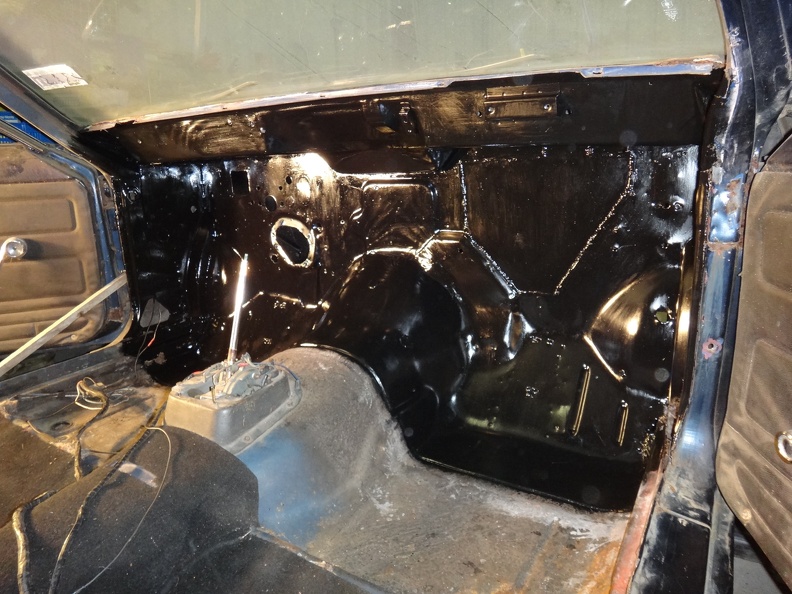
|
Posted By: RSX 401
Date Posted: Oct/02/2016 at 3:14pm
|
Glad to see you are making progress with the Gremlin. When finished, will it be left or right hand drive? I looked back at the first few photo in the thread, but looking at the last few, it's hard to tell.
------------- I'll follow these lines a little ways more, Until I can find what I'm looking for. With the pedal to the metal, I'm gaining my speed. Riding down low in my AMC..... |
Posted By: WesternRed
Date Posted: Oct/02/2016 at 4:35pm
|
It's going back to left hand drive. |
Posted By: WesternRed
Date Posted: Oct/29/2016 at 6:25am
|
Bit of a what the F moment today, the brake booster that was in the car when I got it doesn't fit now that I am truing to mount it on the left hand side: Same booster and master cylinder as my 69 Javelin, I think the donor for the Gremlin was an Ambassador. Looks like I will be borrowing the booster and mounting bracket from my 71 Javelin and buying a new disc brake master cylinder (the Javelin was drums all round). Glad I did a trial fit before cleaning up and painting the booster. |
Posted By: 74gremx
Date Posted: Oct/29/2016 at 4:22pm
As an example, here's mine: ------------- 1970 Javelin 360/727 1974 Levis Gremlin X 304/904 1964 American Convertible 1974 Matador wagon (parts) 2016 Holden Cruze Equipe 2014 Holden Colorado "Don't mistake activity for achievement". |
Posted By: WesternRed
Date Posted: Oct/29/2016 at 5:51pm
Thanks, that's what I have borrowed off the 71 Jav as far as the booster and mounting bracket goes, looks like disc and drum master cylinders are different, so will just get a new master cylinder to suit the front disc setup from Rockauto. 
|
Posted By: 74gremx
Date Posted: Oct/29/2016 at 6:45pm
|
The disc/drum have a large and a small reservoir. THe drum/drum are both the same ------------- 1970 Javelin 360/727 1974 Levis Gremlin X 304/904 1964 American Convertible 1974 Matador wagon (parts) 2016 Holden Cruze Equipe 2014 Holden Colorado "Don't mistake activity for achievement". |
Posted By: WesternRed
Date Posted: Oct/29/2016 at 7:02pm
| I figured that was the case, do you know if the Aussie cars also used the shorter master cylinder bracket? The one that was on the car was about 4", the one off the Javelin is about 3", going to have to get another one for the Javelin at some point. |
Posted By: 74gremx
Date Posted: Oct/29/2016 at 7:34pm
|
You mean the firewall to rear of booster brackets? This one I think is off a Hornet. The brackets are 82 mm deep  ------------- 1970 Javelin 360/727 1974 Levis Gremlin X 304/904 1964 American Convertible 1974 Matador wagon (parts) 2016 Holden Cruze Equipe 2014 Holden Colorado "Don't mistake activity for achievement". |
Posted By: WesternRed
Date Posted: Oct/29/2016 at 7:52pm
| That will be the one, shouldn't be too hard to find locally then. |
Posted By: 74gremx
Date Posted: Oct/30/2016 at 3:55am
|
These are spare if you have any hassles ------------- 1970 Javelin 360/727 1974 Levis Gremlin X 304/904 1964 American Convertible 1974 Matador wagon (parts) 2016 Holden Cruze Equipe 2014 Holden Colorado "Don't mistake activity for achievement". |
Posted By: WesternRed
Date Posted: Oct/30/2016 at 4:48am
|
May take you up on that, not any rush at the moment. Busy compiling a list of other more urgent bits that I need at the moment and sorting out all of the other bits that won't fit back on. Looks like I have a couple of spare Javelin mirrors (or maybe something else), certainly not correct for the Gremlin. Need a brake pedal, accelerator pedal, couple of rust free doors would be nice, the list goes on in the quest to undo the Gremlin bodgieness. |
Posted By: WesternRed
Date Posted: Nov/01/2016 at 5:42am
Success, things go together a lot better when you have the right parts: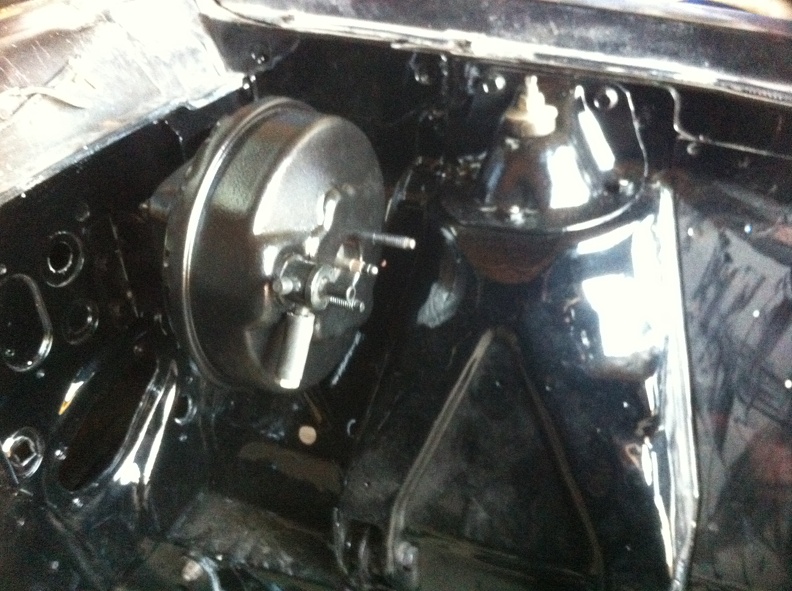
|
Posted By: WesternRed
Date Posted: Nov/05/2016 at 6:40am
|
Dragged out the spare 360 (from the 71 AMX) and made a start on the Dulux rebuild: Casting flash to the max: 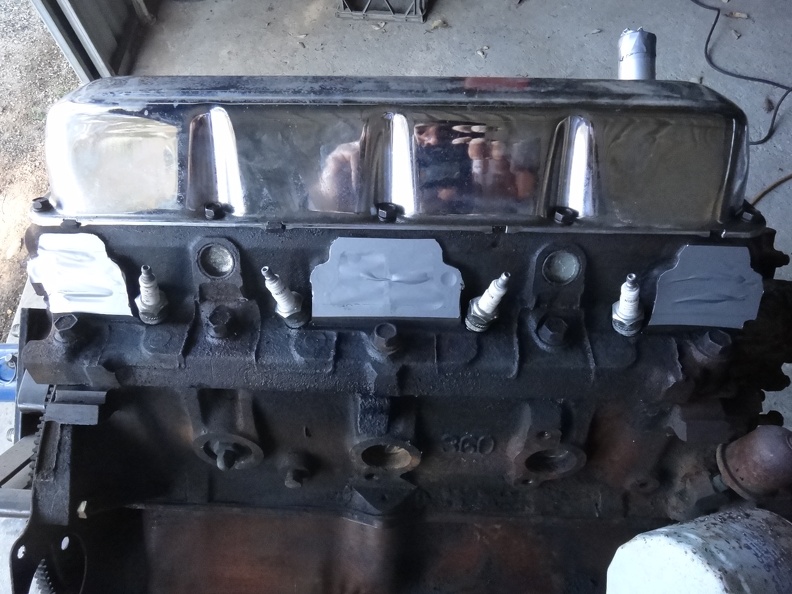 Be gone: 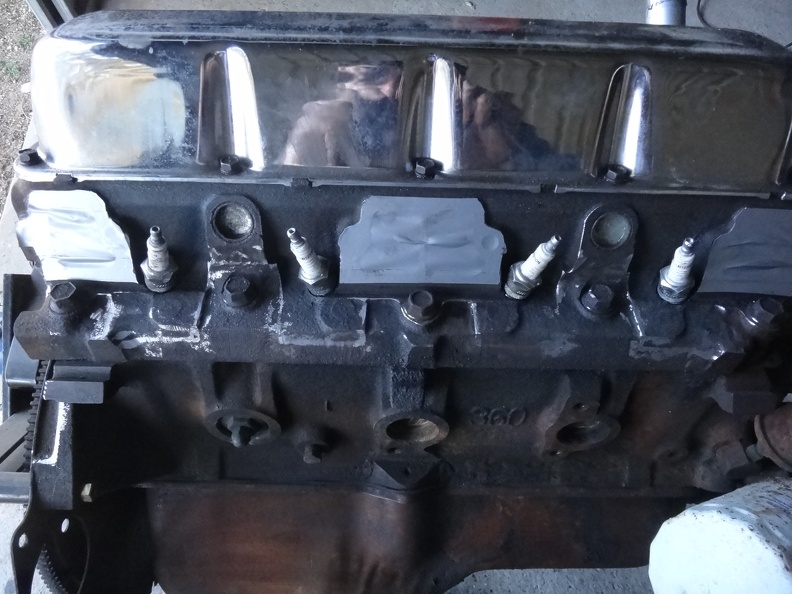 I did swap out the fairly floppy timing chain for a slightly better used one, that is about the extent of the rebuild on this one. The old performer got a bit of a clean up as well: 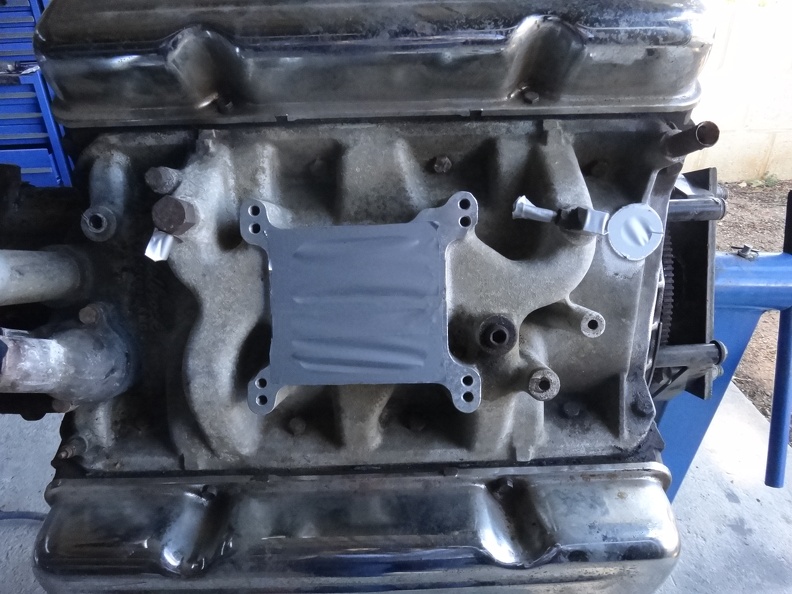 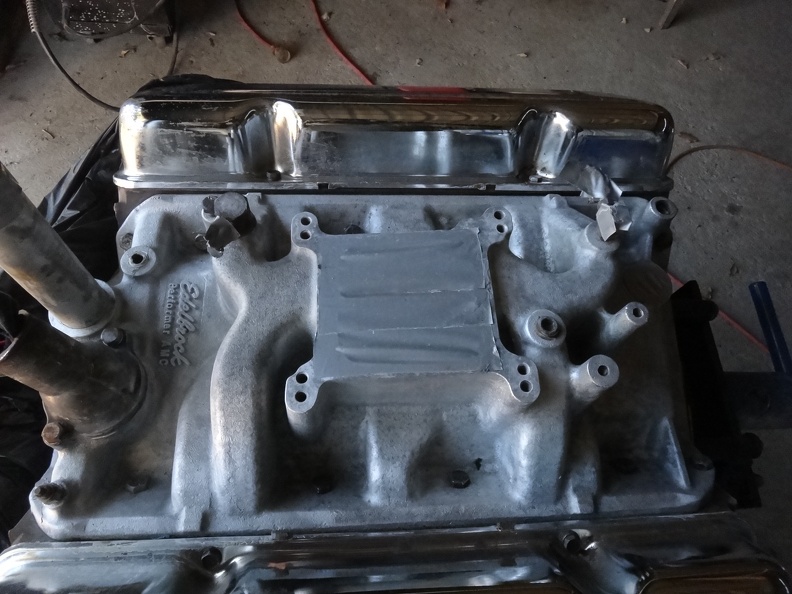
|
Posted By: 74gremx
Date Posted: Nov/05/2016 at 7:18pm
|
Keep going ! You're doing well. ------------- 1970 Javelin 360/727 1974 Levis Gremlin X 304/904 1964 American Convertible 1974 Matador wagon (parts) 2016 Holden Cruze Equipe 2014 Holden Colorado "Don't mistake activity for achievement". |
Posted By: WesternRed
Date Posted: Jan/01/2017 at 8:10pm
|
Bit of an update of sorts on the Gremlin. Had a good chat to Ben Ludlow at the speedway last night. My car did come of the US Base at Exmouth. For those who don't know, the US military guys stationed here were able to bring in cars from the States to use while they were here. Guy by the name of Joe Silla (not sure on spelling) went up there to buy a Camaro and a Stingray, but somebody else got the Stingray first so he ended up with the Gremlin instead. Apparently you needed a license (I'm assuming car dealers license) to buy cars off the base. The car was driven back to Perth on a permit, it was still running the original 6 cylinder and manual transmission at that stage. The car went pretty much straight the Ludlow's, it was Ben Snr's car and they did the conversion on it with Hornet parts. It was apparently the first Gremlin ever registered in Australia. Ludlow's did the engine swap on it as well using a donor 360 and BW transmission from a 70 Ambassador, at that stage Torqueflite transmissions were still pretty thin on the ground. It seems the car was a bit of a magnet for speeding tickets and when Snr got close to running out of demerit points, he sold the car to a jockey who apparently had a similar problem. Garry Dickson bought the car after that and it eventually fell into neglect on the downhill spiral to how it ended up in a wrecking yard in Perth, before being rescued. It still has damage on the roof from having another car stacked on top of it in the wrecking yard. The other interesting bit of trivia is that Ben took moulds off the body and these were used to make the fiberglass body for his speedway Gremlin a few years later. So there you have it, nice to know the history of the car. PS: just found this "JOE SILLA AUTOS; 30 CLAVERING ROAD, BAYSWATER WA 6053; Partnership; Licence no 1322." |
Posted By: WesternRed
Date Posted: Jan/02/2017 at 3:23am
| PS: Forgot about the AMI Gremlin, so maybe the second Gremlin registered in Australia or maybe the first in WA. |
Posted By: 70Hornet
Date Posted: Jan/06/2017 at 4:33am
| I love cars with some history behind them. Do you have any other photos from its past life ie at the wreckers? |
Posted By: WesternRed
Date Posted: Jan/06/2017 at 5:33am
| I don't have any older pics of the car except for the few already posted when Ben Snr had the car. Must see if there are any other stories in old club newsletters. |
Posted By: WesternRed
Date Posted: Jan/25/2017 at 4:53pm
Back to the task at hand, pulled the oil pan and bashed the bottom of it back into shape, also got to clean the remains of some valve stem seals from the oil pickup: Timing cover and oil pan back on with some new gaskets and masked up for paint.  Now with some colour: 
|
Posted By: WesternRed
Date Posted: Jan/27/2017 at 10:35pm
A few more blue bits to go with the engine: With the black engine bay, I figured doing the brake booster and master cylinder in engine colour might brighten things up a bit. |
Posted By: WesternRed
Date Posted: Jan/29/2017 at 4:41am
Small rust repair to the battery tray today: Then I was planning on hitting it with some black, but there were some lumps in the paint that wouldn't go through the spray gun:  Fortunately I found a slightly more fluid tin of paint and managed to get the job done: 
|
Posted By: ausrambler
Date Posted: Jan/30/2017 at 4:10am
| Great progress mate, keep up the good work. |
Posted By: 74gremx
Date Posted: Jan/30/2017 at 5:25am
|
I recognise each black part as I did mine all the same too ------------- 1970 Javelin 360/727 1974 Levis Gremlin X 304/904 1964 American Convertible 1974 Matador wagon (parts) 2016 Holden Cruze Equipe 2014 Holden Colorado "Don't mistake activity for achievement". |
Posted By: WesternRed
Date Posted: Jan/30/2017 at 8:26am
|
Ah yes, I'm sure you got to do all of the same fun stuff. An astute observer might notice that the engine mount brackets are the larger car variety, the engine cross member was obviously fabricated to deal with this since that's what came out of the car. Also third time is a charm with the brake booster and master cylinder setup, now I can think about mounting the proportioning valve and line lock, then running some brake lines: 
|
Posted By: amcglass
Date Posted: Jan/30/2017 at 9:36am
|
keep the updates coming good to see progress ------------- Javmanpres BBG Mark Donohue 401 74 Jav/AMX 71 Matador 2dr sedan delivery wagon 1902 Rambler Runabout 70 T/A Javelin |
Posted By: WesternRed
Date Posted: Feb/12/2017 at 6:48am
Christened the new brake pipe flaring tool today, certainly makes life easy: Managed to get a couple of pipes in: 
|
Posted By: Ruby loye
Date Posted: Feb/12/2017 at 7:20am
|
Is that white wooden stick prop rod original on your Gremlin, mine had telescopic prop rods back in the day. They didn't work as well as that stick though. Cool ride Mark |
Posted By: WesternRed
Date Posted: Feb/12/2017 at 6:18pm
| Ha ha, that's a long way back in the thread, previous owner removed the hinge springs. |
Posted By: greasygt III
Date Posted: Feb/12/2017 at 8:05pm
|
I'd be interested in finding out a bit more about your flaring tool. It doesn't look like anything I've seen before. Thanks and keep up the good work. ------------- 83 Spirit GT 79 Ranchero GT 460 |
Posted By: 74gremx
Date Posted: Feb/13/2017 at 3:06am
That's short run to the safety/prop valve, factory went way over the other side and back again ------------- 1970 Javelin 360/727 1974 Levis Gremlin X 304/904 1964 American Convertible 1974 Matador wagon (parts) 2016 Holden Cruze Equipe 2014 Holden Colorado "Don't mistake activity for achievement". |
Posted By: Amx nz
Date Posted: Feb/13/2017 at 10:40am
Is that an Aussie AMX I see on the other side . What number is that one  ------------- Mad max # 15 |
Posted By: WesternRed
Date Posted: Feb/13/2017 at 3:18pm
|
The brake flaring too is the same as the Eastwood one, expensive, but well worth it: https://www.youtube.com/watch?v=5xYbRKUE5qA" rel="nofollow - https://www.youtube.com/watch?v=5xYbRKUE5qA Putting the proportioning valve under the master cylinder would probably be an issue if I ever wanted to run a manual transmission as it might interfere with the clutch linkage. I'd suggest this is probably why the factory mounted it on the other side. I'm going to mount a line lock on the other side instead. You've probably notice that I'm not looking to be 100% factory correct with this thing, just want to make it functional. |
Posted By: WesternRed
Date Posted: Jul/04/2017 at 6:20am
Haven't updated here for a while, did eventually finish the brake line installation, still hadn't run the rear line in this picture, but it's all done now: One reason for the non-standard proportioning valve location was to allow for installation of the line lock on the other side. I was trying to avoid a transmission rebuild, but when I pulled the pan off my other spare transmission I found this:  So obviously that didn't leave me with too many options:  So far I've managed to install the bolt in sprag so just a few more bits left to go:  In other news, I took my pile of diff bits down to the diff shop and got them to put them together:  Truetrac centre and 4.10 gears should get the job done:  PS: AMX number 3 I think Doug |
Posted By: ausrambler
Date Posted: Jul/05/2017 at 4:03am
| At least you know that you have had it reconditioned and you shouldn't have to touch it for a good while. |
Posted By: WesternRed
Date Posted: Jul/08/2017 at 4:06am
Sometimes you have to improvise: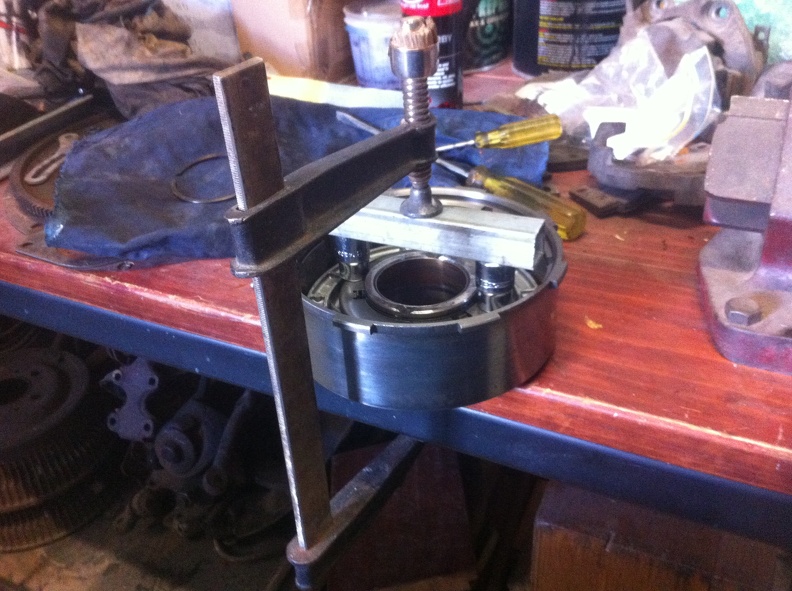 At least it's starting to look like a transmission again: 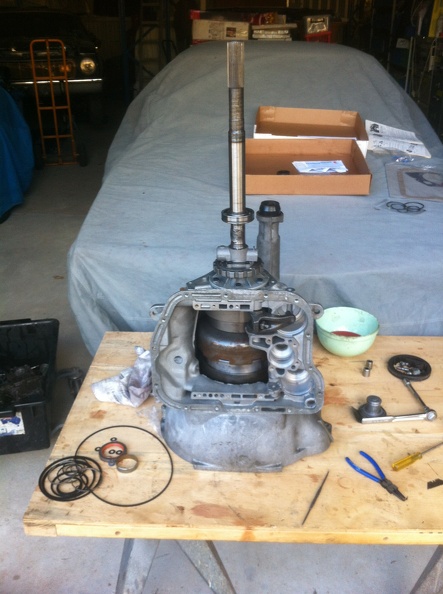
|
Posted By: WesternRed
Date Posted: Jul/12/2017 at 3:21am
So I finished off the auto by delving into the dark secrets of the valve body: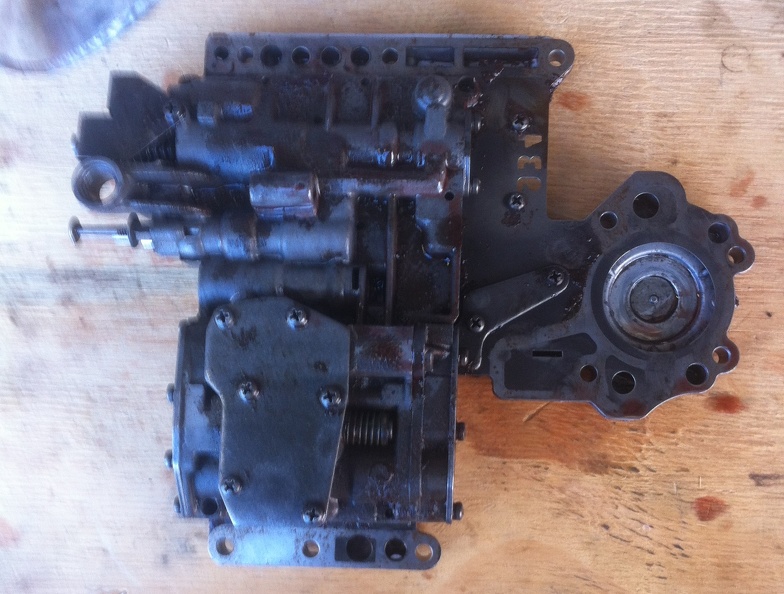 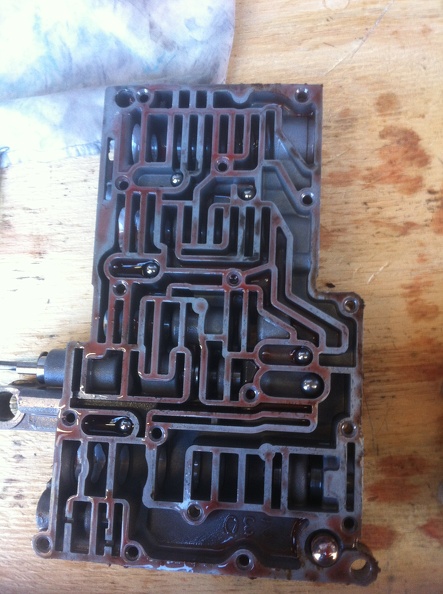 Hope all of those tiny balls went back in the right place: 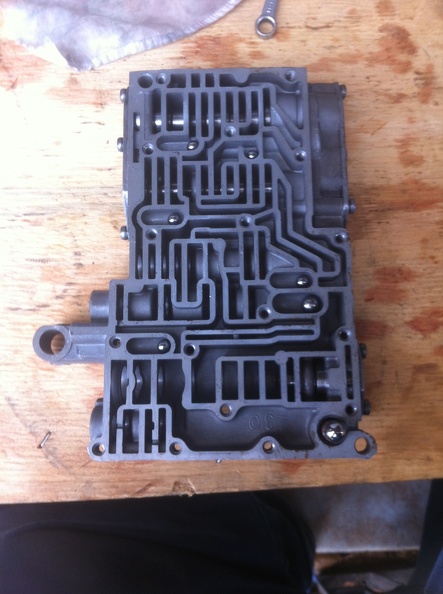  All done: 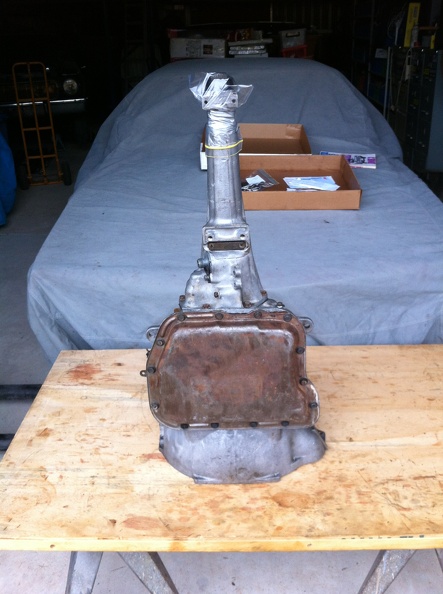
|
Posted By: WesternRed
Date Posted: Jul/12/2017 at 4:08am
Moving right along, it was then time to sort out this concoction of parts to make a torqueflite bolt up to the back of a 71 motor that wasn't intended to have one: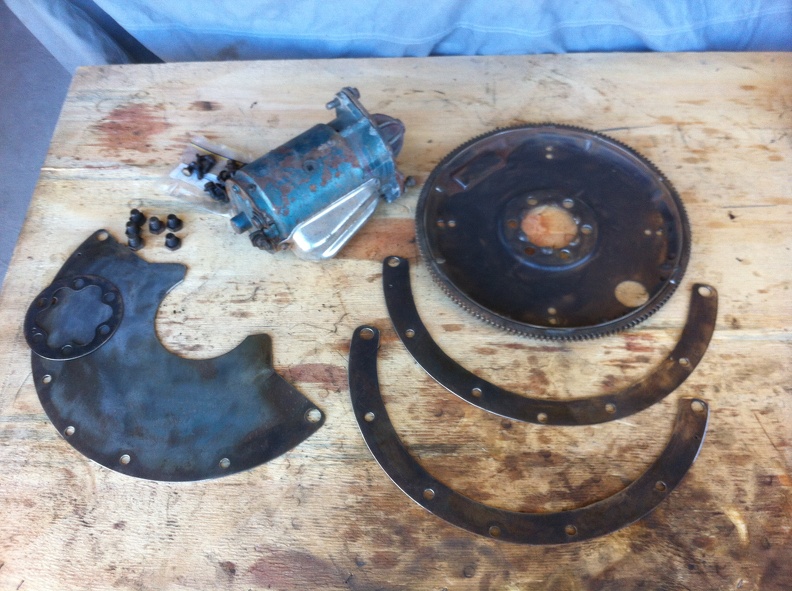 Goes together something like this using a modified convertor for the job: 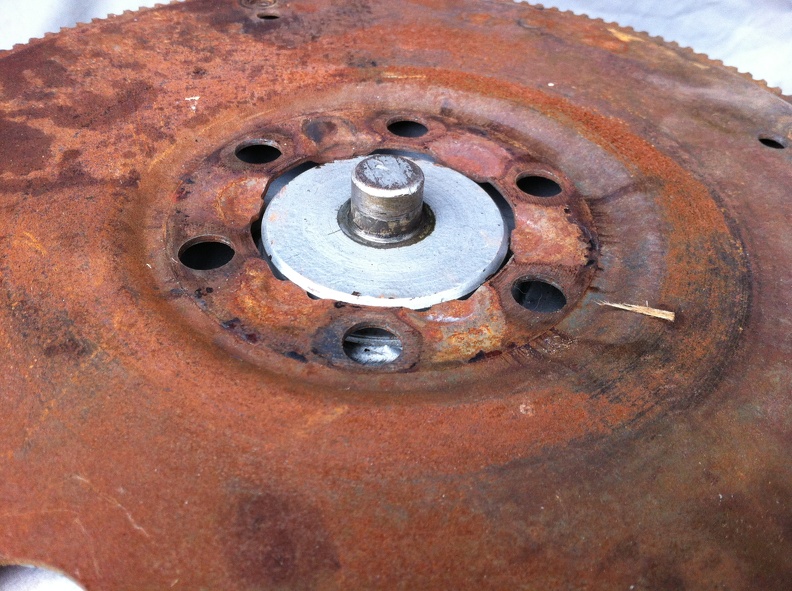 And ultimately there was success, even got the factory kick down assembly mounted up: 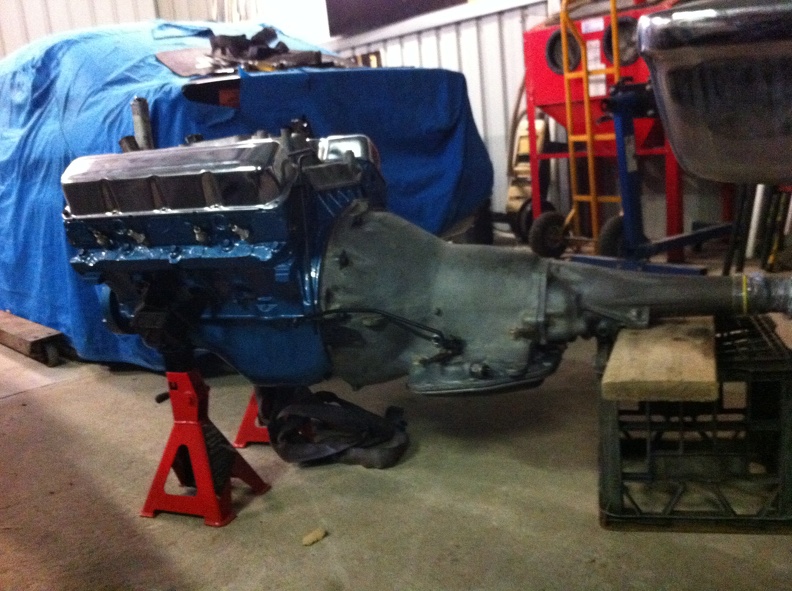
|
Posted By: Mostly last.
Date Posted: Jul/12/2017 at 5:20pm
|
Thanks for posting these pics. I got a lot to learn and it's a great help. |
Posted By: WesternRed
Date Posted: Jul/12/2017 at 9:14pm
Final job to do before dropping the engine is was to install the Lokar transmission dipstick, nobody told me it need to go in before you install the pan: Of course said pan then wouldn't go back on, so the dipstick copped a bit of a trim: 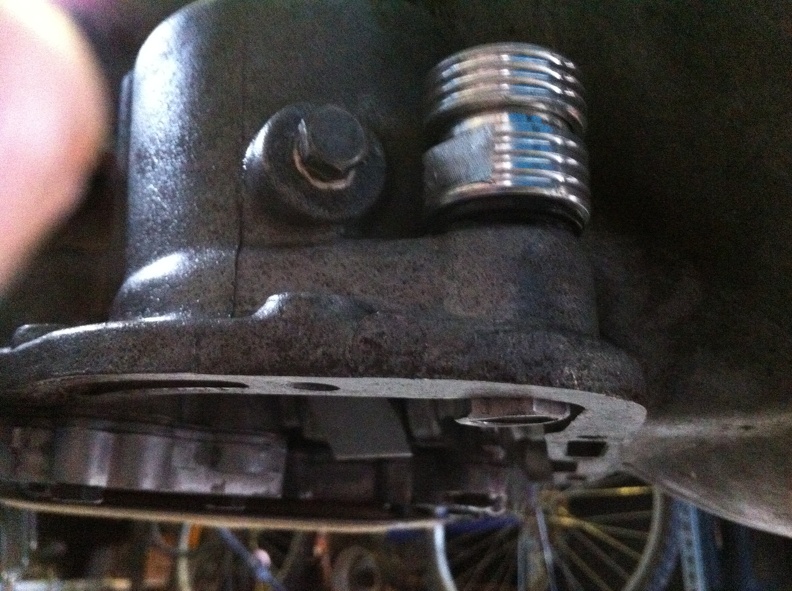 Done: 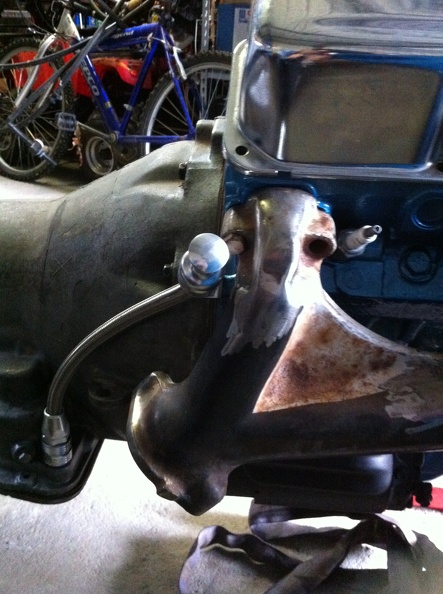 Then the moment of truth, dropping the assembly into the hole, what an absolute nightmare, but after seemingly hours of struggling with angles and position, finally success: 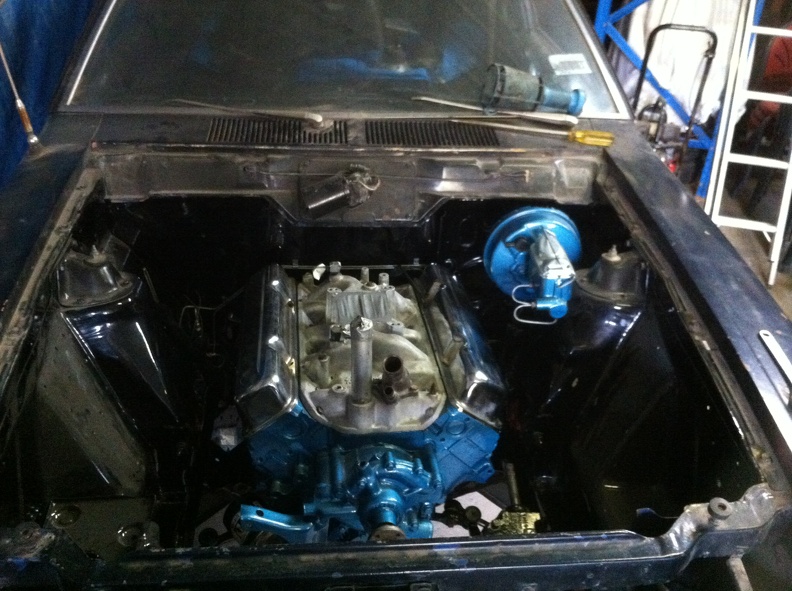
|
Posted By: 74gremx
Date Posted: Jul/12/2017 at 9:49pm
|
You did it with the manifolds on ? I did this great job installing the manifolds, getting the gaskets right, torqueing the bolts with the holes in correctly, then having to take everything off with the engine 6 inches over the mounts. Bummer ! ------------- 1970 Javelin 360/727 1974 Levis Gremlin X 304/904 1964 American Convertible 1974 Matador wagon (parts) 2016 Holden Cruze Equipe 2014 Holden Colorado "Don't mistake activity for achievement". |
Posted By: WesternRed
Date Posted: Jul/13/2017 at 12:30am
|
Manifolds were off, just did a test fit on the right side to make sure that it would live with the dipstick. I'm still contemplating getting the manifolds ceramic coated before installing them for good. I'm still not sure if the steering is going to play nice with the exhaust manifold as I suspect the engine has been centred when it was mad RHD and the brackets on the cross member are certainly not factory. Does yours run free flows on both sides Dave? |
Posted By: 74gremx
Date Posted: Jul/13/2017 at 5:03am
|
No, free flow on the drivers side only. You need a standard log dogleg on the dipstick side. Factory did this and parts book says so, but I've heard people fit free flow but I can't see how. Too tight. Something about grinding the strut rod bracket too. ------------- 1970 Javelin 360/727 1974 Levis Gremlin X 304/904 1964 American Convertible 1974 Matador wagon (parts) 2016 Holden Cruze Equipe 2014 Holden Colorado "Don't mistake activity for achievement". |
Posted By: WesternRed
Date Posted: Jul/13/2017 at 6:14am
| Free flow on the driver's side for LHD? Looks like the free flow just fits in on the passenger side on my car, it's about 10mm off the strut rod bracket. I'm just not sure if there is enough room left on the other side for the steering. Time will tell I guess. |
Posted By: 74gremx
Date Posted: Jul/13/2017 at 7:02pm
|
You did say the previous owner had moved the engine across to suit RHD. Now you've got to got back, or do factory mirror image manifolds. I don't think it will a drama. Part of the fun. ------------- 1970 Javelin 360/727 1974 Levis Gremlin X 304/904 1964 American Convertible 1974 Matador wagon (parts) 2016 Holden Cruze Equipe 2014 Holden Colorado "Don't mistake activity for achievement". |
Posted By: WesternRed
Date Posted: Jul/16/2017 at 6:57am
Had a bit of fun separating the hub from my axle to liberate the brake backing plate I need to use with the Moser axles, had to use all of the tricks of the trade, at least I only had to do one side: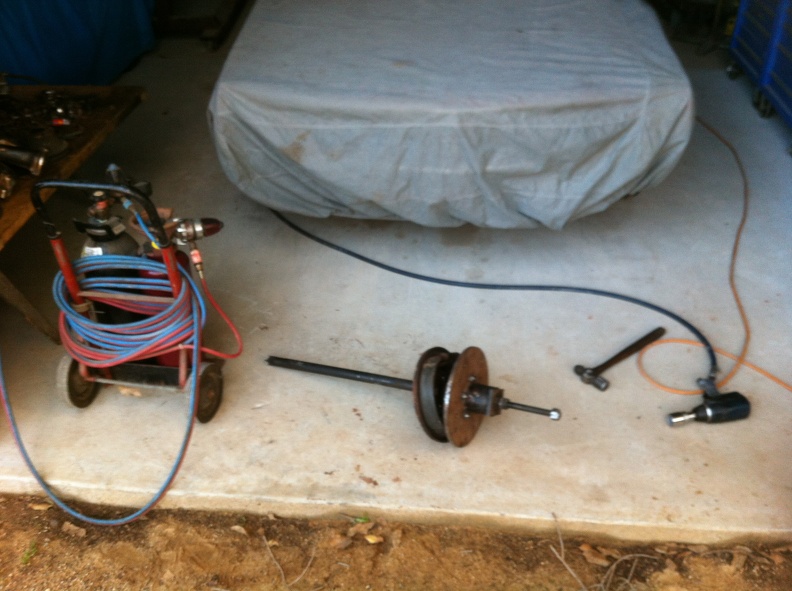 Then after a bit of time with the sand blaster, it was time to build another wind chime: 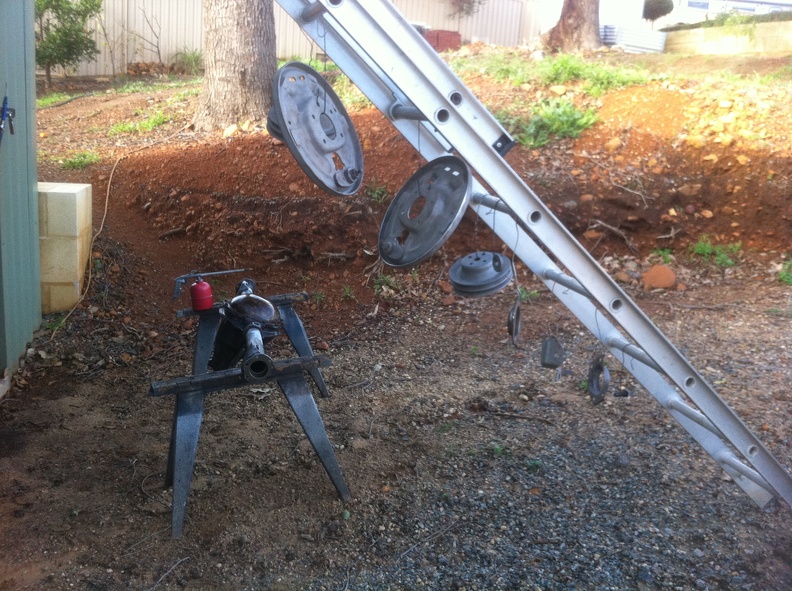 Javelin fender troughs bake good paint drying racks: 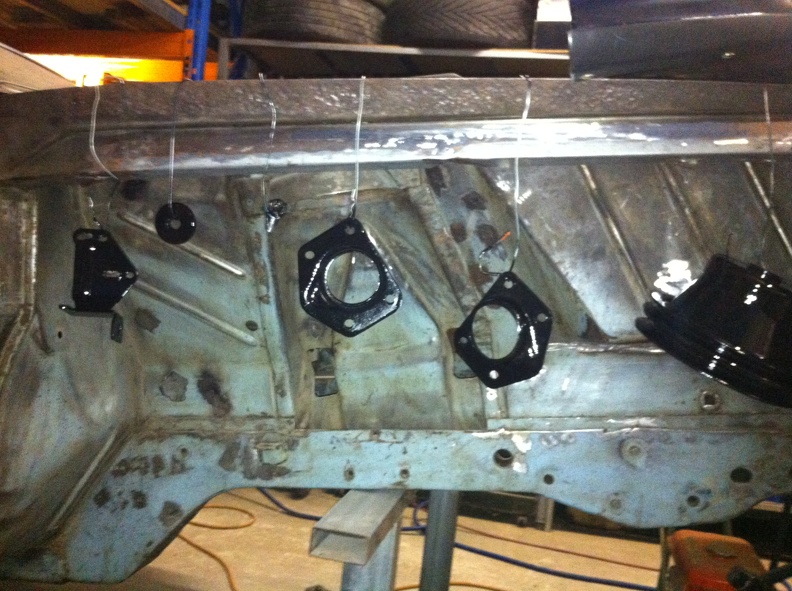 Sometimes it's handy to have a couple of hammers laying around: 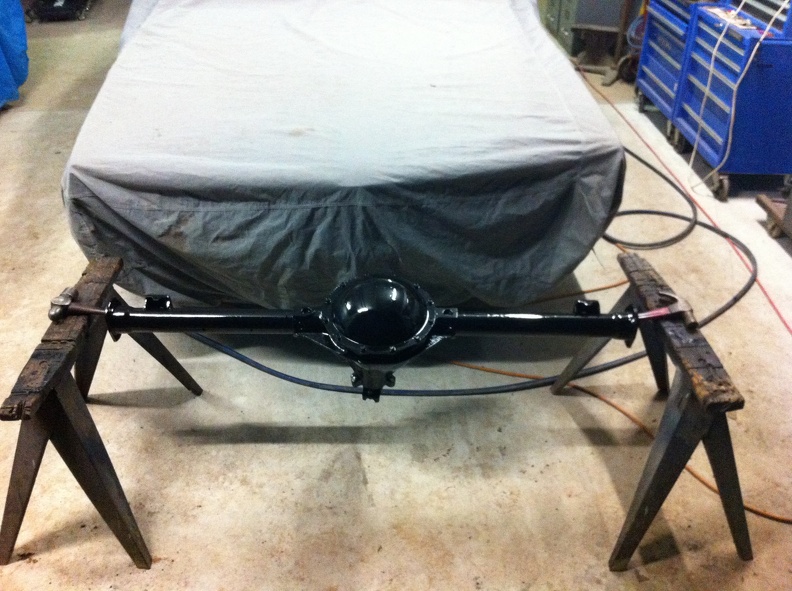
|
Posted By: WesternRed
Date Posted: Jul/16/2017 at 7:19am
In other news, I've started accessorising: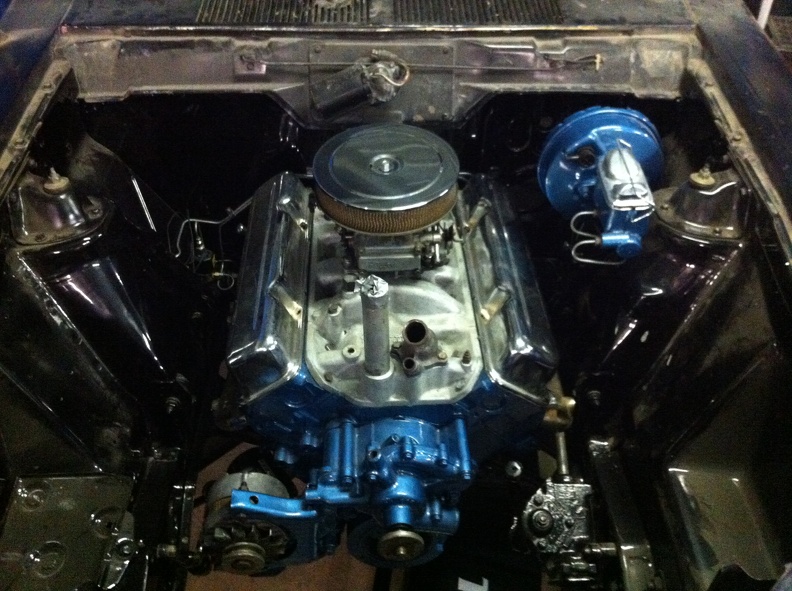 Exhaust manifolds are going to be a problem as discussed earlier: 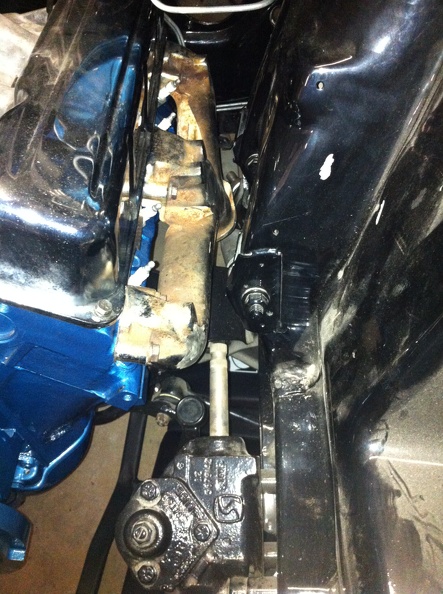 Engine needs to go over about 1/2" to allow room for the steering but the other side is already tight on the strut rod bracket: 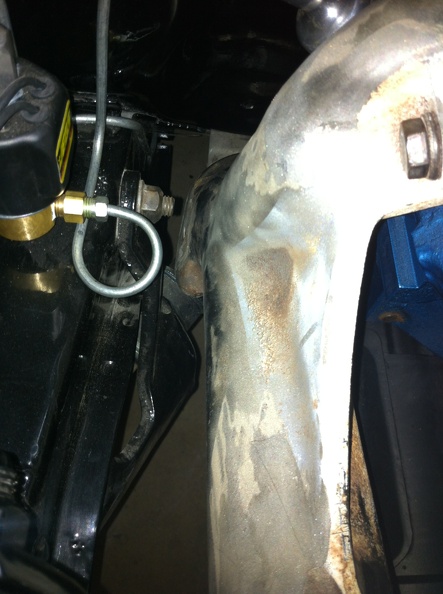 Not sure what I'm going to do here, factory log manifolds don't exactly grow on trees around here, so I think I'll just get the engine running first than figure out what I'm going to do about the steering later. Also wondering if there should be an extra brace from the top of the alternator back to the front of the engine? The motor came out of an A/C car but I won't be running the A/C here: 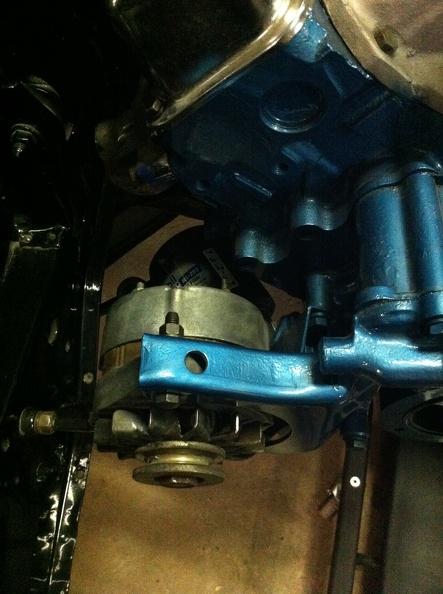
|
Posted By: Amx nz
Date Posted: Jul/16/2017 at 11:47am
|
Yes you are right. I would send you a picture but I have so much trouble sending them if you run into trouble getting one I could send one over ------------- Mad max # 15 |
Posted By: WesternRed
Date Posted: Jul/16/2017 at 5:36pm
| Need for bracket confirmed elsewhere, I will make one, they are pretty simple. |
Posted By: WesternRed
Date Posted: Aug/20/2017 at 7:16am
Still plugging away, out with the old diff: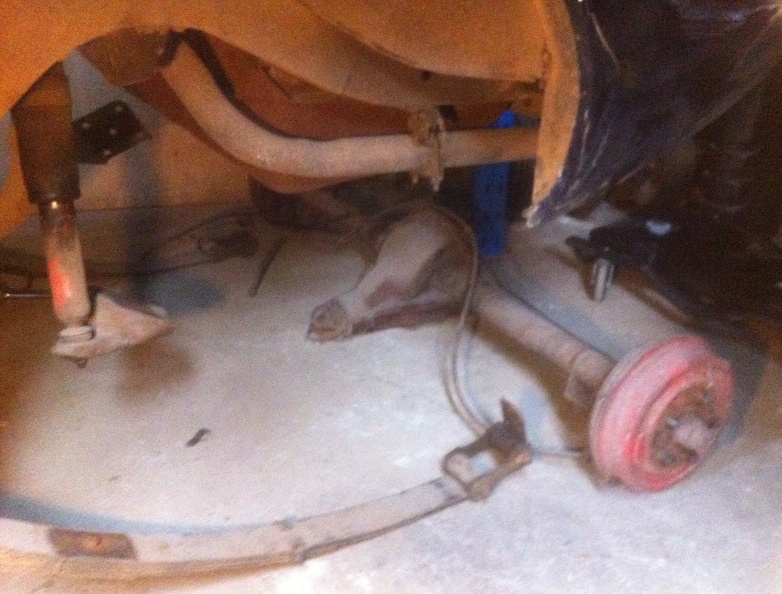 I with the new: 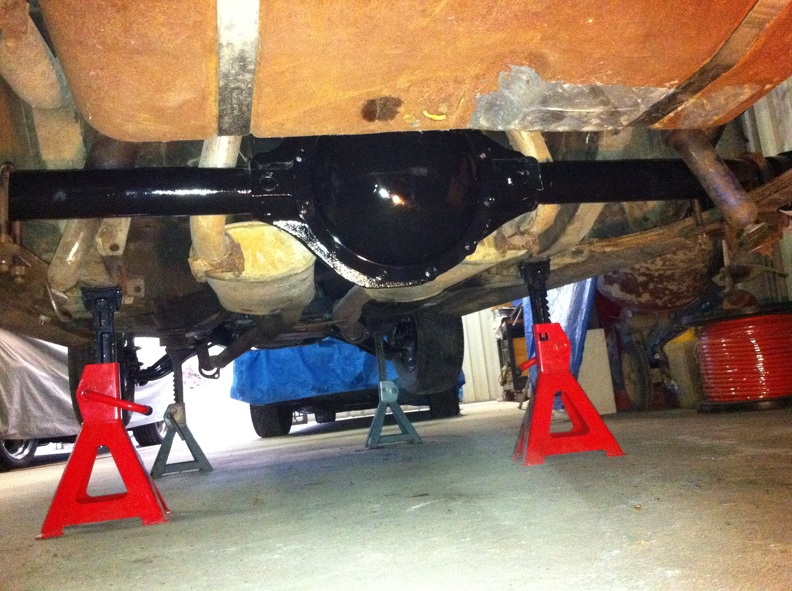 Made some reinforcing plates up for the diff mounting plates that will form the basis for some form of traction device in the future:  Also discovered that the Moser axles don't take the factory outer seals, so waiting on some conversion seals to come in from the US: 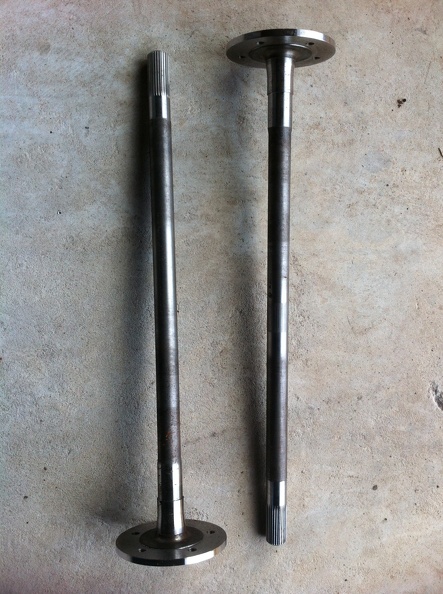 |
Posted By: WesternRed
Date Posted: Aug/20/2017 at 7:19am
In the meantime I've made up some new transmission cooler lines, waiting on a couple of fittings for the cooler itself: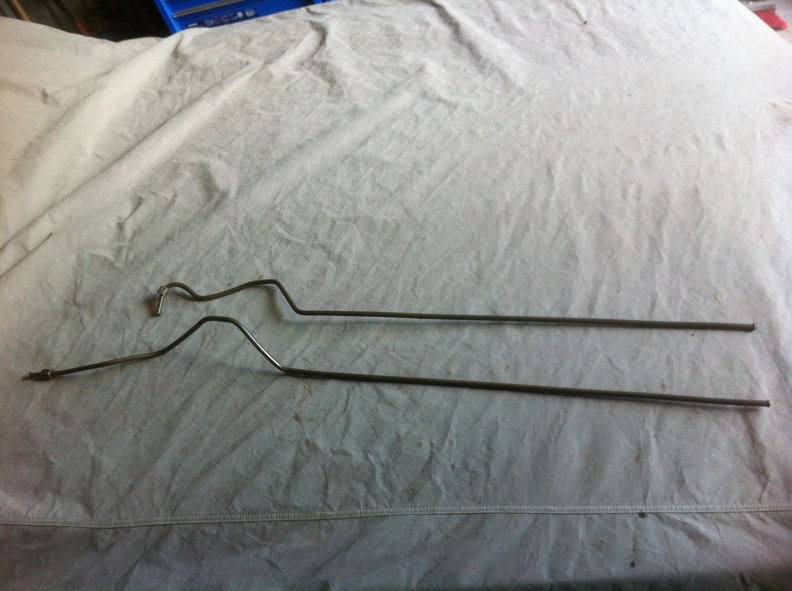 Replaced a couple of exhaust manifold studs that had seen better days and bolted the exhaust back on: 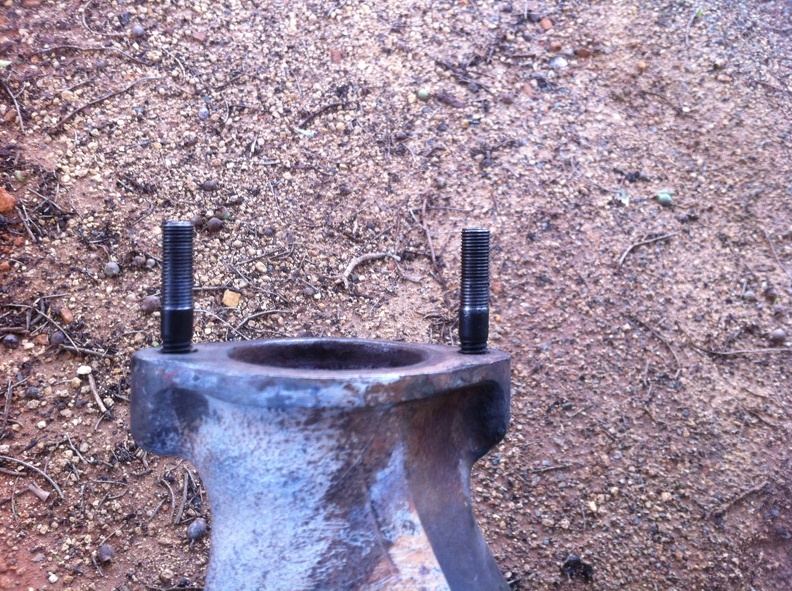 And even go as far as priming the engine: 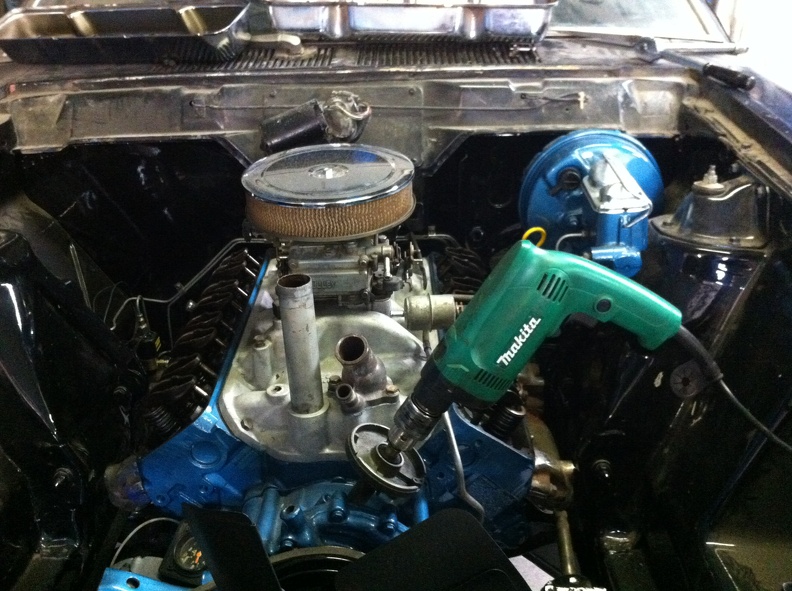 |
Posted By: WesternRed
Date Posted: Aug/27/2017 at 8:55am
One more thing crossed off the list, got the transmission cooler mounted and plumbed up today: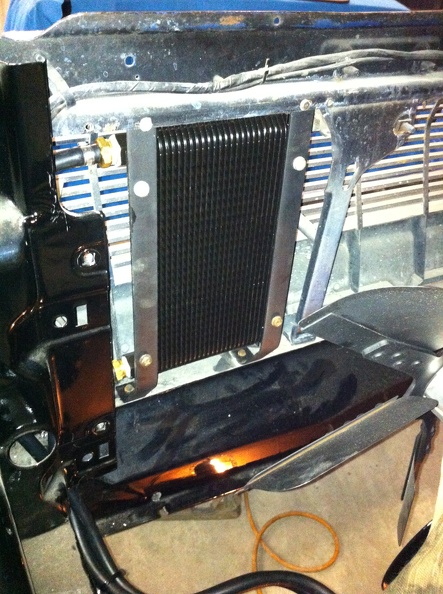 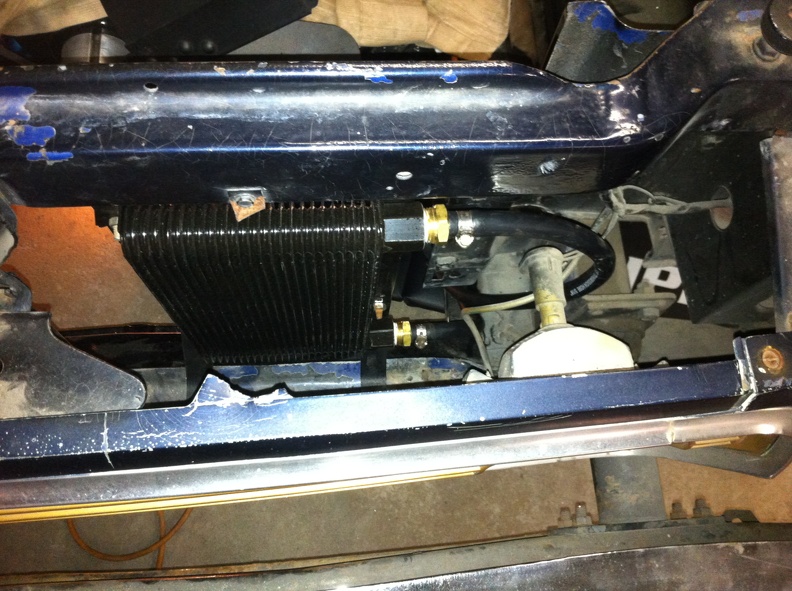
|
Posted By: WesternRed
Date Posted: Aug/28/2017 at 7:55am
New Champion radiator: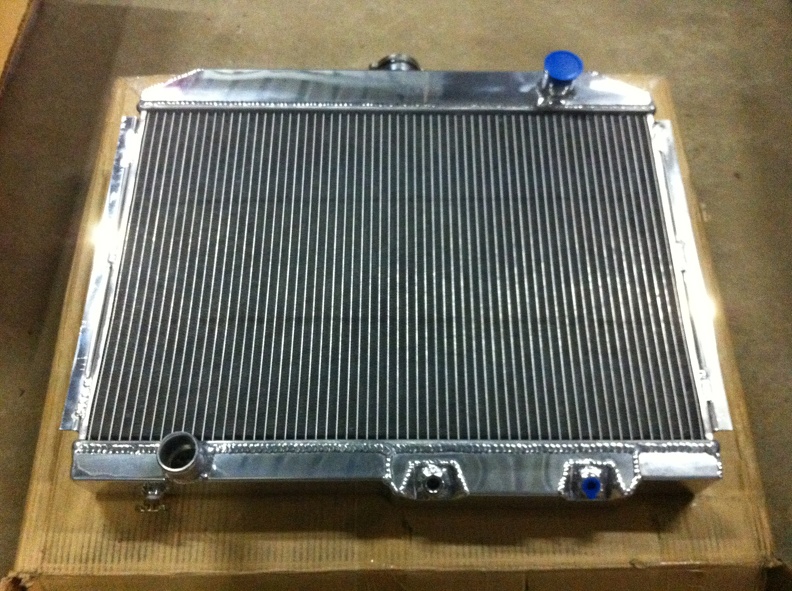 Installed: 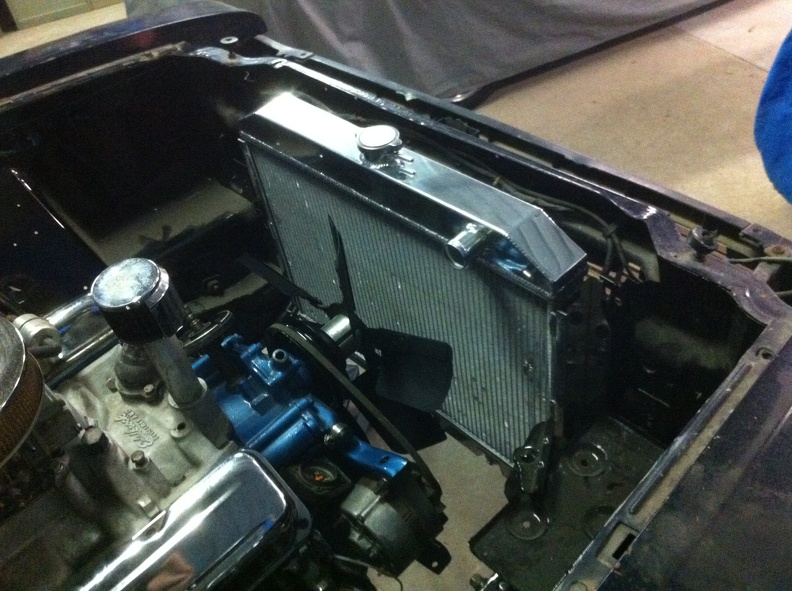 New radiator hoses are on the way. |
Posted By: 70Hornet
Date Posted: Aug/28/2017 at 4:53pm
| Radiator looks good. Where, and how much? I gather a V8 one? |
Posted By: WesternRed
Date Posted: Aug/28/2017 at 5:16pm
| Champion 3 core radiator ex-USA, bought off eBay and came in just under AU$400 including shipping. I'm told you can use a HQ radiator but they are a couple of inches shorter in height and you might have to drill the brackets to mount them. Champion is a direct fit and pretty reasonable for price I reckon. |
Posted By: WesternRed
Date Posted: Aug/30/2017 at 8:00am
Managed to get the bearings pressed on and rear axles installed today: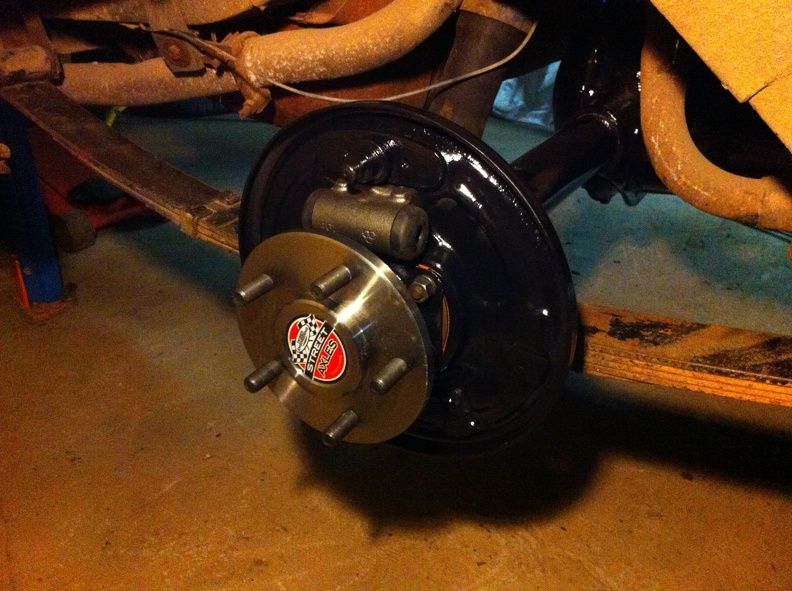 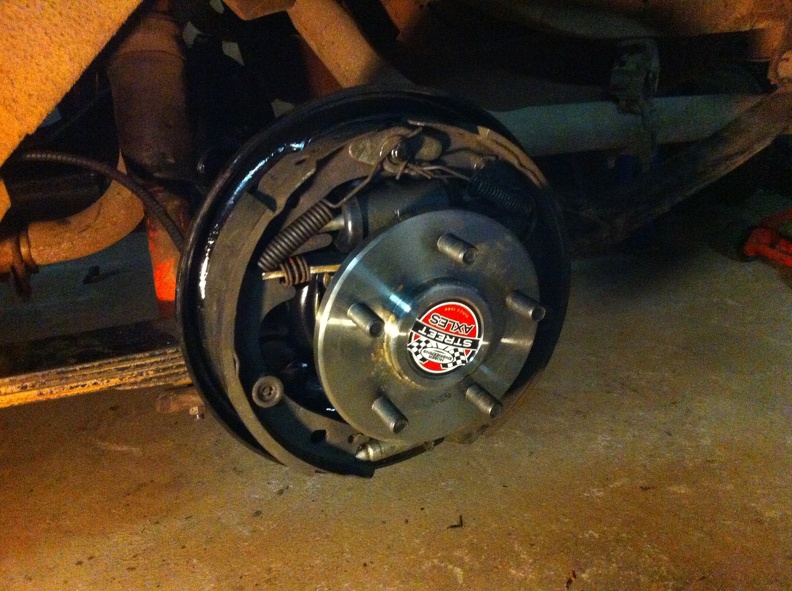 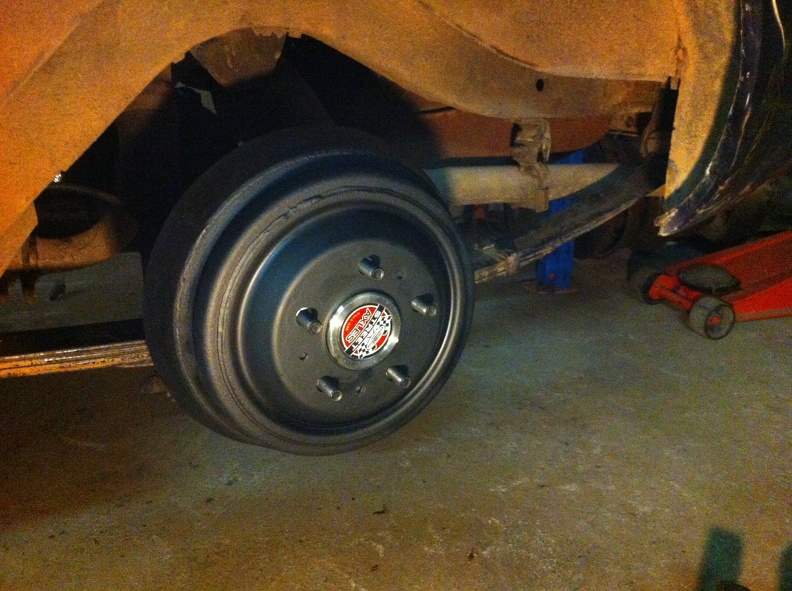 |
Posted By: WesternRed
Date Posted: Sep/08/2017 at 12:11am
|
It lives: https://www.youtube.com/watch?v=aLT-sDDLGNE" rel="nofollow - https://www.youtube.com/watch?v=aLT-sDDLGNE Has a massive exhaust leak so it sounds like a truck and it turns out the fuel pump is stuffed, so I have to order a new one of those. |
Posted By: 70Hornet
Date Posted: Sep/08/2017 at 1:20am
|
Good to see and hear. One of the biggest milestones in a restoration. And the one that gives the biggest smile. Cant wait until my Hornet cranks over for the first time
|
Posted By: WesternRed
Date Posted: Sep/28/2017 at 9:02am
Made myself a modified passenger side (RHS) strut rod bracket yesterday, factory bracket on the right for reference: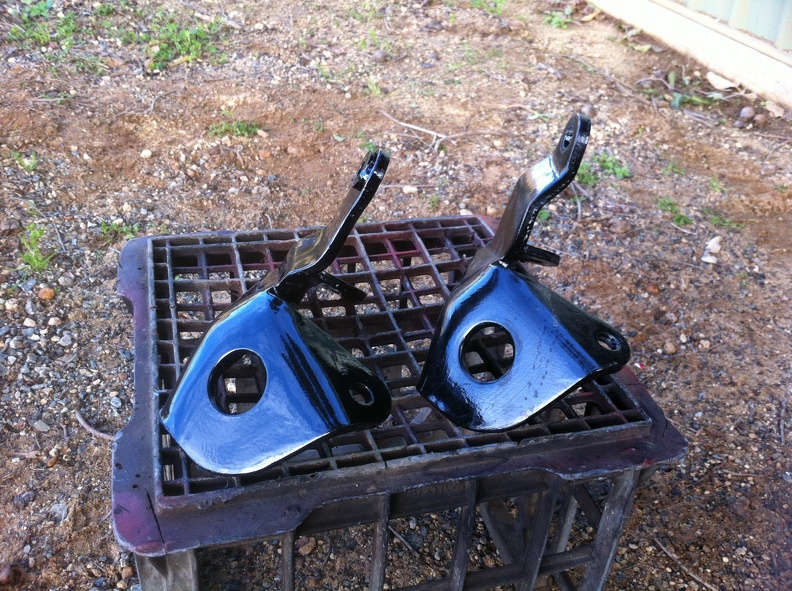 Probably spent a good couple of hours today messing around with the engine position in the bay to try and make it work with free flow manifolds on both sides. I think I am there, guess I will find out when I put the steering column back together and try to install it. It adds to the fun when you are working with somebody else's home made right hand drive V8 cross member and trying to make it work with the steering back on the left. |
Posted By: WesternRed
Date Posted: Oct/23/2017 at 9:18am
|
Since I didn't have a lower dash frame that would work with the left hand drive setup, I decided that reworking the right hand drive one would be the best solution. Had to cut it into six pieces then weld the pieces back to together in the appropriate order to make a mirror image of the original. Before 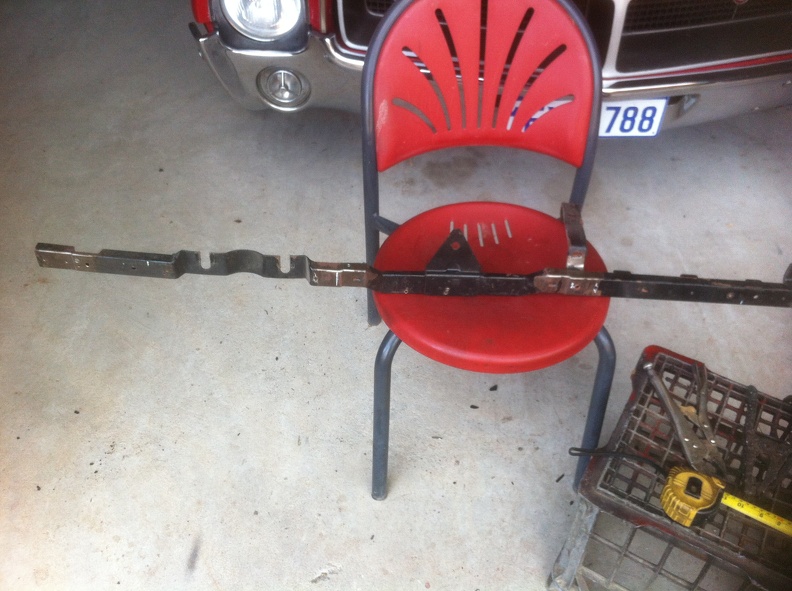 After  Also finished off re-assembling the steering column and installed it in the car: 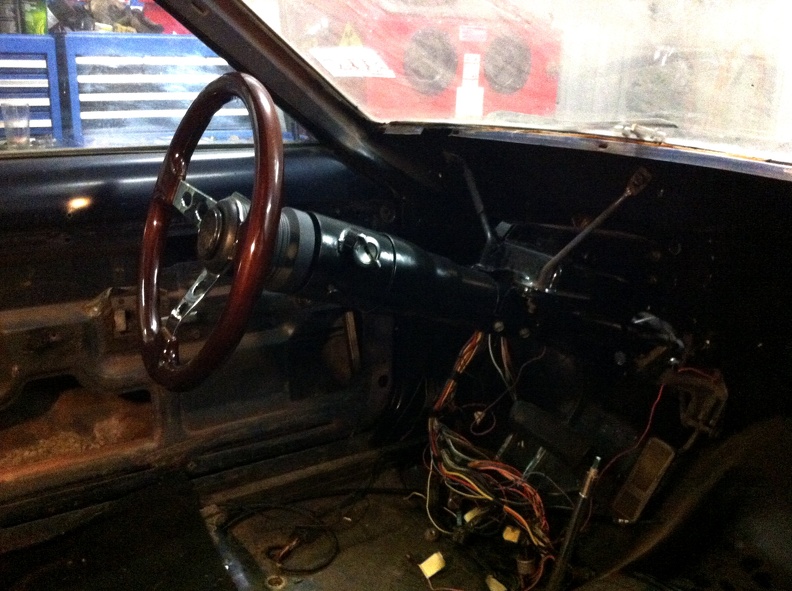 And with the steering now functional, it seemed like a good opportunity to reshuffle the cars in the shed, first time the Gremlin has been on its wheels for a while: 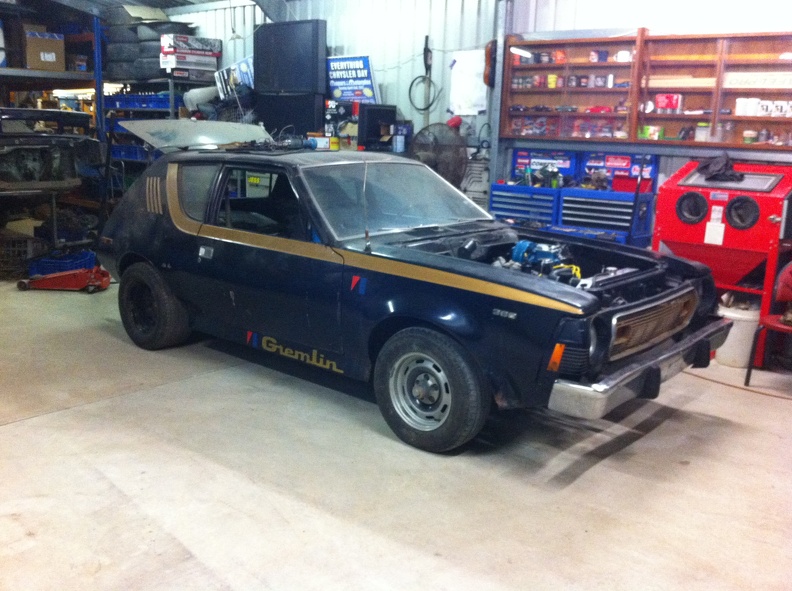
|
Posted By: 70Hornet
Date Posted: Nov/02/2017 at 7:59am
|
That's going to be such a cool little cruiser
|