70 Javelin project
Printed From: TheAMCForum.com
Category: The Lounge Area
Forum Name: Member Projects
Forum Description: Are you doing a restoration or in the middle of a major AMC project? Show and tell us about it (*AMC projects* only Please. Others may be moved)
URL: https://theamcforum.com/forum/forum_posts.asp?TID=157
Printed Date: Apr/16/2024 at 3:26pm
Software Version: Web Wiz Forums 12.03 - http://www.webwizforums.com
Topic: 70 Javelin project
Posted By: billd
Subject: 70 Javelin project
Date Posted: Jul/08/2007 at 11:21pm
|
not really a restoration, but more like "making it nicer again". Disappointed in a few things, like how long the painting took (hood and trunk lid still not done, have given ultimatum) and finish in certain spots, but otherwise ok. Some shots below, more can be seen at: http://theamcpages.com/javelin-body.asp     
|
Replies:
Posted By: 71SC360
Date Posted: Jul/09/2007 at 12:08am
| Bill, Don't get discouraged. It looks great..... |
Posted By: 71gremmy
Date Posted: Jul/09/2007 at 1:23am
|
I love the look of a 70 Jav, and your color and interior make your car top notch. Once you are done with it you will have a really great car don't give up! ------------- 71 Gremlin X,360,t-5,8 3/4 rear axle 66 Rambler Classic, 232,auto |
Posted By: purple72Gremlin
Date Posted: Jul/09/2007 at 2:26am
|
Hey Bill,
Looks Great!!! |
Posted By: Ohio AMX
Date Posted: Jul/09/2007 at 3:00am
|
Outstanding work! Looks like she's coming together well. Don't give up, I'm having my share of problems as well- all mechanical. I really like the correctly oversprayed core support! ------------- 1940 Hupmobile Skylark 1968 Javelin future Pro Street 1969 AMX 290/auto (first car) 1997 Dodge SS/T 5.9L AMO# 983 |
Posted By: Eagle Kammback
Date Posted: Jul/09/2007 at 5:25am
|
I wsh I had a Javelin ------------- 
|
Posted By: billd
Date Posted: Jul/09/2007 at 7:04am
|
I know of a '69............. he's teetering on the fence about keeping or selling. Costing him $1200/year to store it. It needs proper body work, however. It's not a disaster, but the PO used filler instead of doing it correctly. |
Posted By: billd
Date Posted: Jul/09/2007 at 7:09am
|
I finally called 3M's help line. The fellow confirmed - 3M pinchweld primer has been discontinued and they don't have so much as a single can. He did say I could use ANY butyl pinchweld primer, even another brand. So I ordered another brand butyl primer today. This means other than the HELP to get it in place, I can put the glass back in as soon as that arrives sine I already have the butyl tape kits. It takes two to do it right because it must be perfect as when that glass touches the butyl, that's it, you are done - plus - I'd sure not want to drop that glass - especially onto the new paint. Geesh, that was a nightmare enough. Once I can talk some AMCer into helping drop the glass back in, it would technically be drivable. |
Posted By: Eagle Kammback
Date Posted: Jul/09/2007 at 8:37am
|
So far, what has been the hardest part to find? -------------
|
Posted By: billd
Date Posted: Jul/09/2007 at 1:33pm
|
Believe it or not: Drip rail trim, Left rear (quarter extension) trim for vinyl top - the cast piece with 2 pins, Left quarter window belt-line trim (one that's not dented, etc.) And I've still lookin' for each. |
Posted By: FuzzFace2
Date Posted: Jul/10/2007 at 2:08am
|
Bill dont give up now! You have come so far and over come more crap (paint) than any one I know. Most would of given up with the motor right after you got the car, let aloan the paint.
Please keep us posted on how its coming.
Dave ----
|
Posted By: billd
Date Posted: Jul/17/2007 at 12:18am
|
Well, the glass is back in, sort of...... The back glass I think went perfectly, but then it's pretty simple, smaller, more flat, and you are almost laying it down. The butyl wasn't too bad on those curves, either. I suspect it's fine and sat nicely. I'm very pleased with how the back glass went in and how it looks. The windshield - I placed the butyl tape leaving the paper on it. We did a "dry run" putting the glass in place, then marked with masking tape a couple line-up tapes, cut the tape, lifted the glass back out and pulled the paper off the butyl. First, I did a not so great job where the ends of the butyl meet. It's a real @#$@GR%$^ to cut! Then to get it to butt-up. Well, we sat the glass back down and lined the tape up - looking at the tape, it was 150% right on. But after my friends/neighbors left, I looked and it was 1/16" too far to the right and the left side was BARELY touching the butyl. Let me tell ya, the Javelin windshields barely cover the pinch-welds on the sides. The top and bottom look perfect, the right side not so bad, but on the left, it's barely on the butyl tape. However, had it been moved over the 1/16" to the left to center it, I suspect then the right side wouldn't have been 100% on the butyl. Geesh, 1/16" to play with is all? I do think it will seal, but I'm going to do what some advise to do and get some sealer to work in with a plastic applicator - work it into the edge of the glass. I've seen it done, in fact some do it as a matter of habit. Just another seal "just in case". With the glass in, I can now finish the interior. I had to totally rebuild one of the pieces that goes up the left windshield pillar - the plastic backing was really broken and the vinyl pulling away. A tube of super glue and some vinyl glue, it actually does look "good as new". -------------  http://theamcpages.com" rel="nofollow - http://theamcpages.com http://antique-engines.com" rel="nofollow - http://antique-engines.com |
Posted By: billd
Date Posted: Jul/18/2007 at 10:52pm
|
The interior is finished - well, it was until I realized that the right door window doesn't fit quite proper when rolled up. I thought I had it just right, but after going up and down a couple of times, it's not sitting right, so off with the door panel again. and I need to try to figure out where the antenna cable fishes through into the car. Been so long since I removed it, I forgot where the cable enters! Otherwise, the interior is done, carpet, trim and all, and it's actually better than it was. Problem - I realize now that in the past the interior had been apart and back in and the screws just simply were not correct for where they were, so I'm short on the CORRECT screws for the sail panels and those small plastic panels behind the doors along the side. Someone in the past had mixed up screws and left some out so I'll be looking for good correct screws for some interior locations. I backed the car out and ran water over the windshield and back window. Actually, I sprayed them pretty well with the hose nozzle. No leaks. The trim around them sits half-way decent (unlike when that professional auto glass shop reset my back window 2 years ago) so 3/8" butyl is the correct size. Man, is that stuff sticky!! I drove the car over to see if Jeff was FINALLY done with the hood and trunk lid. He wasn't even there.... so I'm still without those items. The next stop for it is probably to have the vinyl top put on. ------------- http://theamcpages.com" rel="nofollow - http://theamcpages.com http://antique-engines.com" rel="nofollow - http://antique-engines.com |
Posted By: billd
Date Posted: Jul/20/2007 at 2:45am
|
OK, kiddies, another lesson learned.
Don't try to save 2K, as it will cost you and you'll have a crap job in the end. If a good well known body person says it will cost xxx, simply accept it and let him do it.
I went back over last night with the Javelin as Jeff had said the hood and trunk would be done. He hadn't even painted them, they were still in the corner of his shop, the shop was a mess filled with stuff, there was stuff stacked on the hood, overspray all over, etc. and he acted non-caring.
So I left quite PO'ed and he could tell in my voice.
I came home, got the truck and drove back over (we talked and Barbara said cut your losses and go get those parts)
So I drove in and took the parts, we had a few words, he said "and don't worry about the other $500" to which I replied "I'd not planned on it, it's going to cost me far far more to fix this now" and drove off.
Barbara helped and we put the trunk lid and hood back on. I used soft-scrub to get some of the overspray off and cleaned them up a bit, deciding to take the car into town (I skipped my annual engine show that I WAS going to and haven't missed in decades).
Bottom line, the body shops said it was so crappy they didn't want to touch it even just to finish those peices. One fellow, who I'd gotten an estimate from said "I remember that car, it's got more waves and dents now than when I saw it" and started pointing things out you could only see in the sunshine. He said sorry, I don't want to touch that.
We chatted a while, he said "I really wish I'd have done that for you, you'd be money ahead and have had the car for the past year with a guaranteed job". I asked if he knew anyone else I could talk to since he now didn't want to touch it. He went to one of his employees who does body work in his home shop but that fellow said "it's going to be several weeks if not months I'm so busy".
We talked some more, and that employee apologised and said he'd be happy to do it and would really like to help me out but it would be so long before he could then suddenly the owner spoke up and said, ya know what, don't worry about that, we'll do it here.
I guess my pleading helped, plus he'd done a couple "owies" on our Jeeps over the years and his work was 100% flawless on those.
See, that's the problem, he was afraid their good work just would not look good against "The other".
So my quest to save 2K is actually going to cost me 2K more now, and I'll have a much less than good paint job. I'd have been better off paying more, having the car faster, and having it 100% right.
Hard lesson learned, but Jeff came so highly recommended and I know for a fact the Hurst Olds he did was excellent, a real show car. However, after the paint fiasco in November/December, he seemed to be really changed and just didn't seem to care much after that, and I guess it shows in the "redo" they did. He even painted over sand on the hood (only saw that last night, that was the first I recally go to see the hood)
So there goes the rest of my car money for the whole year, I have to take the right door apart again to remove the door handle, remove all trim in the area, etc.
We're all just sick over this and broke to boot now (everything I've tried this year has run hundreds if not thousands over budgets - sounds like a GOVERNMENT JOB to me!)
The body guy at TMC said "see the car monday and if I don't see it, I'll know you took it back to Jeff".
I told him "it would be parted on eBay first, and I'm not kidding"
If there wasn't so many thousands in it, I'm afraid I might just do that. We'll be in such a hole over this, won't even be able to afford the $200 for the vinyl top so not sure it will actually even be "on the road" this year.
Too bad, it was sure a joy driving it to town today to the body shops. It ran like a champ, smooth and mellow, goes nice over the railroad tracks and the interior is darned near perfect except for the crappy dash eyebrow pad with the neat headliner, rebuilt armrests and new carpet and all.
I'm just all beside myself being p i s s e d, the emotions, etc. glad to mostly have it back, but sick to look at it, etc. ------------- http://theamcpages.com" rel="nofollow - http://theamcpages.com http://antique-engines.com" rel="nofollow - http://antique-engines.com |
Posted By: 71SC360
Date Posted: Aug/06/2007 at 7:14am
| Bill, How's the Javelin going? I know you been down in the dumps about it but you've got to keep your head up otherwise you'll loose all of your momentum. Step back, take a deep breath and keep a positive attitude, it'll all come together.... |
Posted By: billd
Date Posted: Aug/06/2007 at 7:44am
|
I just talked to the fellow at TMC Auto - they said they were behind on a couple of projects from last week so mine isn't done, but "should be ready to pick up on Wednesday, give a call late Tuesday........" Maybe it's a good thing, it will delay it going on the credit card! I'm dreading the "damage" this will do to the budget - and a bit apprehensive about how their work will look against "the other". but what can ya do? Still can't find a couple pieces I'll need to get it back together: That left quarter extension vinyl top trim, and the clips for the vinyl top stainless trim. A friend up north has tried to find the correct parts, but even though the last batch of clips he sent looked great, I mean very nice quality complete with seals and all, but they were too narrow for the trim. Correct for the holes, too narrow for that narrow vinyl top stainless trim. And many vendors to think that all Javelins used the "post and clip" type of setup for the vinyl top, so you can't go to a vendor. Even Kennedy, who says on their site "this catalog only contains parts correct for your car" shows the clips that fit pins - for a 1970! Wrong, sorry..... The eBay vendors are of no help - they'll send you the clips for the later style posts. Mine had a mix of the plastic and the metal types. I can't see how the metal ones can seal the roof holes against rain, where the plastic ones totally fill the holes and can easily seal. Either way, there's not enough good clips. Geesh, this reminds me - the clips I bought for the belt line stainless trim by the quarter windows are wrong, too! Too big for the holes and I'm not about to drill the holes larger, so I guess I am missing clips for that area, too. Those are also supposed to be the nylon that secure with the pins in the middle. I bought these from ebay and they are just way too big for the holes. It's the final details like that which are a pain......... and you can't see or test what you are buying when buying over the 'net. So I'm left without clips for the vinyl top (and belt stainless by the quarter window) unless something happens soon. I guess I need to step it up getting those final parts - been concentrating on the SX/4, which is also taking some large steps backwards. But when the Jav comes home this week, I need to be able to really get back on it if it's to be done by Labor Day. ------------- http://theamcpages.com" rel="nofollow - http://theamcpages.com http://antique-engines.com" rel="nofollow - http://antique-engines.com |
Posted By: Menace SS/AMX
Date Posted: Aug/08/2007 at 3:32am
|
Hey Bill
Your javelin is looking really nice! I think It's the same color as mine was originally.
Dennis ------------- My AMC Stable 1968 AMX (Craig Breedlove AMX600) 1969 SS/AMX Replica of(THE Big Menace) 1969 AMX 390,auto,Go Package 1970 AMX 390, 4 speed 1970 Javelin 401(Big Bad Red) 1968 AMX (FOR SALE) |
Posted By: billd
Date Posted: Aug/08/2007 at 3:49am
|
Thanks Dennis! when that color is fresh and true, and not faded or dull, it's not a bad green. It's richer color than it used to be. Still wish it was that beautiful burnt orange AMC used, but it's still nice, and not common. I just called the owner of TMC, they got the hood and trunk sprayed this AM. They will buff it out Thursday AM. I asked "what's your thinking, how is it" he said this: "My guy told me today if he had to do restoration bodywork every day, he'd quit" and "I think you're going to wish we'd done the whole car, my fellow put hours into that hood making it perfectly straight and true, the hood looks great, the trunk lid is great, you'll be very happy". So probably tomorrow (Thursday) afternoon.......... however, the sad part is what's it's going to cost me! I'm expecting at least 2K on top of what I paid Jeff (who never did finish and screwed it up the second time) OTOH, on the Javelin, the hood is a part you see a lot, or if you are in a Mustang or Camaro, the trunk lid and that perfect back bumper.........  Anyone wanna come help apply the stripes?? ------------- http://theamcpages.com" rel="nofollow - http://theamcpages.com http://antique-engines.com" rel="nofollow - http://antique-engines.com |
Posted By: Steve_P
Date Posted: Aug/08/2007 at 7:11am
|
I haven't checked up on this in a while- what a bummer on the paint fiasco. I guess the mess with the wrong hardener (?) turned the original painter off on your car and he lost all interest in it. |
Posted By: billd
Date Posted: Aug/08/2007 at 7:20am
|
That is the theory we are operating under, yes. It was pretty much perfect to that point, then all downhill from there. I do believe had the first paint materials been correct, the whole thing would have been much better (perhaps not as good as TMC, but I wasn't looking for 1st place trophy trailer queen paint either)
------------- http://theamcpages.com" rel="nofollow - http://theamcpages.com http://antique-engines.com" rel="nofollow - http://antique-engines.com |
Posted By: billd
Date Posted: Aug/09/2007 at 4:28am
|
Talked to body shop a bit ago - supposedly can pickup car this evening. They didn't fix the "dents" on the top of the fenders as they'd hit my $$ limit on the other items, so it's STILL got the "dents" that I originally told Jeff to concentrate on, and he messed up. Arrrgh. Anyway, have appointment next Wednesday to get the vinyl top installed. Finally, then I can put trim on - oh, wait - still can't do that, not enough clips. Well, I'll have a vinyl top with no trim and have to make really sure the car stays inside as that will mean a couple dozen holes in the roof right over the new headliner. MAYBE, I can at least get the spoiler put back on and the hood reassembled with trim and RAM parts? ------------- http://theamcpages.com" rel="nofollow - http://theamcpages.com http://antique-engines.com" rel="nofollow - http://antique-engines.com |
Posted By: kirkwood
Date Posted: Aug/09/2007 at 5:06am
|
I wonder if the top shop would be able to find the clips - I'd assume they do a fair amount of tops and would have a source? ------------- AMO Newsletter Editor |
Posted By: ZX401
Date Posted: Aug/09/2007 at 5:22am
|
When I put my vinyl top on my Donohue I just used the same wire clips as the rest of the top molding used, and put sealer around them. As thin as the molding is and with the curves I think it will be hard for them to put the top on without also putting on the molding. Can you not repair and reuse the corner you have? I had to do that to mine. I have since found a pair of good ones, but took 4 years and they are scarce as hen's teeth.
Ed ------------- Make mine big and bad --- green! |
Posted By: PHAT69AMX
Date Posted: Aug/09/2007 at 5:22am
|
have ya tried
http://www.wurthusa.com/project/en/leftnavi/products/body-shop/body-shop.html - http://www.wurthusa.com/project/en/leftnavi/products/body-shop/body-shop.html
or
http://www.oemhardware.ca/catalog_auto.htm - http://www.oemhardware.ca/catalog_auto.htm
or
http://www.mrgusa.com/ - http://www.mrgusa.com/
or
Eddie Stakes Planet Houston AMX -------------  Link to a http://www.youtube.com/watch?v=MySiKQsmWxU" rel="nofollow - Short YouTube Burnout Video |
Posted By: billd
Date Posted: Aug/09/2007 at 5:31am
|
Well, I can ask if they have clips. No, the agreement was, and it sounds like they do this alot as it was their idea when I said it was stripped for painting, they install the top, trim it, and I put the trim back on. Mine was installed with some wire clips, some nylon. Nylon will seal better by far, and won't scratch the edge of the hole like the wire will when you push them in. Again, I'll hold off as long as I can, but want to do it once, and right ( at least right in my mind, anyway!) The extension trim has broken pin and was held in place with silicon, well, sort of held in place........ I'll have no choice but to install it broken (and spotted) but am afraid the first person who brushes against the car and snags it.......... I'll give those links a shot - gee, forgot about trying eddie. I have gotten stuff from him that others didn't have. Now there's 3 with ideas right in a row there! The spoiler had a foam ring or gasket around the hole that goes over the trunk lock, sort of like a shield between the spoiler and trunk lid. The old one was there, but sort of distorted. Can I use like that airconditioning foam weatherstrip and make a foam ring to go in there? I've not seen anyone carry those, although I got a set of the nuts and gaskets to mount the spoiler from one of the major vendors. My nuts were quite rusty and had to cut one of them off. Wow, left myself open there, eh? ------------- http://theamcpages.com" rel="nofollow - http://theamcpages.com http://antique-engines.com" rel="nofollow - http://antique-engines.com |
Posted By: billd
Date Posted: Aug/09/2007 at 1:44pm
|
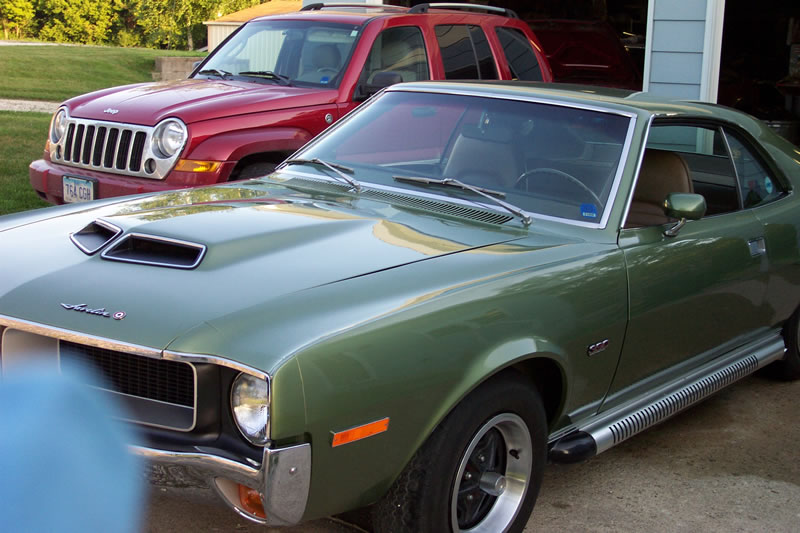
Car is home again. They did a nice job on the hood and trunk lid, and the chipped quarter. Wish the whole car finish was like the hood.
Started putting some more trim back on, and emblems, etc. Need to put the spoiler back in place after I decide what to do about the foam ring around the trunk lock. It looks almost naked without the spoiler.
   ------------- http://theamcpages.com" rel="nofollow - http://theamcpages.com http://antique-engines.com" rel="nofollow - http://antique-engines.com |
Posted By: purple72Gremlin
Date Posted: Aug/09/2007 at 2:04pm
| NICE! |
Posted By: Steve_P
Date Posted: Aug/09/2007 at 10:36pm
|
Bill: I make unavailable body and misc (not engine) gaskets using neoprene rubber I buy from mcmaster. The right thickness and a gasket punch does the trick for me. The car is looking good
|
Posted By: billd
Date Posted: Aug/09/2007 at 10:46pm
|
Thanks. I'm not happy with how the marker lights are sitting. I bought replacements (identical down to all marks, numbers and dates) that come with a full-length gasket where the originals had a slightly thinner gasket that went around only the square bulb part, not full length. The lights stick out a bit in the middle due to the gasket and it's thickness - after all, the lights are only plastic, even the "chromed trim" is plastic, so they flex a bit when you install them. I think I'm going to go back to the original style gasket behind the markers and scrap what came with these lights. They just seem too thick and bulky. In fact, in the photo, you can see how the one light sticks out in the middle. Bugs the heck outta me. All the SEL guys like McMaster-Carr, can get almost anything there it seems. gaskets, sealers, fasteners, etc. and when restoring 100 year old stuff, we need all the help we can get on special items. ------------- http://theamcpages.com" rel="nofollow - http://theamcpages.com http://antique-engines.com" rel="nofollow - http://antique-engines.com |
Posted By: PHAT69AMX
Date Posted: Aug/10/2007 at 12:27am
|
Coming toether very nicely Your story is why I've hesitated to get my entire car painted in 22 years of ownership
Have had quarters fixed and paint blended to top of quarters,
Truink Lid, Hood, front Fender Extensions painted,
but fear "body shop limbo" and all those pesky little pieces
required for the post painting re-assembly.
But once all the hurdles are cleared, it does look very "handsome" ------------- Link to a http://www.youtube.com/watch?v=MySiKQsmWxU" rel="nofollow - Short YouTube Burnout Video |
Posted By: 70MarkDonohue
Date Posted: Aug/10/2007 at 12:30am
| I put over 100 lbs on top of one gasket to flatten it, it didn't work. |
Posted By: Ohio AMX
Date Posted: Aug/10/2007 at 1:23am
|
It's looking GREAT! You're on the home stretch now. ------------- 1940 Hupmobile Skylark 1968 Javelin future Pro Street 1969 AMX 290/auto (first car) 1997 Dodge SS/T 5.9L AMO# 983 |
Posted By: 70 Donohue 390
Date Posted: Aug/10/2007 at 10:49am
|
Nice paint match! Did they blend the fenders & quarters? If not you have found the right shop. NONE of my Javelins have had sidemarker gaskets ------------- 67 Rogue 290 Convert 70 BBO 390 5 Speed Javelin-under construction |
Posted By: billd
Date Posted: Aug/10/2007 at 1:28pm
|
They pointed out what they did. On the hood, they blended over to the edge of the tops of the fenders.
On the right quarter where there was a chip out (Jeff said "an extension cord hit it, must have been a heck of a cord) they blended into the right door a ways.
On the trunk, they went over to the edges of the quarters and up a few inches beside the back window. I could sort of see a bit of "halo" where the clear stopped, but that will be under the vinyl top.
As far as color match, I can't tell at all. The metallic effect is perfect as far as I can see - I can't see the difference between painters or guns, etc.
I can't tell by color or metallic effect where they stopped and started.
I'm told they are one of the best "color matching" shops in the Des Moines area. It doesn't hurt that they used the same paint brand, same formula and the other paint wasn't aged, still matching metallics isn't exactly simple, IMO. I was just looking at it again tonight after we got home from the fair - I'm very pleased with what they did and how they blended it in.
Can't wait to get the rest of the trim on it.
The challange - the c-strip kit. Do I do it, or pay them $50 to do it - they said they'd do the stripes for $50, said it would take about an hour.
I still have the original marker gaskets, I should take a pic and post it, see if they are TRULY stock original.
Too bad the marker light screws are rusty! ------------- http://theamcpages.com" rel="nofollow - http://theamcpages.com http://antique-engines.com" rel="nofollow - http://antique-engines.com |
Posted By: Beavis
Date Posted: Aug/11/2007 at 12:05am
|
Spend the fifty and get the stripes put on, unless you know you can do it without wrecking them. $50 to me doesn't sound too bad for that.
------------- 1968 Javelin SST w/ 401 and other mods 
|
Posted By: bigbad69
Date Posted: Aug/11/2007 at 12:40am
|
Installing the stripes is not that difficult, but it takes some finesse. If it's not perfect, it will detract from an otherwise outstanding car. Unless you have applied lots of these stripes in the past, there is a good chance something could go wrong. $50 versus the replacement cost of the stripes sounds like cheap insurance to me.
------------- 69 Javelin SST BBO 390 T10 |
Posted By: prostreetamx
Date Posted: Aug/11/2007 at 1:15am
|
I have found that the nut and bolt speciality stores around here are stocking many different clips. I found the ones I needed for the hood chrome on my 72. They were'nt cheap as they were packaged indiviually, but I only needed 4 more. The also have lots of the plastic clips. These are the normally wholesale bolt shops that also sell to the public. The replacement side marker lights are actually the same lights used on big rigs for many years. They were produced in huge lots by the same company that made them for our cars. They used the full gasket when used on a rig. You could probably just trim the larger gasket to the correct size or just buy some generic foam gasket material and cut your own. ------------- Richard Payne Las Vegas,NV 72 5.7 Hemi Javelin 77 Prostreet 401/727 AMX,  [/URL] [/URL]
|
Posted By: billd
Date Posted: Aug/11/2007 at 3:56am
|
Funny you mention about the lights - it was a trailer company "out west" that was the source I bought from. Yeah, standard stuff, but all the markings and numbers were exact and other than the new being not pitted or marred, identical. Lucky.
And on ebay they sell them as "NOS" for quite a premium! Yeah, right.
Yeah, I'll try trimming.
I'm REALLY strongly considering letting them do the stripes for that. Ha, would take ME longer than an hour, and no, I've not done decals that large or long. ------------- http://theamcpages.com" rel="nofollow - http://theamcpages.com http://antique-engines.com" rel="nofollow - http://antique-engines.com |
Posted By: kirkwood
Date Posted: Aug/11/2007 at 7:45am
|
looking good bill!
Now If I could ever see a picture of this car with clean tires... ------------- AMO Newsletter Editor |
Posted By: PHAT69AMX
Date Posted: Aug/11/2007 at 8:44am
|
yeah, I was thinkin' "scrub them tires" too ------------- Link to a http://www.youtube.com/watch?v=MySiKQsmWxU" rel="nofollow - Short YouTube Burnout Video |
Posted By: billd
Date Posted: Aug/11/2007 at 9:11am
|
I need to pull the wheels and clean them up, and I've got new "decals" for the center caps.............. at the same time, I'd probably shoot a bit of black under the fenders and in the wheel wells.
Yeah, the tires are filthy, almost gray/brown they're so bad.
I agree, fellas.
I need like 55 clips for this thing! For the vinyl top trim and the right quarter window beltline molding. I hope I counted right, I think the top alone takes like 53 clips!
Got the ram air stuff back in the hood. Need to figure which way is up on the repop insulation (see question in restoration section) ------------- http://theamcpages.com" rel="nofollow - http://theamcpages.com http://antique-engines.com" rel="nofollow - http://antique-engines.com |
Posted By: billd
Date Posted: Aug/12/2007 at 1:13pm
|
OK, correction and clarification on the marker lights. The fronts had NO gasket, the rears had a gasket that went around the square part that protrudes into the trunk. To seal water out of the trunk, I'm sure. So I removed the gaskets completely on the front markers and they pull into place nicely. I cut the gaskets for the rear to match the originals, but won't mount them probably until I patch up the paint in the trunk. I'm told there's a place in DSM that can match any trunk spatter paint.
Barbara agrees - pay them the $50 to do the stripes and be done with it.
The paint on the bottom-side of the hood sucks, Jeff did a terrible and blotchy job on that part. Luckily, the insulation covers much of it, but I'll have to fix some of it myself, I guess.
I'm including this shot so you can see how hot and humid it's been, yes, that's fog on the camera lens. I had to keep wiping it off! It was so humid, there was fog on the house windows - on the outside.
Anyway, foggy camera lense - later, you get a glimpse of the rag I used on the lense.............
 Yes, the bottom of the hood is bad, but the camera flash and lighting made it look much worse. I'm also short one clip that holds that front rubber strip. Anyone got an extra? Just need one! They are smaller than others used as far as the holes they fit into.
 I LOVE this shot! Got a good used ram trim piece, and a NOS piece and was SO careful installing them. Luke helped repaint the emblems suchh as the SST, the 390 and the targets, and they turned out pretty decent. I repainted the black on all the trim and emblems using a couple tricks I'd used on my old engines.
 Tires washed just for kirkwood and others.
Still need to mount the spoiler after I chase the threads on the mounting studs. Need to figure out how to get the antenna lead back in, and put the right door back together. They wanted the outside handle and trim removed to blend repairs.
 ------------- http://theamcpages.com" rel="nofollow - http://theamcpages.com http://antique-engines.com" rel="nofollow - http://antique-engines.com |
Posted By: kirkwood
Date Posted: Aug/12/2007 at 1:26pm
|
That is really looking sharp! ------------- AMO Newsletter Editor |
Posted By: Mountainmoron
Date Posted: Aug/12/2007 at 3:11pm
|
Looks great, billd! ------------- '69 AMX 390EFI, AMO #9412 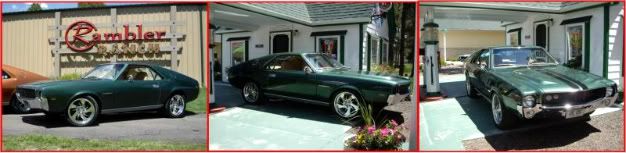
|
Posted By: 72Javelin
Date Posted: Aug/13/2007 at 9:48am
|
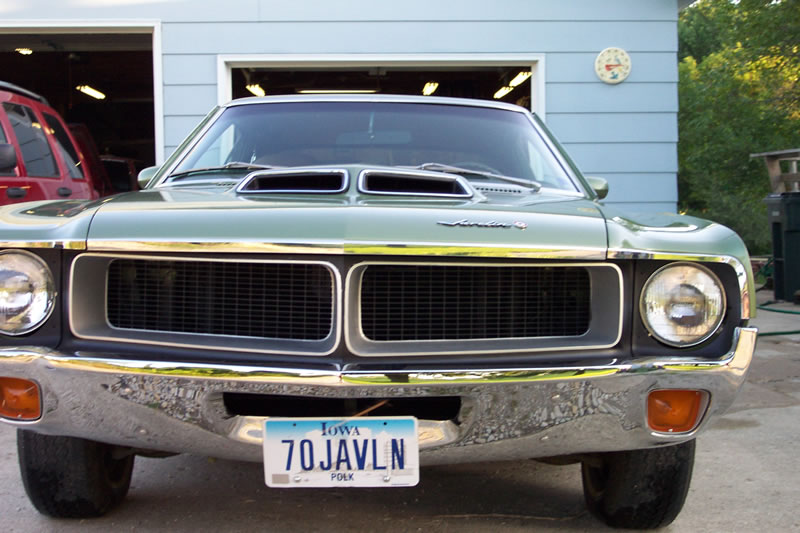
Lookin' good Now go tidy up that front license plate--it's crooked!!  ------------- Jeff Reeves Auburn, GA AMO Technical Editor Currently AMC-less after 30+ years |
Posted By: billd
Date Posted: Aug/13/2007 at 12:51pm
|
It had a nasty plate bracket when I got it, the one I got was also bent, I straightened it best I could, but it's not perfect. Where and how it's bent is near impossible to further straighten....... I was looking for a better one, but geesh, the prices! Just for a bracket - probably because they are VERY vulnerable where they sit.
------------- http://theamcpages.com" rel="nofollow - http://theamcpages.com http://antique-engines.com" rel="nofollow - http://antique-engines.com |
Posted By: PHAT69AMX
Date Posted: Aug/13/2007 at 5:13pm
|
Does the single clip you're looking for look the same as the ones used
to hold the bottom radiator rubber seal strip to the radiator crossmember ?
Guess the one you're looking for is for the seal strip on the hood ?
The ones that hold the bottom radiator seal are the same as an obsolete Ford Part.
Was gonna say something about the plate, but thought better of it.
Car is looking quite "pretty" ... er ... "handsome".
When one looks this good, the little things jump out at ya is all. ------------- Link to a http://www.youtube.com/watch?v=MySiKQsmWxU" rel="nofollow - Short YouTube Burnout Video |
Posted By: billd
Date Posted: Aug/13/2007 at 10:31pm
|
Not sure how to handle the crooked license plate. Two options - one is to elongate a hole in the plate, but then I'd know it still isn't right. The other is to remove that bracket for like the 5th time and try again to straighten it. It's bent in a bad place to try to correct. You should have seen it when I first got the bracket! The clips I believe are essentially the same, but I'm thinking maybe they are smaller to fit into smaller holes as I have a set that look nearly the same, but they are a tad wider (so they don't fit the holes) and the "wings" aren't as long. Shorter and fatter, otherwise the same. I replace the bottom strip and never really did compare! I only need one! OK, guys - I'll work on the plate bracket! It's going to be dropped off after work tonight to have the vinyl top put on tomorrow. Still lacking correct clips so not sure when I can get trim back on. In the meantime, it's got to stay CLEAR of rain! Those holes lead right to the headliner.... ------------- http://theamcpages.com" rel="nofollow - http://theamcpages.com http://antique-engines.com" rel="nofollow - http://antique-engines.com |
Posted By: billd
Date Posted: Aug/14/2007 at 4:25am
|
Spent my lunch hour+ shopping around body suppliers in Des Moines. It's hot and the lunch-crowd traffic is BAD. What made it worse, no luck on clips.. No one had anything even close for the vinyl trim clips, nor the quarter window belt-line trim. Not even the metal ones. Skunked, no clips at all. They were my last shot at getting anything locally - they supply the other guys. Stuck for want of two nylon clips for the quarter window trim and about 20 for the vinyl top trim. One fellow said if he could get them, I'd have to buy 100. I said, GREAT, I'd sell the extras and get my money back! But no luck. ------------- http://theamcpages.com" rel="nofollow - http://theamcpages.com http://antique-engines.com" rel="nofollow - http://antique-engines.com |
Posted By: PHAT69AMX
Date Posted: Aug/14/2007 at 4:55am
|
This is the lower radiator seal clip, available from Mr. G's
There's an obsolete ford parts place in Cin, Greene Sales, they had'em too.
Made of metal, think it is for a 3/16 dia. hole, top is 5/16 x 1-1/16.
------------- Link to a http://www.youtube.com/watch?v=MySiKQsmWxU" rel="nofollow - Short YouTube Burnout Video |

Posted By: billd
Date Posted: Aug/14/2007 at 5:05am
|
Yup - that's exactly what I have in the middle hole as I was one short of the originals. 2 minor picky little problems - they are not original style or size I don't have enough of that type, either........ So, since I was short by one (1), I used one of the style the lower rad seal came with, and that's what you posted in the photo. I'd rather go with the original style since I'm short anyway.......... and will have to buy and pay shipping. Anyone parting a Javelin or AMX with A/C ? Otherwise, I guess I'll have to buy a couple of those to make a set of 7. Ha, now I know where to get that style! ------------- http://theamcpages.com" rel="nofollow - http://theamcpages.com http://antique-engines.com" rel="nofollow - http://antique-engines.com |
Posted By: billd
Date Posted: Aug/15/2007 at 10:46pm
|
Well, I THOUGHT I was going to put trim on last night. I found clips that "MAY" work, and picked up the car from the top shop. Never even looked before taking off as the traffic was HEAVY and it was getting late.
I set the trim on the car and got this sinking feeling....... OMG, they trimmed it wrong!
The nice white vinyl top doesn't cover everything it's supposed to at the back where it comes to a point. And they didn't trim enough in several places up front.
Once again, "it's going back".
Barbara says that car is jinxed as every step of the way, major problems, expensive problems.
This time, I even took it to one of the best shops in this area (not saying much, this is DES MOINES, after all)
I decided to put the trim on myself partly as I didn't have clips then, and partly because I wanted to clean and primp it and do it real carefully. Otherwise, I told them "don't care, whatever it costs".
So I'm on the road today setting up networking in a new office, but will TRY to get the car back in to have them do it all over again! Since they trimmed the back too small, they will have to totally replace it!
(Barbara is NOT a happy camper right now, NOTHING has gone well, or right the first time on this thing. My luck they'll screw up the paint redoing it!) ------------- http://theamcpages.com" rel="nofollow - http://theamcpages.com http://antique-engines.com" rel="nofollow - http://antique-engines.com |
Posted By: luked
Date Posted: Aug/16/2007 at 5:39pm
|
Am I wrong in assuming this, or is the problem that many of these mechanics, auto detailers nowadays really don't care that much about craft in their profession. Sure seems that way. I mean, I know there are really good people out there, but it seems to be less and less. And with people in such a hurry too, the customers seem to care less and less about quality as well. Just...too many things seem like lazy work, and less like mistakes or just "unlucky". In my own area of design, a lot of times from other colleagues I hear the "well, it's good enough", and shove it out there. Um, no it's not. We may be human, but standards sure seem to be slipping everywhere. Sorry to hear about this dad. |
Posted By: billd
Date Posted: Aug/16/2007 at 10:43pm
|
There is one reason - get 'em in and get 'em out and collect. There are few true "craftsmen" in many trades today. Odd on this top - if you look at it from the side, a proper job the vinyl would follow the horizontal body lines all along the quarter panel. Had they done that, it would have been fine, holes or no holes to go by. But to go 4/5 of the way back, then work upward with the cut, well, think - would the designer do that? No. They followed the flow of the body line. I was beginning to think, well, how could they know, they didn't have the trim, then I stood a few feet from the side and looked - looks like heck when it doesn't follow the body line! It should have been obvious. The designer of the Javelin was an artist, the lines flow quite smoothly and are simple and appealing. There's no "jut" anywhere. Well, they said it would be a few days, have to order the top again. But I took it back yesterday and said keep it until it's done. I also left with them ALL of the remaining trim - for the top and the rest of the car, so there's no excuse! I'm getting anxious with Cordova meet coming up...... OTOH, driving that beast around lately on these missions, it sounds SO sweet! It really is a trip back to the 60's and 70's with the sound it has. Love to go over a bridge and give it some gas and here it talk back to me as those side pipes echo off the bridge sides. ------------- http://theamcpages.com" rel="nofollow - http://theamcpages.com http://antique-engines.com" rel="nofollow - http://antique-engines.com |
Posted By: kirkwood
Date Posted: Aug/16/2007 at 11:54pm
|
Well at least it is getting close to being done. Did they have an excuse for not getting it correct? Also, did they say anything about the trim clips? What would they do if you brought a car to the and had them do the entire top? (maybe I don't want to know what they would do!) ------------- AMO Newsletter Editor |
Posted By: billd
Date Posted: Aug/17/2007 at 3:21pm
|
I was shocked to get a call this afternoon about 3 - the top was replaced and ready (I still need to reinstall trim)
Two issues now, (well, 3, but the third is minor)
I seem to be missing a piece of the trim since I picked the car up. I HOPE it's still in their shop on a bench somewhere! As I KNOW there's no way in he $$ to get a replacement, ever.
The paint has lifted off a small area right behind the right quarter window - down to bare steel. PISSED as heck. It's right at the edge of the vinyl and I *think* I can repair it myself and it will be hidden, but makes me wonder, what else...................
The vinyl still wasn't trimmed small enough in several areas - they apparently don't realize, even after I put all the trim in the car, just how narrow that trim is - how little it covers, or, they didn't want to trim it that close unless they were putting the trim back on.
So, tomorrow, I'll see if they are even open on Saturday and ask if they have that piece of trim there. Otherwise, I'm screwed.
Oh, also put the spoiler back on tonight. Not a bad job, but had to be VERY careful to line the bolts up and not scratch anything. In the process, the spoiler was unwrapped from the blanket it was in for the first time since I picked it and the car up in MAy - the bottom edge of the back of the spoiler has no paint, only primer, and the leading edge - front, next to trunk lid, is rough. So more paint work to do there!
Can a person get clearcoat in a spray can? I've got a cup or so of the left-over paint to touch-up the bottom edge of the spoiler (seen only when trunk is open) and that roof area, but hate to buy a whole quart of clear if I can get a decent clear for that purpose in a can. Esp since it won't be exposed to the elements that much, and it's such a tiny area, seldom seen, and the lifted paint will be mostly under the vinyl top trim.
If I had the money, energy and time, I think I'd be pursuing a lawsuit. ------------- http://theamcpages.com" rel="nofollow - http://theamcpages.com http://antique-engines.com" rel="nofollow - http://antique-engines.com |
Posted By: Mountainmoron
Date Posted: Aug/18/2007 at 2:07am
Sounds like you would have grounds for one. I hope you find the missing trim piece!
As for buying a small amount of clear coat, see if your local auto body repair store sells SEM clear coat and buy an 8 oz. can of it. You can then buy a Preval Spray Gun, which amounts to a glass jar screwed onto a Preval Power Unit -- fancy name for a fancy aerosol sprayer.
The glass jar is reusable. You can buy as many aerosol Power Units as you need to finish the job. Very economical (probably less than $30 for everything) way to get professional looking paint touch-up when you're only dealing with a small area. ------------- '69 AMX 390EFI, AMO #9412
|
 billd wrote:
Posted By: billd
Date Posted: Aug/18/2007 at 3:12am
|
I have an airbrush, wonder if I could use that for this SMALL area and the edge of the spoiler?
I think next year I need to take it in to TMC and have the roof redone - repainted.
I kept the trim bundled until just before putting it in the car so they'd have it to check the vinyl edge. I"ll look again here, but that's the only place there it wasn't in one of two other spots - bundled with rubber bands on top of cupboards in my shop, or sitting on the tail of the Eagle which sat next to the Jav.
If it weren't for bad luck, I'd have no luck at all with this car! ------------- http://theamcpages.com" rel="nofollow - http://theamcpages.com http://antique-engines.com" rel="nofollow - http://antique-engines.com |
Posted By: kirkwood
Date Posted: Aug/18/2007 at 7:02am
|
I've found that clear doesn't flow very well out of an airbrush. RM makes some cut in clear in a spray can that isn't bad - Something AM1000? ------------- AMO Newsletter Editor |
Posted By: billd
Date Posted: Aug/19/2007 at 4:57am
|
Got all the trim, still looking for clips, however as those I bought at an autobody supply place don't grip the body so leave everything REALLY loose.
Got a wanted ad with pictures for that - need 20+ metal spring type clips.
Trying to figure out now how to address that lifted paint........ will probably just do what's needed to prevent rust since it will be under the trim.
It's the size of half a penny.
Also need to touch-up trunk bolts and hood nuts, etc where the paint is scratched from the installs.
Now to go back out and figure out the antenna lead routing!
Thanks for the tip in the clear - I know a couple places I bet that carry that, or can get it. ------------- http://theamcpages.com" rel="nofollow - http://theamcpages.com http://antique-engines.com" rel="nofollow - http://antique-engines.com |
Posted By: Steve_P
Date Posted: Aug/20/2007 at 3:42am
| bill- you can get a lacquer or enamel clear in a spray can. But what's on the car has a hardener added and is going to be about a million times more durable. You can buy omni (I think it's "shop line" now) clear by the quart and it's very economical and very good quality compared to PPG, Dupont, etc. If you don't want to do this I would ask the painter at shop that did your last round work if he'll give you a pint of clear and half pint of hardener for touch ups. Did they give you the extra base coat? If not I'd ask if they had any and saved it. |
Posted By: billd
Date Posted: Aug/20/2007 at 4:22am
|
Yes, I got what feels like nearly a couple cups worth in the can they
gave me of the green base. Plenty for small touch-ups. Their match of
color was perfect. He told me: "The number you gave us ended up being Omni, it's so cheap they don't guarantee it and so was can't guarantee the paint either but do guarantee our work as always". He basically said it was the "cheapest" paint they work with. Got a real warm-fuzzy........ I could drop by and check into a bit of the clear, but I wonder, for the tiny spots I've got if attempting to mess with the bc/cc would be worth it? the bottom edge of the spoiler which sees no sun unless the trunk is open, and the small spots are actually almost too tiny to spray except with an airbrush. The amount of paint that sticks to the sides of an empty pot would be more than enough to cover these areas! Guess I could go get their thoughts on it..... ------------- http://theamcpages.com" rel="nofollow - http://theamcpages.com http://antique-engines.com" rel="nofollow - http://antique-engines.com |
Posted By: ZX401
Date Posted: Aug/20/2007 at 1:05pm
|
I realize it is not "car paint" but you can do small touchups with Krylon clear and buff it gently by hand. Try it on some scrap - you'll see. Only thing, of course is it is not catalyzed so don't spray back over it with catalyzed paint. ------------- Make mine big and bad --- green! |
Posted By: billd
Date Posted: Aug/21/2007 at 12:25am
|
Still trying to decide on best way to "touch-up" the tiny dings, and deal with that lifted paint area. Removing the loose paint, it's up to the size of half a quarter now. Most of that under the edge of the vinyl. Still need to order: Trunk lid jack and spare tire use decal (no one seems to have those, not even AMARK! (at least not a good, proper one that is clear and has the correct images)) I have a VERY good original if someone wants to reproduce. It's too large to scan on my scanner, which does only 8.5"x11" so I'd have to scan elsewhere http://theamcpages.com/images/javelin/trunk-decal.jpg - http://theamcpages.com/images/javelin/trunk-decal.jpg Emissions decal for firewall (AMARK has an EXCELLENT one!!!!! That's where I'll get that decal) Not sure where tire pressure decal would go, my car didn't have one when I got it. I see AMARK also has the shifter knobs - mine is dinged (I did it) I think perhaps I've found the vinyl trim thanks from a forum member. And the clips, I hope will work finally are probably on their way. This has truly been a forum project! If it weren't for forum members and friends, there's no way it would have all the parts needed. And some of the advice on correct colors for parts, finishes for parts, etc. it wouldn't be as nice as it is. It may be "my car" but the forum members and others need to pat themselves on the back, too. Several people have been invaluable in their restoration facts and info. Countless others for odds n ends parts and hardware, NOS backup lens and good used housing from badx - and paint formula from xracer390 (formerly known as wagonslayer). Down to the final details now. The front seats will have to wait until next year, as will the suspension (rear springs, front suspension bushings, etc. I see the lower spring seat bushings are well-worn) ------------- http://theamcpages.com" rel="nofollow - http://theamcpages.com http://antique-engines.com" rel="nofollow - http://antique-engines.com |
Posted By: bigbad69
Date Posted: Aug/21/2007 at 12:43am
------------- 69 Javelin SST BBO 390 T10 |
Posted By: billd
Date Posted: Aug/21/2007 at 1:23am
|
I guess I meant for sale, like someone wants to reproduce it and sell to others......... however, I'll use your tip! There is a graphics shop near the fairgrounds on our way home from work that states they will print anything on anything... I think you just saved me some time! These appear to be a heavy paper, but no, not really paper either as it's been wet and wrinkled, and I ironed it (don't tell Barbara I used her good iron for my car stuff) ------------- http://theamcpages.com" rel="nofollow - http://theamcpages.com http://antique-engines.com" rel="nofollow - http://antique-engines.com |
Posted By: billd
Date Posted: Aug/21/2007 at 3:50am
|
Just spoke with Craig, the owner of TMC (where the hood and trunk lid were redone) I explained the spots that needed "touch-up" including the lifted paint spot. He said "get yourself two glass jars with lids that seal and bring them in....." Steve knows the rest........ He said I could touch up with a fine brush and let it dry the xx hours, brush on some clear with hardener and could buff it out. I'm to call Wednesday afternoon to see if they can put the stripes on Thursday. ------------- http://theamcpages.com" rel="nofollow - http://theamcpages.com http://antique-engines.com" rel="nofollow - http://antique-engines.com |
Posted By: Steve_P
Date Posted: Aug/21/2007 at 6:37am
|
Bill: Omni is good stuff; don't let anyone tell you otherwise. I've used almost their entire line of products for 3+ years with excellent results. I also use PPG and Glasurit. The only issue is that some of Omni's basecoats (like red) don't cover as well as the higher $ ones. So you have to put on more for full coverage. They don't warantee it IMO so you might opt for PPG. But, the bottom line is that 99.999% of the time you will not get a paint problem warrantied- problems are truly user error that %. Anyway, I put Omni BC/CC on my daily drivers roof and hood ~3 yrs ago. It sits outside 365 days a yr and has held up beautifully. It should last an occasional driver that is garaged 100 yrs at that rate. From what I've read from long term users, it's 95%+ as good as PPG at ~50% of the cost.
The negatives overall with omni is that it probably doesn't have as much UV resistance in the clear as high $ clears (but you used the BC so don't worry), and that the build primers shrink a little more.
edit: what is up with the "lifted" spot? That doesn't sound good. Did it lift after it dried, or ?
If you have left over hardener shoot some MIG gas in the jar before sealing it up and it will last forever. If you don't do this it will go bad within a yr, maybe much sooner.
|
Posted By: billd
Date Posted: Aug/21/2007 at 6:49am
|
That's pretty much what the body shop told me - for this car, it will last my lifetime. It won't get sun but a few days a year, at shows, etc. or for fun drives. I took it in but really won't worry about it. The clear is the first defense, anyway..... OK, that lifted spot. That's an area where the roof/quarter was taken to bare metal because the vinyl roof installers in the 1990's when they trimmed the vinyl cut DEEPLY, clean through the paint below, and it left a thin line of rust all the way around the vinyl. He (Jeff) took it down to bare metal to treat that line of rust (very thin - like the sharp edge of a knife blade wide) That's the original Jeff paint part. So I get it back from TMC and getting the trunk lid and hood redone and that ding on the right quarter, about belt-line fixed. I take it to Iowa Auto Top to get the vinyl put on. I get the car back and find they cut the vinyl wrong, with trim on, the vinyl would not cover all it was supposed to, and other places, they didn't trim near enough, but I can fix that part. Basically, they trimmed the top to small at the back. This was Wednesday. I took it back Thursday and left it. They replaced the top on Friday. I picked it up and when checking to see if I needed to trim more, saw a funny look to the edge of the vinyl on the right, just behind the right quarter window. I saw it was paint that was lifted - stuck to the vinyl top and lifted clean off the steel. So apparently when removing the wrong-cut top and putting this one on, the paint came up with the vinyl in one spot, the paint was stuck to the vinyl but not the steel in a small spot. Apparently it didn't stick there - poor prep, whatever. It's right where the trim will go, and back up under the vinyl like 3/8" inch. ------------- http://theamcpages.com" rel="nofollow - http://theamcpages.com http://antique-engines.com" rel="nofollow - http://antique-engines.com |
Posted By: billd
Date Posted: Aug/21/2007 at 6:50am
|
MIG gas? about the only gas I get is from peppers............ I have an old AC arc welder, old skool stuff. Acetylene work? Not inert, I know! ------------- http://theamcpages.com" rel="nofollow - http://theamcpages.com http://antique-engines.com" rel="nofollow - http://antique-engines.com |
Posted By: Peter Marano
Date Posted: Aug/21/2007 at 1:42pm
| Bill, put a chunk of dry ice in the can. But wait for it to sublimate! |
Posted By: billd
Date Posted: Aug/21/2007 at 2:45pm
|
I'm talking SMALL jars, a garlic jar for the clear coat, and a smaller jar, smaller than babyfood for the other. So I guess a SMALL piece of dry ice!
Now if I wait for it to sublimate (turn to vapor for those wondering if we are talking dirty), there wouldn't be any dry ice, would there?
I need so little, plus I don't have any larger jars with decent lids, unless I borrow some of Barbara's pint pickle/canning jars.
That is a good idea, and the local grocery store carries dry ice. ------------- http://theamcpages.com" rel="nofollow - http://theamcpages.com http://antique-engines.com" rel="nofollow - http://antique-engines.com |
Posted By: billd
Date Posted: Aug/23/2007 at 1:41am
|
Well, no stripes this week, they said they are too busy to do it this week. I don't have the trim on to cover the holes anyway, and with the constant heavy storms and all the rain.......... I wouldn't take it out of the garage anyway. ------------- http://theamcpages.com" rel="nofollow - http://theamcpages.com http://antique-engines.com" rel="nofollow - http://antique-engines.com |
Posted By: Mountainmoron
Date Posted: Aug/23/2007 at 2:05am
Just tell them it's a Javelin and they'll get you right in. It works everytime! ------------- '69 AMX 390EFI, AMO #9412
|
Posted By: billd
Date Posted: Aug/29/2007 at 1:08am
|
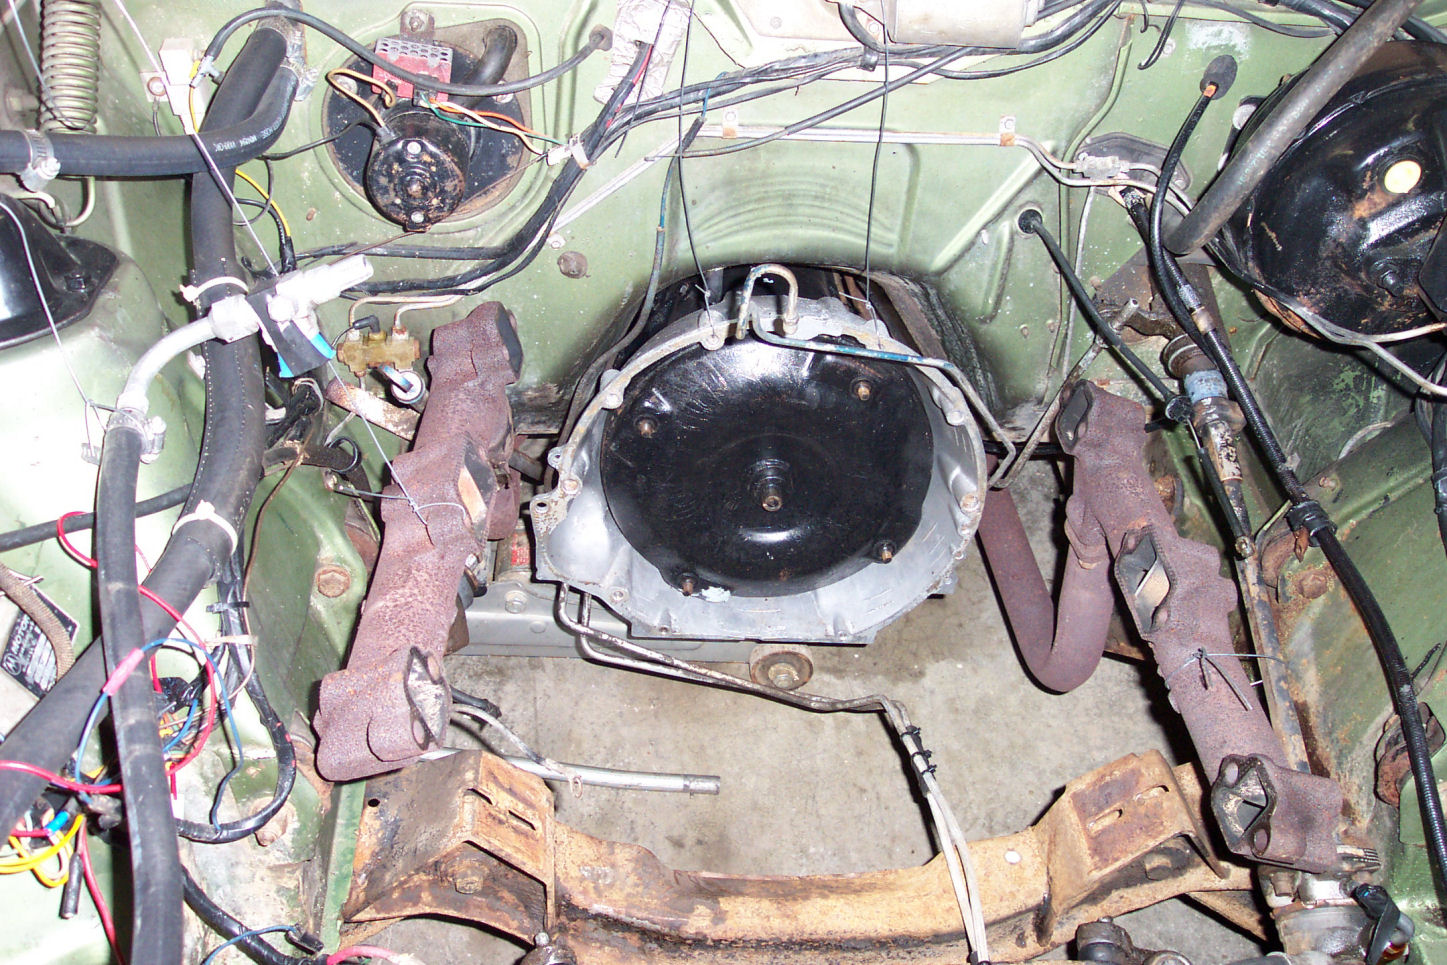
We won't comment on the stripes here other than to say, they tried but couldn't do it due to stripe quality and adhesive issues. I got the blower motor all cleaned and painted, powdercoated the master cylinder cover, painted the master black as well. I slide a couple pieces of plastic from a jug under the bail when I put the cover back on, and polished the brass rivets on the blower then put a dab of grease on each when I painted the motor. I replated the through-bolts so they would be nice and silver when I put the blower back together, new gasket between motor and mounting plate. Also cleaned and plated the blower motor resister housing. Need to aim headlights (gotta look up how since it's been so many years since I used to do that, and then I had headlight adjusters that made it easy) and replace some bulbs - not sure if connections or bulbs but one marker is out now and two tail lights quit. 37 years old, could be a ground or sockets could need more cleaning inside. Oxide of almost anything is a decent insulator. Any thoughts on what sort of screw held the blower motor ground wire, and to where? I think I know, want to confirm. ------------- http://theamcpages.com" rel="nofollow - http://theamcpages.com http://antique-engines.com" rel="nofollow - http://antique-engines.com |
Posted By: billd
Date Posted: Sep/03/2007 at 6:42am
|
Can I say wooo-hooo?!
The Zolatone paint was as good a match as I figure you can get for the 70 AMC trunk short of finding the original formula and having the original maker(s) start production again.
I gotta say, however, the look of this paint has EVERYthing to do with the gun and all the settings, and the person spraying it. I could get nearly every effect under the sun as I played with the pressure, air and fluid flow, and turned the screw that changes from suction to pressure. Wow, that alone changed a lot in the way it looked. Thus, MY part is less than perfect in spots, but in places, I was not able to easily tell a difference between the original and my "touch-ups". I got heavy at times on the "gray" parts (almost gray, not really gray) and there's too much effect in places. But, I noticed the factory did the same! At the back there was a lot more spackle effect and more "background" as it went forward, so I wasn't the only one playing with the gun as they sprayed.........
My trunk (spare and jack use) decal turned out great if I do say so myself. It's crisp and clear. I used a clear acrylic on the white paper I printed it on. Sprayed several thin coats on each side, letting it completely dry between coats. I used my wifes quilting tools - rotary cutters, mat, rulers, and her super good scissors to cut it to shape and a 3M spray adhesive to put it on.
Photos soon - but it's REALLY hard to get good photos of that trunk due to the paints - it reflects camera flashes weird.
Back at it - finishing the painting of the barn floor today, too. This IS why they call it labor day, right? ------------- http://theamcpages.com" rel="nofollow - http://theamcpages.com http://antique-engines.com" rel="nofollow - http://antique-engines.com |
Posted By: billd
Date Posted: Sep/03/2007 at 2:27pm
|
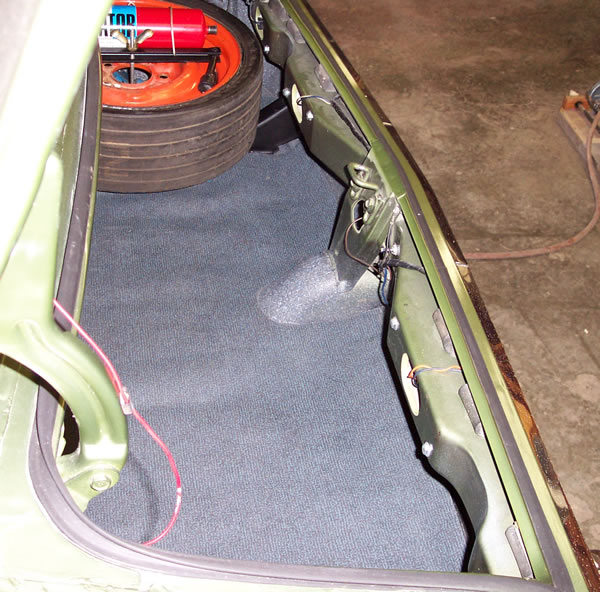
More progress on the car that's jinxed.......... photos and explanations. Oh, if you happen to see something amiss in the way I've put the spare, etc. in, please let me know. I went by the decal as things didn't seem quite right 2 years ago -who knows how many times it had been out and in, many of them incorrect.
First up, photo of my home-made trunk/jack instruction decal. Not bad at all. It's as crisp and clear as the original. The difference being the paper it's on, I'm sure. 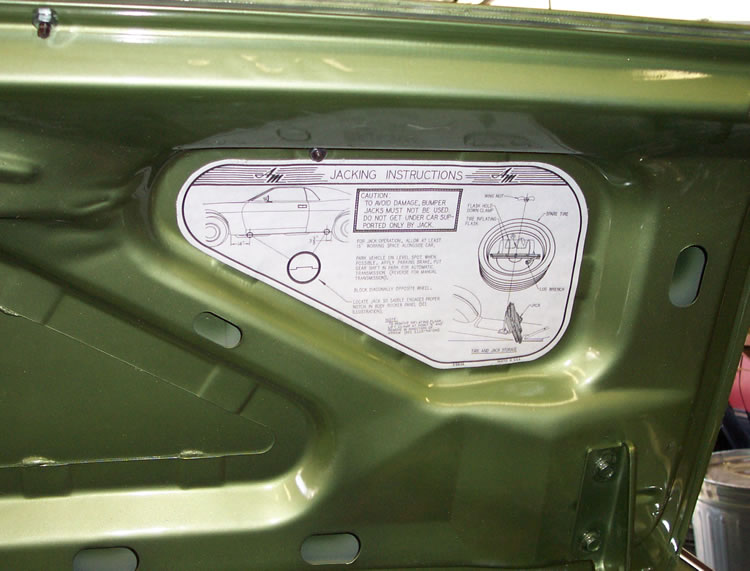 Here I'm attempting to show how well the paint I got can be made to match the original. Flash just doesn't do it justice and changes the colors and hues. My camera is NOT good at colors or color match! The paint was great, the operator, well, a GOOD painter could have matched it better, but I suspect few will notice.
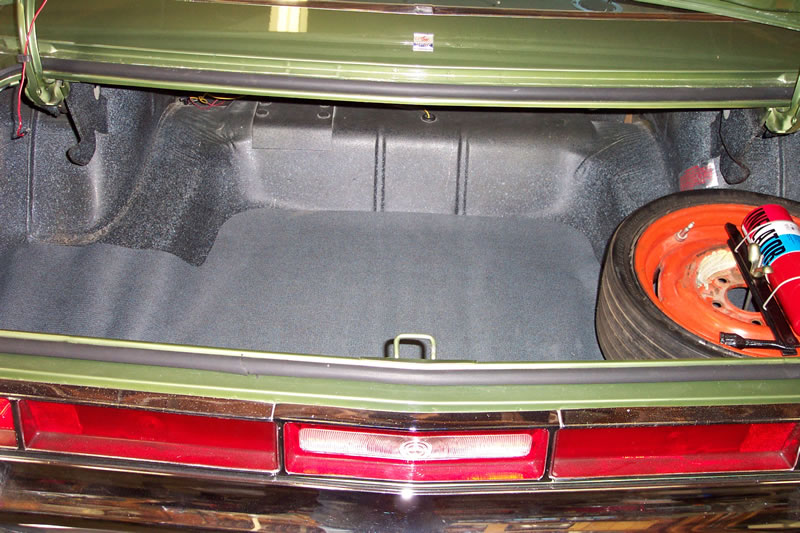
 Below - if I could match that orange of the wheel, or find a good replacement decal for the spare wheel, I'd probably repaint it this winter, but it will have to do for now.
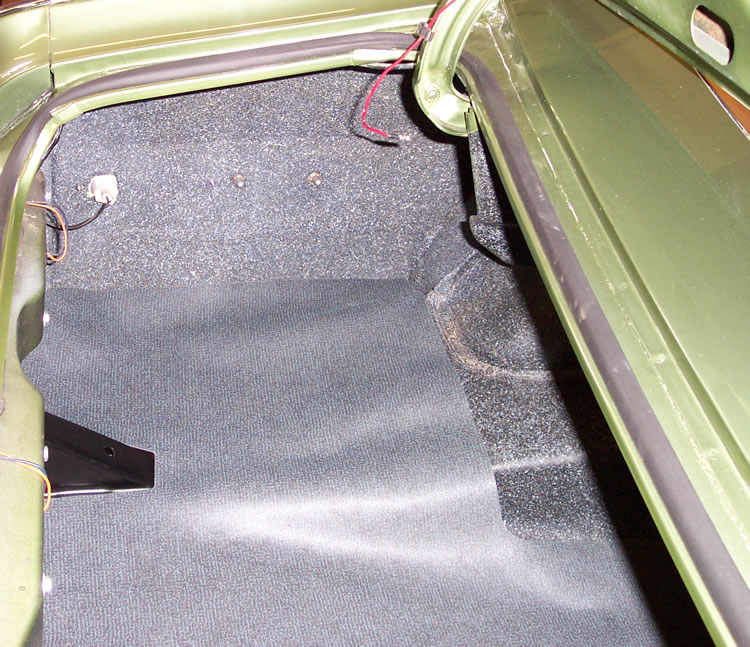
 Another view left side inside trunk - with mat in place. Below that are simply some other views......
   ------------- http://theamcpages.com" rel="nofollow - http://theamcpages.com http://antique-engines.com" rel="nofollow - http://antique-engines.com |
Posted By: luked
Date Posted: Sep/04/2007 at 1:33pm
|
Awesome, that decal looks great :) I knew adding a multiply layer to darken the black ink was a good idea :P |
Posted By: Budwisr
Date Posted: Sep/04/2007 at 1:48pm
|
Oh, if you happen to see something amiss in the way I've put the spare, etc. in, please let me know. I went by the decal as things didn't seem quite right 2 years ago -who knows how many times it had been out and in, many of them incorrect.
You're close, but the spare is upside down. Black side goes up. BTW, where did you get your trunk mat? Thanks, Bud ------------- 1970 AMX 1980 AMX <br |
Posted By: billd
Date Posted: Sep/04/2007 at 2:38pm
|
Trunk mat from APD, probably as good as it gets. It's the correct size/shape and color, at least when I laid my old original on it, it matched in all but texture.
Hmm, the wheel, well, the decal doesn't show, and that's how it was when I got it. I've only ever seen them that way, so went by that. Thanks for the correction.
You can tell by the orange paint that it's pretty much always been mounted that way - you can see where the jack handle has been.
Bet the tank will fit better with the wheel reversed! Now it's gonna bug me until I fix it.
Yeah, Luke. In the image I saw some spots I was going to clean up a bit more, some spots from the scan process, etc. However, when I printed it for the first time, you could not tell - couldn't even see those spots, so left it alone and it turned out GREAT!
It's better than the reproductions I've seen. ------------- http://theamcpages.com" rel="nofollow - http://theamcpages.com http://antique-engines.com" rel="nofollow - http://antique-engines.com |
Posted By: billd
Date Posted: Sep/05/2007 at 9:39am
|
OK, I checked. That spare hasn't been installed outside, or orange side down/black side up. there are no marks where the jack handle was against it. Also - it simply won't work that way. It puts the center of the wheel/rim so low that the j-hook wouldn't be able to have the wing nut screwed on. Bottom line, I have found no way to make it work black, or inside up, nor has it been installed that way. Things won't fit........ So unless this is the wrong wheel for the car and the wrong hardware, guess this one goes orange side up, or outside of the wheel up. That's the only way the hook and wing nut will fit. I tried! (for several minutes) ------------- http://theamcpages.com" rel="nofollow - http://theamcpages.com http://antique-engines.com" rel="nofollow - http://antique-engines.com |
Posted By: CloudyB
Date Posted: Sep/05/2007 at 11:19am
|
First off billd your doing a heck of a job.Looks great.Trunk came out great.I think you learned a new trade.My spare is the same as yours orange side up.Been that way for awhile it looks like too.
Fine job your doing.
|
Posted By: billd
Date Posted: Sep/09/2007 at 11:33pm
|
OK, after looking at SEVERAL 70 AMX and Javelins, I believe my car has the wrong j-bolt (and that after I replated mine) One fellow also has his tire placed in the trunk like mine, but when he tried to turn it orange side down, his jack handle was too long to fit, his only worked orange side up because of his jack handle. His handle might not be correct for the car, dunno. but others had the wheel black side up, with a VERY short j-bolt, and it worked. I'd have to have a pretty short j-bolt for mine to go that way, and although that may be correct, looking at my wheel, it's not been mounted that way before. However, I'll try to find a correct length j-bolt and go from there......... ------------- http://theamcpages.com" rel="nofollow - http://theamcpages.com http://antique-engines.com" rel="nofollow - http://antique-engines.com |
Posted By: Peter Marano
Date Posted: Sep/10/2007 at 10:46am
|
And maybe your car came that way. I can think of two possibilities, there are probably more. Someone made an error during assembly, inspectors check to see that the spare is installed and secure but not if it is 'black side up'. Production had none of the short 'J' bolts, would the line get stopped or would the spares be installed orange side up? |
Posted By: billd
Date Posted: Sep/10/2007 at 12:36pm
|
I suspect longer bolts might have been used with other spare tire types...... but can't say for sure.
------------- http://theamcpages.com" rel="nofollow - http://theamcpages.com http://antique-engines.com" rel="nofollow - http://antique-engines.com |
Posted By: billd
Date Posted: Nov/12/2007 at 11:59pm
|
I'm going to add this 'disclaimer' to my project threads:
"If you like this car, please thank members of TheAMCForum Ian Webb, Steve Parsons, Tom Benvie and several others who had valuable input into the correct colors and finishes on several parts." ------------- http://theamcpages.com" rel="nofollow - http://theamcpages.com http://antique-engines.com" rel="nofollow - http://antique-engines.com |
Posted By: sidewinder
Date Posted: Nov/13/2007 at 12:56pm
|
Did you ever confirm where the ground wire goes for the blower motor?
I think I posted that it goes on the top mounting screw of the brake proportioning valve. I'm curious if you found the same thing because I have to connect mine and it's too short to go there??? ummmmmmm ------------- Chuck Page ,AKA Sidewinder 1968 "BLACK CHERRY" Javelin Previous owner of 2013 Heritage Cup winner 1970 BBO AMX |
Posted By: billd
Date Posted: Nov/13/2007 at 2:53pm
|
I can't swear to what is correct, but here is how it was when I bought it - the ground was on the ballast resister bolt in the firewall. Now, you say the ballast isn't original - fact. However, it was part of the grp19 Mallory coil install, and I'd ask - why would one move the blower ground to that screw when installing the ballast, OR, did they install the ballast using the blower motor ground screw? Why undo the ground, install the ballast, then move the ground to that screw?
I'd probably refrain from another hole and mount that resistor using the same screw that grounded the blower motor.
At least that's how I would have done it.
So........... that being said......
 ------------- http://theamcpages.com" rel="nofollow - http://theamcpages.com http://antique-engines.com" rel="nofollow - http://antique-engines.com |
Posted By: sidewinder
Date Posted: Nov/13/2007 at 11:41pm
|
Bill...
I got two brake proportioning valves at my secreat junk yard a few weeks ago because I melted the switch pin trying to get the lines off mine. Both were off javelins...one was a 70. The ground wire from the blower motor was under the top mounting screw on the proportioning valve on the 70 but not on the other one....the blowers were both gone so I have no clue where else they could have gone. Mine was attached onder the AC resister above the blower ......who knows??? I have a short wire on mine so I'm not sure where to put it.... ------------- Chuck Page ,AKA Sidewinder 1968 "BLACK CHERRY" Javelin Previous owner of 2013 Heritage Cup winner 1970 BBO AMX |
Posted By: billd
Date Posted: Nov/14/2007 at 12:26am
|
Oh, STEEEEVE.......... comment on the proper place for the blower motor ground wire?
Yeah, we are asking you as a subject matter expert. OK, so we'll owe you - I can send you a spare set of magnets from a Wizard magneto or something, or perhaps recharge your magneto magnets, or get you a set of B&S rings free. ------------- http://theamcpages.com" rel="nofollow - http://theamcpages.com http://antique-engines.com" rel="nofollow - http://antique-engines.com |
Posted By: sidewinder
Date Posted: Nov/25/2007 at 11:46pm
|
Bill.... Do yopu need drip rail trim? There are two Javelins that I have been getting parts from and I'm pretty sure at least one has trim. Its probably not perfect but if you know a good trim guy it can usually be fixed and buffed. Let me know and I'll try to see what I can do. ------------- Chuck Page ,AKA Sidewinder 1968 "BLACK CHERRY" Javelin Previous owner of 2013 Heritage Cup winner 1970 BBO AMX |
Posted By: billd
Date Posted: Nov/25/2007 at 11:52pm
|
I do need - esp the driver side.
The right side isn't bad, but isn't perfect. The left side, well, the imperfections are my fault. So I pay the price of the mistake or being in a hurry. (not that they were perfect before, so I'd still probably be looking)
I'm told you can take a wood block from the backside (sitting in the car) and drive them off by putting the block against the bottom edge and then striking the block. Sounds logical. ------------- http://theamcpages.com" rel="nofollow - http://theamcpages.com http://antique-engines.com" rel="nofollow - http://antique-engines.com |
Posted By: sidewinder
Date Posted: Nov/25/2007 at 11:57pm
|
I'm going to try and get out to the parts cars soon...I'll check out the trim and let you know. I need to check on a few little parts that I need too. I found these cars buried in the back bushes of a yard on the indian reservation near here. Not much left but I have "saved" some good parts. I'll keep you in mind...... ------------- Chuck Page ,AKA Sidewinder 1968 "BLACK CHERRY" Javelin Previous owner of 2013 Heritage Cup winner 1970 BBO AMX |
Posted By: billd
Date Posted: Nov/26/2007 at 1:15am
|
Please do! IS there a good spare tire hold-down in there? The "J-hook" ?
I need an original short style hook since no one seems to like my spare tire the way AMC installed it.
I also need the bolts that hold the taill lights in place and the clip that holds the trunk light wire to the trunk lid hinge. ------------- http://theamcpages.com" rel="nofollow - http://theamcpages.com http://antique-engines.com" rel="nofollow - http://antique-engines.com |
Posted By: sidewinder
Date Posted: Nov/26/2007 at 2:08am
|
Funny you mention the tail light bolts..or acorn nuts?? My car has the original ones but a few are bent up. I know there are a few left on the one Javelin so thats one item I was planning on grabbing. If I end up with any extra your welcome to them. I doubt that there will be a "J" hook. I bought mine from APD. These cars are pretty picked over and rusted. One is pretty much gone but there are a few usable parts on the other...like the trim....some glass.... ------------- Chuck Page ,AKA Sidewinder 1968 "BLACK CHERRY" Javelin Previous owner of 2013 Heritage Cup winner 1970 BBO AMX |
Posted By: billd
Date Posted: Nov/26/2007 at 2:34am
|
I ended up putting later 70 tail light housings in, so my tail lights now use bolts.
The acorn nuts were used through early Feb, I believe, then they switched from studs cast into the housing to holes, with bolts.
I have acorn nuts for when I get my original housings restored. For now, I'm using later housings and would like to get the correct bolts for them. ------------- http://theamcpages.com" rel="nofollow - http://theamcpages.com http://antique-engines.com" rel="nofollow - http://antique-engines.com |
Posted By: 71SC360
Date Posted: Nov/26/2007 at 10:22am
|
Bill, I have the correct tail light housing bolts, correct "J" hook for the spare tire and the clip for the trunk light...
Chuck, What cars are you checking out? Skyway in Buffalo has a 68 and a 70 Javelin. I know they both have the drip rail trim. The 70 still has the original AM radio and faceplate. Not too bad but I didn't have time to pull them.
|
Posted By: sidewinder
Date Posted: Nov/26/2007 at 11:11am
|
Never been to the skyway yard....been planning on checking it out though.
Can't believe theres a radio!! I have one on e-bay right now...nice one too! The cars I've been getting things from are on the reservation in Lewiston..... not much left there.... ------------- Chuck Page ,AKA Sidewinder 1968 "BLACK CHERRY" Javelin Previous owner of 2013 Heritage Cup winner 1970 BBO AMX |
Posted By: sidewinder
Date Posted: Nov/26/2007 at 11:22am
|
Bill...
thanks for the info on the AC compressor.....I gotta fix that!! Mine has suction and discharge marked on the top and it's hooked up wrong.....
easy fix ..... ------------- Chuck Page ,AKA Sidewinder 1968 "BLACK CHERRY" Javelin Previous owner of 2013 Heritage Cup winner 1970 BBO AMX |
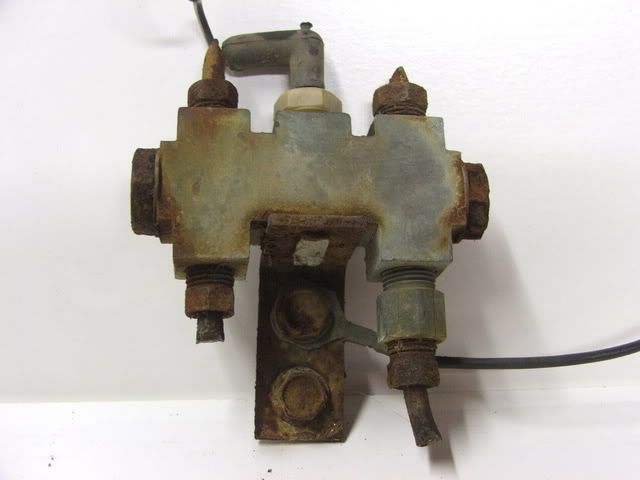
Posted By: sidewinder
Date Posted: Nov/28/2007 at 5:19am
|
Bill....
I'm convinced now that the ground for the blower motor goes to the top screw on the brake proportioning valve. I found another javelin at the yard and it was there just like the other ones I found. Just thought you'd like to know....proof is in the pics!.....LOL...
 ------------- Chuck Page ,AKA Sidewinder 1968 "BLACK CHERRY" Javelin Previous owner of 2013 Heritage Cup winner 1970 BBO AMX |