
|
|
|
Your donations help keep this valuable resource free and growing. Thank you.
|
71-74 Jav Window guide Bushings "No More Wobble" |
Post Reply 
|
Page 123 24> |
| Author | |
PlazinJavelin 
Supporter of TheAMCForum 
Joined: Nov/02/2008 Location: Atlanta USA Status: Offline Points: 2703 |
 Post Options Post Options
") Thanks(1) Thanks(1)
 Quote Reply Quote Reply
 Topic: 71-74 Jav Window guide Bushings "No More Wobble" Topic: 71-74 Jav Window guide Bushings "No More Wobble"Posted: Feb/19/2012 at 8:00pm |
|
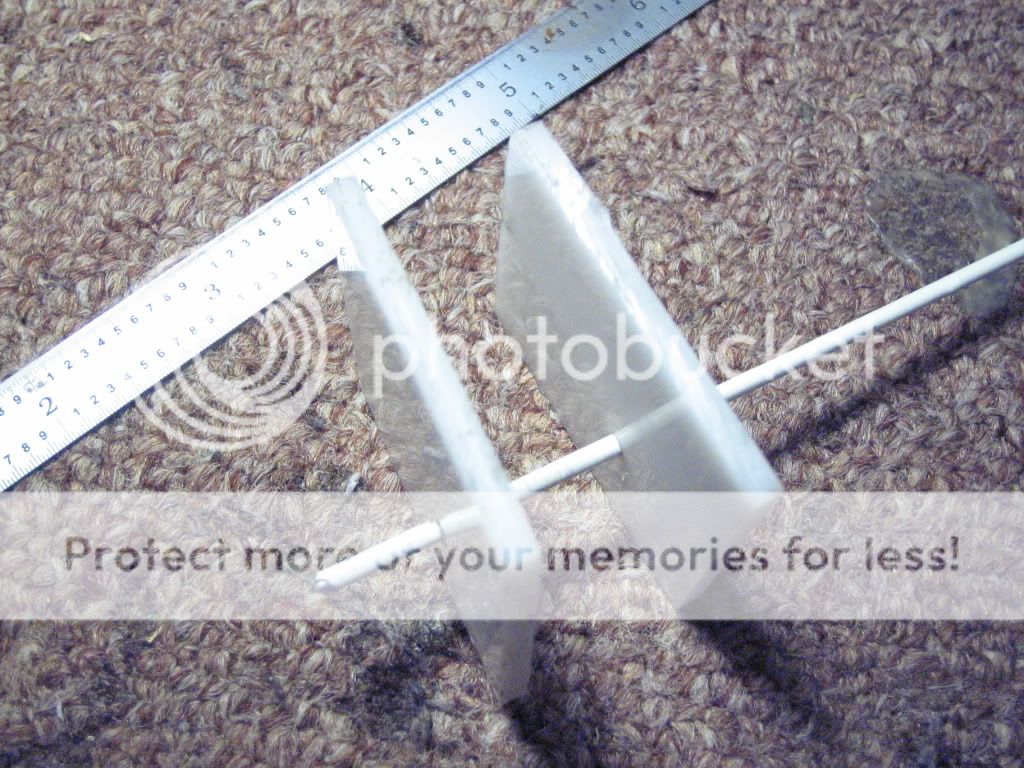
1971-1974 Javelin Window Guide Bushings Read on for the repair info and history of the new part development, or skip ahead a few pages to get right to the new parts available. I had wanted to do more of complete post/write up on this, but just hadn't had the time. After a couple of request I'm throwing out the basic info for those who'd like to try and improve their door window stability without waiting on me to make prettier instructions. Now... you either can take the "easy way" and knock out the old bushing, destroying them in the process, or dismantle the window guide, pull out the window and guides to gently remove the old bushings. My old ones were either missing, shot or broking/crumbling already, so who cared if they came out in pieces. In the simplest attempt, one needs to roll the window about 90% of the way down, and remove the door panel to get at the bushings. So here's what I did on my windows once I got all the measurements down to a few thousands... First I bought a 12"*12" sheet of .125" thick Acetal. It's similar to teflon, but rates harder and more ware resistant. It's veeeery slick stuff, same thickness but harder that OEM and faaaar tougher than the after market junk I bought, tried and scraped. Next I cut blocks to size from the sheet, slightly beveled one end and drilled a "locking hole". The hole is roughly 1/8". The red edge farthest from the hole is the beveled edge. That edge needs just a hair taken off so the block can more easily be tapped in to place. Doesn't need much off, just the corners so it will go in without a big fight. The 1.6" is important for a perfect tight fit. The 1.8" inch is less important for accuracy. The hole placement doesn't need to be laser accurate either, but get it close as possible again for easier fit. You can make all identical pieces, no need for lefts and rights as long as the bevel is on the correct end.
What the bevel looks like...
Once the old ones are out of the way, time to tap in the new ones. Here's where you're going to find that 1.6" cut and accompanying bevel important with the install. On 3 doors I had, the clearance was 1.6" on the nose. I hope this is true of other years and doors. You may want to try and measure your own to be sure it's the same. I pressed the block in just a tad against the guild pole, then put a small strip of wood on the top of the new bushing and tapped on the wood to set the bushing in place. You want the holes you drilled to line up with the slot in the metal brace where the old bushings were so the "lock pin" can be slid in and bent over at the ends. See the next set of pictures....
Now it's time for a bit of grease to make all this slide well. In my case, all the wobble was gone and the window still moved up and down very well. Wobble of the window was about 1/2"or better before I made these changes. After, it was barely measurable at maybe 1/16" of an inch. Edited by PlazinJavelin - Dec/06/2018 at 12:05pm |
|
 |
|
|
hassyfoto
AMC Addicted 

Joined: Nov/16/2009 Location: Maryland Status: Offline Points: 3378 |
Post Options
Thanks(0)
Quote Reply
Posted: Feb/20/2012 at 5:25am |
|
Nice pics and info! PS I completed the hood frame replacement in November, I just haven't got around to posting the pics. |
|
|
Murphy's Law:
Any given mechanical job you decide to solve alone will imminently require a third hand, at its most critical moment |
|
|
|
|
PlazinJavelin
Supporter of TheAMCForum
Joined: Nov/02/2008 Location: Atlanta USA Status: Offline Points: 2703 |
Post Options
Thanks(0)
Quote Reply
Posted: Feb/20/2012 at 4:24pm |
|
Thanks, and I look forward to seeing your other work. I could give you a hard time about not posting your pics sooner, but ya know... pot, kettle, black :) |
|
|
|
|
SST343
AMC Nut

Joined: Jul/20/2007 Location: Virginia Status: Offline Points: 366 |
Post Options
Thanks(0)
Quote Reply
Posted: Feb/20/2012 at 11:08pm |
|
Thanks for sharing Troy

|
|
|
|
|
pit crew
Supporter of TheAMCForum

Joined: Jul/08/2007 Location: delete Status: Offline Points: 5341 |
Post Options
Thanks(0)
Quote Reply
Posted: Feb/21/2012 at 5:24am |
|
Very good information. Thanks for posting.
Now when are you going to start milling your own "donuts" from Acetal and offering them for sale?  Edited by pit crew - Feb/21/2012 at 5:25am |
|
 73 Hornet - 401EFI - THM400 - Twin Grip 20 |
|
|
|
|
pit crew
Supporter of TheAMCForum
Joined: Jul/08/2007 Location: delete Status: Offline Points: 5341 |
Post Options
Thanks(0)
Quote Reply
Posted: May/30/2012 at 8:43pm |
|
Hey Troy. You started this so you get all the credit. I am now a big fan of acetal. The windows are back in the Javelin and it is like they are welded in place. No wobble, none at all. Crazy solid now. Look at the new acetal bushing compared what the vendors are selling now a days. It was milled from 1 inch thick acetal. These are just prototypes. What a great idea you had. Thanks a million.
No more zip ties for me.    Edited by pit crew - Dec/23/2017 at 7:36pm |
|
|
73 Hornet - 401EFI - THM400 - Twin Grip 20 |
|
|
|
|
PlazinJavelin
Supporter of TheAMCForum
Joined: Nov/02/2008 Location: Atlanta USA Status: Offline Points: 2703 |
Post Options
Thanks(0)
Quote Reply
Posted: May/30/2012 at 10:10pm |
|
Oh man your milled bushing is awesome. Did you do that by hand or CNC? That window won't wobble again for the next 400 years! So when am I going to be able to buy a set of those? I just put my doors in primer this past weekend, but still not mounted and not too late to make some changes. |
|
|
|
|
Javelin74
AMC Nut

Joined: May/18/2010 Location: Scottsdale Status: Offline Points: 398 |
Post Options
Thanks(0)
Quote Reply
Posted: May/31/2012 at 12:45am |
|
No kidding! Those look killer! I'd be interested in a set and I imagine others would, too.
|
|
|
|
|
72Javelin
Supporter of TheAMCForum

Joined: Jul/01/2007 Location: United States Status: Offline Points: 2466 |
Post Options
Thanks(0)
Quote Reply
Posted: May/31/2012 at 5:18am |
|
I could use some of those too...
|
|
|
Jeff Reeves
Auburn, GA AMO Technical Editor Currently AMC-less after 30+ years |
|
|
|
|
pit crew
Supporter of TheAMCForum
Joined: Jul/08/2007 Location: delete Status: Offline Points: 5341 |
Post Options
Thanks(0)
Quote Reply
Posted: May/31/2012 at 6:35am |
Dan and Jeff, keep an eye on this thread. If this works out I'll post the information here first. Edited by pit crew - May/31/2012 at 6:43am |
|
|
73 Hornet - 401EFI - THM400 - Twin Grip 20 |
|
|
|
|
Post Reply
|
Page 123 24> |
 Tweet
Tweet
|
| Forum Jump | Forum Permissions You cannot post new topics in this forum You cannot reply to topics in this forum You cannot delete your posts in this forum You cannot edit your posts in this forum You cannot create polls in this forum You cannot vote in polls in this forum |


 Click for TheAMCForum Rules

 Topic Options


 PlazinJavelin wrote: