
|
|
|
Your donations help keep this valuable resource free and growing. Thank you.
|
70 Javelin Rust Repair |
Post Reply 
|
Page 123 8> |
| Author | |
hassyfoto 
AMC Addicted 

Joined: Nov/16/2009 Location: Maryland Status: Offline Points: 3378 |
 Post Options Post Options
") Thanks(0) Thanks(0)
 Quote Reply Quote Reply
 Topic: 70 Javelin Rust Repair Topic: 70 Javelin Rust RepairPosted: Feb/15/2017 at 7:49am |
|
There is always a story or two with every photo, so I'll just tell the story.
As most folks know, I am heavily involved with putting together the AMO National event in Gettysburg. With that said I was really looking forward to my car entering the show for the first time. All the other AMO Shows have been attended as a spectator. Well, as Murphy's law would have it, things may not go as planned. Now a little background facts, my car just won a top 50 award at the East Coast Indoor Nationals in December, so she was looking sharp. Now I went to clean/prep the car for winter storage and that includes removing the full size spare out of the trunk. I removed the hold down, lifted the wheel, caught my sleeve on something and dropped the tire on the trunk floor. What happened next, the floor gave way, so everything dropped onto the gas tank. Funny how a little trunk floor mat can hide things. So, one thing lead to another and we found out the previous owner did not repair the rust, they just placed body filler in all the rust holes, covered it with seam sealer and paint. Three sides of the perimeter of the trunk floor was held together with bondo, nothing else. The quarter panels had metal patches on the lower sections and the wheel wells where large rust holes existed had been fiiled with only bondo. So, this is the start of another project. A big project! 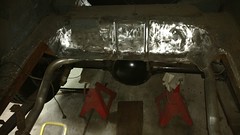 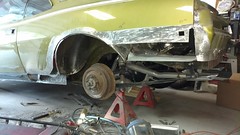 Edited by hassyfoto - Feb/15/2017 at 8:13am |
|
|
Murphy's Law:
Any given mechanical job you decide to solve alone will imminently require a third hand, at its most critical moment |
|
 |
|
|
hassyfoto
AMC Addicted
Joined: Nov/16/2009 Location: Maryland Status: Offline Points: 3378 |
Post Options
Thanks(0)
Quote Reply
Posted: Feb/15/2017 at 8:09am |
|
The trunk floor was ordered. Hmmmmm, a fair warning to everyone, the one & only metal trunk floor metal patch offered on the internet is displayed as a single unit, no foot notes anywhere that the floor comes in eight pieces. The quality is terrible. Luckily I have been an auto repair tech for most of my life. I had to extensively rework the sheet metal both before installation and during installation.
During the removal of the trunk floor the the trunk wells, rear body panel and rear body panel support was found to have extensive rust. All the rusted metal was removed and many metal patches were made from scratch or the trunk floor aftermarket part was modified to fit. I did clean out all other metal parts & channels ( frame rails, rear body support, etc) and applied rust inhibitor, primer and paint. I taped up the flange areas during the paint process, removed the tape after drying and applied weld-thru primer in preparation for welding the floor to the rails. ( The under side of the floor that sits over any enclosed area, was prepped the same way as the flange areas ( Can't paint inside a frame rail once the part is welded on. 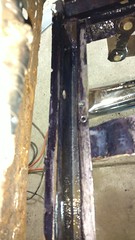 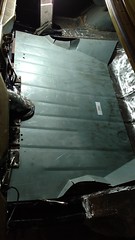 |
|
|
Murphy's Law:
Any given mechanical job you decide to solve alone will imminently require a third hand, at its most critical moment |
|
|
|
|
bigbad69
Supporter of TheAMCForum 

Joined: Jul/02/2007 Location: Ottawa, Ont. Status: Offline Points: 6685 |
Post Options
Thanks(0)
Quote Reply
Posted: Feb/15/2017 at 8:26am |
|
Ouch! That's enough to make a grown man cry. On the upside, it looks like the car is in good hands. Good luck with the rebuild.
|
|
|
69 Javelin SST BBO 390 T10
|
|
|
|
|
kcsamc
AMC Addicted

Joined: Sep/03/2011 Location: Denver, PA Status: Offline Points: 1974 |
Post Options
Thanks(0)
Quote Reply
Posted: Feb/15/2017 at 12:00pm |
|
Kirby, I guess you weren't kidding... Nasty nasty stuff. You are in up to your neck on that!
|
|
|
|
|
AMXFSTBK390
AMC Addicted

Joined: Oct/22/2013 Location: SF Bay Area Status: Offline Points: 3489 |
Post Options
Thanks(0)
Quote Reply
Posted: Feb/15/2017 at 12:42pm |
|
Nightmare!Instead of a Trailer Queen you were duped into a Drama Queen. Yikes! I feel your pain. As said, at least it is in capable hands now.
|
|
|
Questions are powerful tools...what's in your toolbox?
|
|
|
|
|
hassyfoto
AMC Addicted
Joined: Nov/16/2009 Location: Maryland Status: Offline Points: 3378 |
Post Options
Thanks(0)
Quote Reply
Posted: Feb/15/2017 at 5:51pm |
|
On the Javelin between the floor pan and the rear body panel is a three sided c-channel made into the the vehicle design. This was part of the factory design, I assume for strength and creates a 1 inch gap between the trunk floor and rear body panel. So, I went to Home Depot and purchased a square tube very close in size. It certainly doesn't hurt anything to close off the 3-side c-channel as this can not be seen from underneath the car except with the gas tank removed and a flash light.
You can see the square tube had to be heated and slightly bent to match the original contour, but over all it was a pretty easy fit. The square tube is slightly smaller than the original, but by time the sheet metal is welded over top, the thickness is almost exactly spot on.  Edited by hassyfoto - Feb/15/2017 at 6:06pm |
|
|
Murphy's Law:
Any given mechanical job you decide to solve alone will imminently require a third hand, at its most critical moment |
|
|
|
|
hassyfoto
AMC Addicted
Joined: Nov/16/2009 Location: Maryland Status: Offline Points: 3378 |
Post Options
Thanks(0)
Quote Reply
Posted: Feb/15/2017 at 6:00pm |
|
Next step, grind down the welds until smooth. Then make a patch panel from scratch to replace the rusted rear body panel. I had to duplicate this procedure for both sides of the rear body panel, left & right. When completed about 75% across the bottom and 2-4 inches up was replaced on the rear body panel. A template was made of the unique contours needed where the rear bumper bumper brackets bolt up to the car. This is accomplished by using different metal stretching and shrinking techniques. Because of the complex contours, the patches on each side of the rear body panel was accomplished in stages with multiple metal patch panels.
 You can see the area on the left side of the patch is not welded yet. Another new patch, after the complex contours are replicated will be installed and the welding completed The old section from the rear body panel.  Edited by hassyfoto - Feb/15/2017 at 6:08pm |
|
|
Murphy's Law:
Any given mechanical job you decide to solve alone will imminently require a third hand, at its most critical moment |
|
|
|
|
LakesideRamblin
AMC Addicted

Joined: Dec/21/2015 Location: So. California Status: Offline Points: 2694 |
Post Options
Thanks(0)
Quote Reply
Posted: Feb/15/2017 at 6:18pm |
|
My hat is off to you. You see the problem and jump on it. Looks like the repair will work out nicely when completed and you get all the satisfaction! Thank you for sharing your work with us.
|
|
|
LakesideRamblin
69 Rambler 360 73 Javelin 360 "If you could kick the person in the pants responsible for most of your trouble, you wouldn't sit for a month." T. Roosevelt |
|
|
|
|
pit crew
Supporter of TheAMCForum

Joined: Jul/08/2007 Location: delete Status: Offline Points: 5341 |
Post Options
Thanks(0)
Quote Reply
Posted: Feb/15/2017 at 6:54pm |
|
Impressive work. Too bad you have to do it in the first place. Good luck with your project.
|
|
 73 Hornet - 401EFI - THM400 - Twin Grip 20 |
|
|
|
|
Ollie
AMC Addicted
Joined: Sep/17/2012 Location: Brandon, MS Status: Offline Points: 2803 |
Post Options
Thanks(0)
Quote Reply
Posted: Feb/15/2017 at 7:08pm |
|
You will have to have talent and patience.
You're off to a good start. Have AMC Fun, Ollie |
|
|
1966 American Convertible -- "The Rambler"..SOLD
1974 Postal Jeep -- "Rapid Delivery"...SOLD 1969 Rambler 220 post car--"Road Warrior" 1989 Jeep Comanche Pioneer, 4.0L, auto, 2wd |
|
|
|
|
Post Reply
|
Page 123 8> |
 Tweet
Tweet
|
| Forum Jump | Forum Permissions You cannot post new topics in this forum You cannot reply to topics in this forum You cannot delete your posts in this forum You cannot edit your posts in this forum You cannot create polls in this forum You cannot vote in polls in this forum |


 Click for TheAMCForum Rules
 Topic Options