71-74 Jav Window guide Bushings "No More Wobble"
Printed From: TheAMCForum.com
Category: The Garage
Forum Name: Body/Interior
Forum Description: Paint, glass, interior, rust, sheetmetal goes here.
URL: https://theamcforum.com/forum/forum_posts.asp?TID=37076
Printed Date: Apr/18/2024 at 10:35am
Software Version: Web Wiz Forums 12.03 - http://www.webwizforums.com
Topic: 71-74 Jav Window guide Bushings "No More Wobble"
Posted By: PlazinJavelin
Subject: 71-74 Jav Window guide Bushings "No More Wobble"
Date Posted: Feb/19/2012 at 8:00pm
|
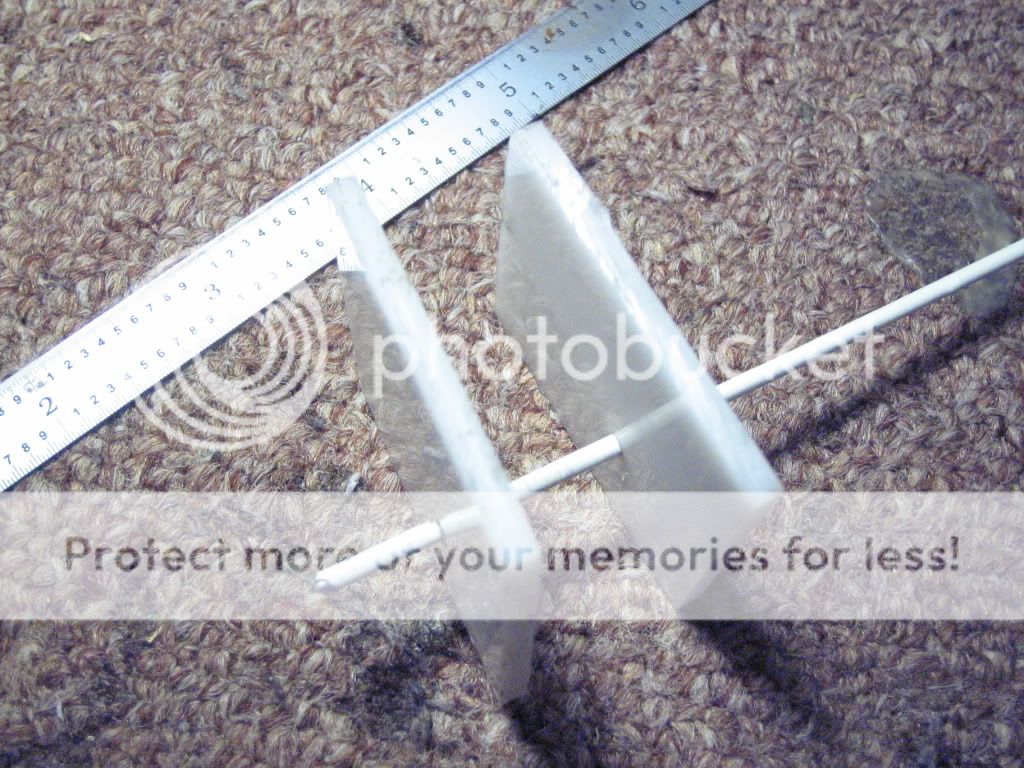
1971-1974 Javelin Window Guide Bushings Read on for the repair info and history of the new part development, or skip ahead a few pages to get right to the new parts available. I had wanted to do more of complete post/write up on this, but just hadn't had the time. After a couple of request I'm throwing out the basic info for those who'd like to try and improve their door window stability without waiting on me to make prettier instructions. Now... you either can take the "easy way" and knock out the old bushing, destroying them in the process, or dismantle the window guide, pull out the window and guides to gently remove the old bushings. My old ones were either missing, shot or broking/crumbling already, so who cared if they came out in pieces. In the simplest attempt, one needs to roll the window about 90% of the way down, and remove the door panel to get at the bushings. So here's what I did on my windows once I got all the measurements down to a few thousands... First I bought a 12"*12" sheet of .125" thick Acetal. It's similar to teflon, but rates harder and more ware resistant. It's veeeery slick stuff, same thickness but harder that OEM and faaaar tougher than the after market junk I bought, tried and scraped. Next I cut blocks to size from the sheet, slightly beveled one end and drilled a "locking hole". The hole is roughly 1/8". The red edge farthest from the hole is the beveled edge. That edge needs just a hair taken off so the block can more easily be tapped in to place. Doesn't need much off, just the corners so it will go in without a big fight. The 1.6" is important for a perfect tight fit. The 1.8" inch is less important for accuracy. The hole placement doesn't need to be laser accurate either, but get it close as possible again for easier fit. You can make all identical pieces, no need for lefts and rights as long as the bevel is on the correct end.
What the bevel looks like...
Once the old ones are out of the way, time to tap in the new ones. Here's where you're going to find that 1.6" cut and accompanying bevel important with the install. On 3 doors I had, the clearance was 1.6" on the nose. I hope this is true of other years and doors. You may want to try and measure your own to be sure it's the same. I pressed the block in just a tad against the guild pole, then put a small strip of wood on the top of the new bushing and tapped on the wood to set the bushing in place. You want the holes you drilled to line up with the slot in the metal brace where the old bushings were so the "lock pin" can be slid in and bent over at the ends. See the next set of pictures....
Now it's time for a bit of grease to make all this slide well. In my case, all the wobble was gone and the window still moved up and down very well. Wobble of the window was about 1/2"or better before I made these changes. After, it was barely measurable at maybe 1/16" of an inch. |


Replies:
Posted By: hassyfoto
Date Posted: Feb/20/2012 at 5:25am
|
Nice pics and info! PS I completed the hood frame replacement in November, I just haven't got around to posting the pics. ------------- Murphy's Law: Any given mechanical job you decide to solve alone will imminently require a third hand, at its most critical moment |
Posted By: PlazinJavelin
Date Posted: Feb/20/2012 at 4:24pm
|
Thanks, and I look forward to seeing your other work. I could give you a hard time about not posting your pics sooner, but ya know... pot, kettle, black :) |
Posted By: SST343
Date Posted: Feb/20/2012 at 11:08pm
Thanks for sharing Troy 
|
Posted By: pit crew
Date Posted: Feb/21/2012 at 5:24am
|
Very good information. Thanks for posting. Now when are you going to start milling your own "donuts" from Acetal and offering them for sale?  -------------  73 Hornet - 401EFI - THM400 - Twin Grip 20 |
Posted By: pit crew
Date Posted: May/30/2012 at 8:43pm
|
Hey Troy. You started this so you get all the credit. I am now a big fan of acetal. The windows are back in the Javelin and it is like they are welded in place. No wobble, none at all. Crazy solid now. Look at the new acetal bushing compared what the vendors are selling now a days. It was milled from 1 inch thick acetal. These are just prototypes. What a great idea you had. Thanks a million. No more zip ties for me.    ------------- 73 Hornet - 401EFI - THM400 - Twin Grip 20 |
Posted By: PlazinJavelin
Date Posted: May/30/2012 at 10:10pm
|
Oh man your milled bushing is awesome. Did you do that by hand or CNC? That window won't wobble again for the next 400 years! So when am I going to be able to buy a set of those? I just put my doors in primer this past weekend, but still not mounted and not too late to make some changes. |
Posted By: Javelin74
Date Posted: May/31/2012 at 12:45am
| No kidding! Those look killer! I'd be interested in a set and I imagine others would, too. |
Posted By: 72Javelin
Date Posted: May/31/2012 at 5:18am
|
I could use some of those too... ------------- Jeff Reeves Auburn, GA AMO Technical Editor Currently AMC-less after 30+ years |
Posted By: pit crew
Date Posted: May/31/2012 at 6:35am
Dan and Jeff, keep an eye on this thread. If this works out I'll post the information here first. ------------- 73 Hornet - 401EFI - THM400 - Twin Grip 20 |
 PlazinJavelin wrote:
Posted By: hassyfoto
Date Posted: Jun/01/2012 at 6:13am
|
Certainly add me to the list. ------------- Murphy's Law: Any given mechanical job you decide to solve alone will imminently require a third hand, at its most critical moment |
Posted By: SST343
Date Posted: Jun/01/2012 at 7:13am
| I would also like a set. |
Posted By: PlazinJavelin
Date Posted: Jun/01/2012 at 7:41am
I was thinking about what you said about the hole diameter and guide travel when I had a thought.... the guide bar is curved. Putting the strait bored bushing on might have a bit of an interference issue. Maybe cutting the bushing height down a bit would help. Here's a crude exagerated sketch of what I mean.
 Other than that I'm fine in taking some 400 grit or steel wool to the bore if some "adjustment" is necessary
|
Posted By: pit crew
Date Posted: Jun/02/2012 at 2:30pm
------------- 73 Hornet - 401EFI - THM400 - Twin Grip 20 |
Posted By: SST343
Date Posted: Jun/02/2012 at 6:37pm
|
Pitcrew, I'm sure if you decide to make some sets of your window bushings they will sell out. Bravo and well done for your effort :) |
Posted By: pit crew
Date Posted: Jun/02/2012 at 7:13pm
Here is a shot of an installed bushing along with Troy's side guide plates. Works like a charm. I did cut the side guide plates down just a little after this picture was taken. They were binding at the top of the window guide tube where it flairs out just before it bolts to the top of the door. I should have paid more attention when Troy suggested making them 1.8 inches tall. I cut them to match the angle of the steel bracket. I will have to get another picture tomorrow to illustrate the change.  ------------- 73 Hornet - 401EFI - THM400 - Twin Grip 20 |
Posted By: FuzzFace2
Date Posted: Jun/03/2012 at 11:50am
|
Nice job guys now if that would work for us pre 71 guys.
Where did you guys buy the Acetal? Thinking the rollers could be made of the same stuff if needed.
Dave ---- ------------- TSM = Technical Service Manual 75 Gremlin X v8 for sale 70 Javelin 360/auto drag car 70 Javelin 360/T5 Street car |
Posted By: pit crew
Date Posted: Jun/03/2012 at 3:01pm
------------- 73 Hornet - 401EFI - THM400 - Twin Grip 20 |
Posted By: pit crew
Date Posted: Jun/03/2012 at 3:10pm
Troy and everyone else following this thread. Here is my modified version of Troy's side guide plates. Note that I cut them to match the angle of the steel bracket. This was to ensure I had clearance when it reaches the top of the window guide pole. At that point the window guide pole flairs out to accommodate the attached nut used to it bolt the pole to the top edge of the door. ------------- 73 Hornet - 401EFI - THM400 - Twin Grip 20 |
Posted By: PlazinJavelin
Date Posted: Jun/03/2012 at 7:14pm
|
Stylin'. Looks like it came of the line that way. I'd left mine with the box cut as cutting it further didn't seem to have any benefit on my set up. (ok, maybe I just got lazy). Now that I have power regulators, my setup is no longer like everyone else's though. You went to the same supply I did. They seemed to have the best selection and price for small quantity hobby orders for guys like us. |
Posted By: PlazinJavelin
Date Posted: Jun/03/2012 at 7:18pm
My Jav currently has one 69 and one 70 door mounted. (Soon be be replaced with these 74's) I've not torn apart other year doors yet. What rollers are you refering to? When I pull the old doors I can have a look inside. |
Posted By: FuzzFace2
Date Posted: Jun/03/2012 at 10:31pm
|
Thanks guys, It is good to know where you guys bought it so if others want to do the same they can. One place I Googled had machining and forming so guess if you have prints they could do up what you need but thinking would not pay unless you did a bunch of them.
Plazin the older doors have tracks that rollers or wheels fit in to guide the glass up & down. They are what came before what you guys are showing. They are a 2 peice but dont see why they could not be a solid wheel. I saw somewhere a square one that fit a ford, I guess thier tracks are straight and not curved like ours. You will see when you get into the old doors.
Dave ---- ------------- TSM = Technical Service Manual 75 Gremlin X v8 for sale 70 Javelin 360/auto drag car 70 Javelin 360/T5 Street car |
Posted By: PlazinJavelin
Date Posted: Jun/11/2012 at 9:33pm
|
Ok... here we are. Pit Crew sent me his beta set of bushing and they are now installed. Goodbye ugly zip tie. The window moves on the track a bit better as it more of a perfect fit instead of small bind given by the "well close enough I guess" zip ties. Compared to the worn out originals and the "you've got to be joking me" after market replacements being offered, these are a dream. Thanks again P.C. The vendors would have to be nuts not to stock these instead of that other junk. Yesterday I ran across one of the smaller guide pole bushings I'd bought. It's completely turned rubbery after a couple of months. You can bend it around like putty. I'd make pawning off any more of those things a crime in most states.
|

Posted By: pit crew
Date Posted: Jun/11/2012 at 10:17pm
------------- 73 Hornet - 401EFI - THM400 - Twin Grip 20 |
Posted By: Fluffy73
Date Posted: Jun/12/2012 at 12:43am
|
I'd definitely be down for a set. Other than the driver door missing it's bits that hold it open, the floppy driver window is the #1 thing I despise about my humpster. ------------- I am genetically incapable of being Politically Correct. |
Posted By: PlazinJavelin
Date Posted: Jun/12/2012 at 7:41am
|
I thought so, but after seeing your window mounts all cleaned up and coated in black It's got me thinking ... hmmm. I'm going to have to call it good enough for now though. So many bigger things I've got to get done. And watch for another thread coming soon on the sound deadening material I used in the doors. Man, I thought the engine was going to be my biggest challenge. The effort and cost restoring the doors rival the engine. (that's with weather seals included). |
Posted By: pit crew
Date Posted: Jun/12/2012 at 7:58am
------------- 73 Hornet - 401EFI - THM400 - Twin Grip 20 |
Posted By: 71SC360
Date Posted: Jun/12/2012 at 8:38am
AMark has reproductions of the original style..... http://www.amarkamc.com/product.sc?productId=377&categoryId=34" rel="nofollow - http://www.amarkamc.com/product.sc?productId=377&categoryId=34
|
Posted By: pit crew
Date Posted: Jun/12/2012 at 10:46am
Thanks for pointing that out. That is good information to have. The problem with the original style upper guide spacers, and I am sure Troy will agree, is that as designed they provide limited contact area with the window guide post and allow the window glass to wobble even when the guide spacers are "brand new". I think the real goal in this case was not that we were looking for a 100% correct restoration or even a replacement for a hard to find part as much as a longing for a solid long lasting solution to the wobble issue. I think Troy's design is the best so far. Newer materials like Acetel provide an opportunity to "improve" on the original design with more support, better wear resistance, and improved lubrication characteristics. The overall design of the window guides in the big body Javelins was a bit weak right from day one. But then again I don't think anyone at AMC ever expected to see their cars in use and on the roads some 35 years, or more, later. ------------- 73 Hornet - 401EFI - THM400 - Twin Grip 20 |
Posted By: 71SC360
Date Posted: Jun/12/2012 at 1:34pm
| I knew that you guys were looking for a better soloution to a common problem, I figured that I'd post those in case some haven't seen them... |
Posted By: PlazinJavelin
Date Posted: Jun/12/2012 at 7:35pm
|
I think you covered it all well. I'm always one for putting in improvements when possible and definitely in cases where you can still look stock but use newer tech. I don't know what AMark uses for material, but the other vendor is using "bubble gum and plaster" for bushings (IMHO). Acetel parts in these new configurations have 4-5 times times the contact surface, better strength and better support than even the best original stock parts. So neh neh ne neh heh. :) |
Posted By: kingsX
Date Posted: Jun/12/2012 at 10:26pm
|
Put me down for a set too. My windows are a pain to roll up and down. ------------- 73 AMX Javelin PC  
|
Posted By: 71SSTJavelin304
Date Posted: Jul/23/2012 at 2:43pm
|
What is the width at the widest part where it bolts to the guide plate?
I'm thinking about buying 2" Acetal rod and turning it down with my lathe and then finishing by milling the shape and drill the mount holes by hand with a template.
I've got 3 javelins in need of some attention.
|
Posted By: Ant
Date Posted: Jul/23/2012 at 3:02pm
|
2" is too small I bought 2.5" and will be machining a few sets soon. ------------- 73 AMX project 401 stroker, t-56 mag Full-time machinist |
Posted By: 71SSTJavelin304
Date Posted: Jul/23/2012 at 3:11pm
| I was afraid of that, at least with the larger diameter there's more to play with and way cheaper than the 1" thick sheet. |
Posted By: pit crew
Date Posted: Jul/23/2012 at 3:43pm
------------- 73 Hornet - 401EFI - THM400 - Twin Grip 20 |
Posted By: Fluffy73
Date Posted: Jul/23/2012 at 4:08pm
|
Did any of the major suppliers want to get on board and help out? How about PG Classics? They seem to offer some reproduction AMC parts now and might want to get in on an exclusive part. ------------- I am genetically incapable of being Politically Correct. |
Posted By: pit crew
Date Posted: Jul/30/2012 at 9:28am
------------- 73 Hornet - 401EFI - THM400 - Twin Grip 20 |
Posted By: 73pc4sp
Date Posted: Jul/30/2012 at 6:54pm
| I would like a set as well. |
Posted By: shootist
Date Posted: Aug/01/2012 at 10:26pm
| Ken, to reduce costs for mass production but still provide a much better product than what is out there have you thought about reducing the original stock to 1/2"? It would result in a faster mill time as well with less material to remove. Another methoed would be to use the acetal rod as original stock resulting in less waste in acetal and again reducing mill work to drilling your center hole and routering and drilling the lip. I am out of ideas for potential cost reductions. |
Posted By: pit crew
Date Posted: Aug/20/2012 at 10:16pm
|
Anybody got any good window wobble stories to share?
------------- 73 Hornet - 401EFI - THM400 - Twin Grip 20 |
Posted By: PlazinJavelin
Date Posted: Aug/21/2012 at 6:51pm
|
Is there such a thing? Back to 1982... the window on my 68 Javelin wobbled enough that it would pinch a nice little bruise if you had the window down, your arm resting on the door and hit a good enough bump. "don't put your arm there dope!" |

Posted By: pit crew
Date Posted: Aug/21/2012 at 7:52pm
------------- 73 Hornet - 401EFI - THM400 - Twin Grip 20 |
Posted By: sasyamx
Date Posted: Aug/24/2012 at 12:39am
|
Do you have any for sale |
Posted By: amxsteve
Date Posted: Aug/30/2012 at 12:51pm
| I will take a set also if you start selling them |
Posted By: AmeriMan
Date Posted: Aug/30/2012 at 1:42pm
|
Add me to the list. One set for me please. ------------- larue390@comcast.net |
Posted By: pit crew
Date Posted: Aug/30/2012 at 4:26pm
|
Ok, looks like I will have to go back and bug the guy with the CNC machine again to see I can get some more made. ------------- 73 Hornet - 401EFI - THM400 - Twin Grip 20 |
Posted By: 1badrambler
Date Posted: Sep/30/2012 at 2:26pm
| I would be interested in some as well. I just purchased the guides from Amark and haven't gotten them in the mail yet. I just stumbled across your thread. Thanks for keeping the hobby alive!!! |
Posted By: jkarisny
Date Posted: Sep/30/2012 at 5:16pm
|
That gives me some ideas. I can cut acetal and many other materials with my cheap home made CNC mill. http://www.instructables.com/id/Building-a-drawer-slide-CNC-machine-for-under-200/" rel="nofollow - http://www.instructables.com/id/Building-a-drawer-slide-CNC-machine-for-under-200/ I always forget I have it, I guess that means I have too many hobbies! Anyways...way to take an idea to the next level! Keep up the good work!!! ------------- You can do things the right way or the wrong way. Or you can do it MY way...which is like the wrong way, only faster. |
Posted By: Fluffy73
Date Posted: Sep/30/2012 at 5:36pm
|
I am really surprised no aftermarket companies want to pick this up. The quality of parts I got is phenomenal - much better than some stuff I've actually bought from the repop companies. But therein lies the difference I guess - company in it for money .... person in it for product that works.
Like, I was shocked the other day when I had a revelation that, companies are now reproducing an AMAZING amount of interior parts for a Gremlin! Carpets both cargo area and passenger area, Sail Panels for the early cars, rear seat panels for the early cars, seat covers for 71-76 cars and I'm sure a few other bits I'm forgetting. This is pretty sweet considering when I first bought my Gremlin (2001) the only thing being made was poor-fitting carpets. Really, all we need now is maybe door panels, headliners and dashpads and think of how many more Gremlins could be saved!! An old Mopar friend I touched base with last weekend at a show was AMAZED at how AMC's have come up in the world even over the last 10 years. I went to a little tiny show in Creston, BC and there were THREE AMC's there! A '70 AMX, a Rebel Machine and my Humpster. ------------- I am genetically incapable of being Politically Correct. |
Posted By: PlazinJavelin
Date Posted: Sep/30/2012 at 5:42pm
| Nice homemade cnc project. Have you used it to make anything yet? I think I have all of that hardware lying around here already except for the control board and stepper motors. Looks like I might have a winter project. I'll be in Wisconsin the end of this month, too bad I'll be too far way in Madison or I'd ask to come have a look. |
Posted By: jkarisny
Date Posted: Sep/30/2012 at 5:55pm
|
Thanks! Yes, I have made a few items. A cooling stand for my Apple Mac Mini, and more parts for the CNC itself. And that was the idea, make a usable CNC for under $200. Reading this topic got me thinking of more parts for my Javelin I can make. I started a few drawings of a gauge cluster I might take a shot at. ------------- You can do things the right way or the wrong way. Or you can do it MY way...which is like the wrong way, only faster. |
Posted By: Dave Z
Date Posted: Apr/27/2017 at 3:50am
|
Is anyone making these parts? Dave Z |
Posted By: mstrcrftr
Date Posted: Dec/22/2017 at 11:21am
|
I just used this method to fix my 74 amx windows and it came out awesome. My hats off to the original poster for coming up with this method. |
Posted By: mstrcrftr
Date Posted: Dec/22/2017 at 11:22am
Dave are you talking about the window shims? IF so i have an extra set i made while i was doing mine. let me know.. Thanks Barney |
Posted By: pit crew
Date Posted: Dec/22/2017 at 1:02pm
|
Still looking for someone with a CNC machine willing to take on some side work. Most people tell me they just can't be bothered with small projects. Now that 3D printers can print with nylon I would hope that someone would make up some bushings to try out.
------------- 73 Hornet - 401EFI - THM400 - Twin Grip 20 |
Posted By: mstrcrftr
Date Posted: Dec/22/2017 at 2:26pm
| i wish i had a cnc machine.. that would be very cool |
Posted By: Scene One
Date Posted: Dec/22/2017 at 8:53pm
Buster |
Posted By: pit crew
Date Posted: Dec/22/2017 at 10:06pm
------------- 73 Hornet - 401EFI - THM400 - Twin Grip 20 |
Posted By: billd
Date Posted: Dec/22/2017 at 10:49pm
|
I need the parts for my 73 - tired of having to stop the car, open the door, and hold the window while I roll, or TRY to roll, it up or down. The nylon parts are GONE on the left side - and I don't mean worn - I mean GONE. -------------  http://theamcpages.com" rel="nofollow - http://theamcpages.com http://antique-engines.com" rel="nofollow - http://antique-engines.com |
Posted By: 304-dude
Date Posted: Dec/23/2017 at 5:05am
|
Wow, I thought this discussion was dead... but not forgotten. Since I never had window issues in my 73 back in the late 80s early 90s, and my 71 with years of use on its life, i thought little into fixing or replacing my original bushings. So I never thought about peeps needing these, as the fix is fairly simple to do and well explained here in this thread. As far as i am concerned, it does not need mil spec mechanical skills or machinery to accomplish. I spent a lot of time, experimenting with Delrin and poly using a minium of tools, which most have in their wee box or laying about in a cupboard. I had to be more exact than for what is being said about in this discussion as of late. I would imagine any Polypropylene plastic, Nylon, or Delrin can be done as a fix. Now for a wee quick fix that may not need any tools, well a drill to make a hole if need. I messed with a number of glues and adhesives, mostly off the shelf from any hardware store, the oddest adhesive I have noted that is durable and can be used to make a pour mold for such a bushing is E6000. All it would take is paraffin wax and using a fairly good bushing to create an imprint. Or use some new age silicone rubber putty and heat some Poly plastic pieces to have them melt into the shape of the mold. A simple toaster oven can do thé trick. Why??? Because it will work, and many are over thinking the fix and hitting it with a sledge hammer. Not that it is too much, but really, CNC work? Maybe it's for speed over high tolerance, in production... that I guess would be spitting out as fast as one could load fresh sheets. If anything it is not the force being applied to the bushings when rolling up or down the window. It's the fact the OEM plastic becomes brittle in its lifetime of use. Sure putting high impact and low friction materials will do thé trick and prolly won't show any benifit until your long gone and some apocalyptic highway man and his dog goes about in the desert wanting to roll down the window. Poking at your ribs here. You must remember back in 66 to 67 when AMC designed the window channels for later soon to be produced cars, plastics were still a new tech in the auto industry. PVC was still an infant, and probably could have lasted long enough to make this thread mute. Just saying here, the problem can be fixed fairly easy at home if you are willing to look at various simple means one can do and will function just as good as any other fix given here. ------------- 71 Javelin SST body 390 69 crank, 70 block & heads NASCAR SB2 rods & pistons 78 Jeep TH400 w/ 2.76 Low 50/50 Ford-AMC Suspension 79 F150 rear & 8.8 axles Ford Racing 3.25 gears & 9" /w Detroit locker |
Posted By: Scene One
Date Posted: Dec/23/2017 at 6:36pm
|
I am happy to cut these on the CNC. as I stated my machine is tied up till Feb. I just went thru the thread and it appears some of the images appear to have been deleted. I have reworked my doors with the best original parts I had but it sounds like I would be better off with new improved bushings. Tomorrow I will look and see whether I have an old set in my barn but I am not sure what mod's have been done to your new bushing, I would assume it would be taller. Ken if you could either send me the one you have or a simple drawing or photo with measurements would be more than sufficient. In fact that would save on postage both directions. With that info. I can quickly draft up what I need. The next thing would be what Material everyone thinks would be best and where to buy it at the best price. Once I have all of that the cut time should be quick and I will have it in the computer for the future. It would be great to cut a bunch right away so if we could figure out how many people are interested we can cut them. Buster |
Posted By: billd
Date Posted: Dec/23/2017 at 6:53pm
|
IT's so weird - when I took my machine shop courses and learned lathe, mill, boring bar, etc. we used blue prints and drawings, and rulers and micrometers and calipers, etc. - we mounted the stock and cut according to the plans. Now you need to be a computer programmer, you mount the stock, start the program and stand back and watch........... (I know it's not QUITE that simple, a friend and co-worker took CNC classes a couple of years back -before he retired. He told me all about it - and how some were even failing the simple parts.) It would seem to me to be easier if a person had one to go by, or a decent drawing, to just go to the machine and make one or ten. I guess I'm old school. ------------- http://theamcpages.com" rel="nofollow - http://theamcpages.com http://antique-engines.com" rel="nofollow - http://antique-engines.com |
Posted By: 304-dude
Date Posted: Dec/23/2017 at 7:02pm
|
SceneOne, the first page shows the drawings and images just fine, and i am not using any plug in on my browser. Donno if you are looking for something else than the custom bushing themselves. If you want images of good factory bushings, i can probably post them, as I have 4 per door and complete window guide in my basement, left untouched when removed. ------------- 71 Javelin SST body 390 69 crank, 70 block & heads NASCAR SB2 rods & pistons 78 Jeep TH400 w/ 2.76 Low 50/50 Ford-AMC Suspension 79 F150 rear & 8.8 axles Ford Racing 3.25 gears & 9" /w Detroit locker |
Posted By: Scene One
Date Posted: Dec/23/2017 at 7:10pm
More complicated pieces can be 3d scanned and go straight in the control computer. I am like you Billd more old school I do most of my drawings by hand for my shop work. With the cnc machine it needs to be computer drafted. Actually the drafting program is fairly easy I have done some drafting on the machine but my son went to college for just that and he is very fast and good at it. He designs drafts sets up the tool paths, cutter speeds and the works. I rely heavily on him, that is pretty much why I bought the machine years ago. Our build times have reduced greatly and are much more accurate with the CNC. I am very thankful for him he is a good builder welder and fabricator besides performing all my tool repair work. I have a great crew and he is a big part of that.. |
Posted By: Scene One
Date Posted: Dec/23/2017 at 7:15pm
The only thing I see on the first page are the flat guides, Which are just squares with holes. For some reason Pit crews pictures are not showing up on my computer. The square pieces don't need CNC the can just be cut and drilled. |
Posted By: 304-dude
Date Posted: Dec/23/2017 at 7:25pm
Ah, now i see... i did not check for Pit Crews pix. As for the round bushing, that he machined, so measurements can be done with mine or yours if you still have them set aside. I forgot I had some thick Teflon washers...i may have to see check what i can do with them, as an option. I don't know why one post had a negative thought on Teflon, i used them in my strut rod mod and found them durable enough to hold up to pressure against steel washers, even when thinned half its thickness. ------------- 71 Javelin SST body 390 69 crank, 70 block & heads NASCAR SB2 rods & pistons 78 Jeep TH400 w/ 2.76 Low 50/50 Ford-AMC Suspension 79 F150 rear & 8.8 axles Ford Racing 3.25 gears & 9" /w Detroit locker |
Posted By: pit crew
Date Posted: Dec/23/2017 at 7:48pm
To recap some of the issues. The cold cast resin version gets soft with time and weather. I have seen them get limp within a few months. There is also a wear issue with the cold cast resin. The Acetel (polyoxymethylene) is a lightweight and low-friction polymer commonly known as Delrin (DuPont's brand name.) Often used as a metal substitute, acetal is capable of operating in temperatures in excess of 200 degrees Fahrenheit. Instead of trying to find someone who could cast acetel it was cheaper and quicker to find someone who could run them off with a CNC machine. That is until they decided it was too much trouble to load the machine and watch it run. And here is what it looks like installed along with the improved side guides. ------------- 73 Hornet - 401EFI - THM400 - Twin Grip 20 |
Posted By: billd
Date Posted: Dec/23/2017 at 7:57pm
|
I guess it's the guides that are missing in mine - I thought all this talk was about those since that's why my windows wobble around and won't roll up and down without holding them as they tip fore and aft. But it seems that there's nothing plastic/nylon in my doors at all. Geesh so there's other parts it needs. And no, people keep saying to go to AMARK for those guides - he's not had any for a while. I need everything window related (including tinted glass) - the nylon guides and now I see there's bushings, too? That sure looks different than my 73 door inside but maybe that's because so much is wrong in there. ------------- http://theamcpages.com" rel="nofollow - http://theamcpages.com http://antique-engines.com" rel="nofollow - http://antique-engines.com |
Posted By: Scene One
Date Posted: Dec/23/2017 at 8:00pm
|
That looks easy enough I will check in my barn tomorrow to see if I have the old stile bushing. Then I will check it's dim. and get in touch with you and figure out what we want the new ones to be. Merry Christmas Buster |
Posted By: pit crew
Date Posted: Dec/23/2017 at 8:04pm
------------- 73 Hornet - 401EFI - THM400 - Twin Grip 20 |
Posted By: Scene One
Date Posted: Dec/23/2017 at 8:04pm
I have an assortment of door parts in my barn if I can help and I have it I will send you what you need. I will make the new bushings in Feb. if you are interested. B. |
Posted By: pit crew
Date Posted: Dec/23/2017 at 8:10pm
Merry Christmas. ------------- 73 Hornet - 401EFI - THM400 - Twin Grip 20 |
Posted By: 304-dude
Date Posted: Dec/23/2017 at 8:14pm
|
It's been a long time since I checked adjustments on window guides. Isn't the guide rod round bushing to have some slop (thin ring for a reason), as the rod has adjustment at the bottom of the door frame, for tilt. It would explain the bottom square bushings as to keep the rod stable after adjustment. Maybe once I take a look at mine, I can figure out exactly how the mechanism is to function before making such a bushing with close tolérances with rod fitment. ------------- 71 Javelin SST body 390 69 crank, 70 block & heads NASCAR SB2 rods & pistons 78 Jeep TH400 w/ 2.76 Low 50/50 Ford-AMC Suspension 79 F150 rear & 8.8 axles Ford Racing 3.25 gears & 9" /w Detroit locker |
Posted By: pit crew
Date Posted: Dec/23/2017 at 8:21pm
------------- 73 Hornet - 401EFI - THM400 - Twin Grip 20 |
Posted By: 304-dude
Date Posted: Dec/23/2017 at 8:57pm
Ok, now I got the picture... just thought there was extra martial to keep the rod more centered and secure. That part i over looked in the thread, probably because of the pictures, so I guess I was only seeing 1/2 of the bushing fix. Thanks for clarifying and posting the pix that did not show up on the 1st page. Yes, I agree now, you will need to do a bit of specialised machining. Even if i tried to make your style by hand, the fit would probably be worse than my original bushing as for how your new style is made. Delrin would work well also, as I was pleased on how well it cut without melting doing dry cuts. ------------- 71 Javelin SST body 390 69 crank, 70 block & heads NASCAR SB2 rods & pistons 78 Jeep TH400 w/ 2.76 Low 50/50 Ford-AMC Suspension 79 F150 rear & 8.8 axles Ford Racing 3.25 gears & 9" /w Detroit locker |
Posted By: Mopar_guy
Date Posted: Dec/23/2017 at 9:50pm
|
I did this back about 4 years ago when I changed mine over to power and the windows still work perfect. This is the best mod you can do for Javelin windows! One note from my experience - use silicone grease instead of petroleum based grease on them. The Delrin doesn't seem to like petroleum based grease. ------------- " http://theamcforum.com/forum/hemilina_topic95889.html" rel="nofollow - Hemilina " My 1973, 5.7 Hemi swapped Javelin |
Posted By: 304-dude
Date Posted: Dec/24/2017 at 5:45am
That I did not réalisé, though my usage with Delrin and Teflon has been without any lubricant usage. Both types really don't require lubrication, unless you have rust from condensation. Though, the rod is stationary, one can keep the areas in question clean and covered by mounting a plastic collar to collect drips and such when applying lubricant for window up and down function. I Should read up on Delrin limitations, as I thought it was a harder Teflon material, that was immune to lubricant breakdown of it's compound. Thanks for bringing it up! ------------- 71 Javelin SST body 390 69 crank, 70 block & heads NASCAR SB2 rods & pistons 78 Jeep TH400 w/ 2.76 Low 50/50 Ford-AMC Suspension 79 F150 rear & 8.8 axles Ford Racing 3.25 gears & 9" /w Detroit locker |
Posted By: White70JavelinSST
Date Posted: Dec/24/2017 at 7:07am
|
FWIW, if there is any painting to do after the windows are installed, any silicone based products will make the paint act really strange and do awful things. Even having silicone products in the same room as the painting action can cause trouble for the paint. I don't use anything silicone based any more, had too many bad experiences before I figured out what was causing them. ------------- 70 Javelin SST, second owner, purchased 1972 |
Posted By: Mopar_guy
Date Posted: Dec/24/2017 at 9:14am
|
Due to the arc of the rod as Pitcrew talked about earlier in the thread, they wanted to bind or stick slightly so I had put a little white lithium grease on it which worked fine. About a year later they started chattering and acting bad so I pulled one apart to find the rod was all sticky. I cleaned everything all up on both sides and put a little Super Lube silicone grease on them and haven't had any problems since. I didn't look to see if Delrin reacts to petroleum products or not but this is what my experience was and though I would pass it along. This is from Super Lube's website - Silicone Lubricating Grease with Syncolon® (PTFE) has a wider operating range
than petroleum based lubricants; Excellent water protection and moisture barrier.
Use on Plastic gears, plastic threads, as a damping medium for Dash Pots, lubricate
O-Rings, electrical motor bearings and rubber components. ------------- " http://theamcforum.com/forum/hemilina_topic95889.html" rel="nofollow - Hemilina " My 1973, 5.7 Hemi swapped Javelin |
Posted By: PlazinJavelin
Date Posted: Dec/24/2017 at 1:47pm
|
SceneOne, what file format do you need? I still have the 3d model with proper hole dimensions I made for this project. My depths are a bit closer to the original part dimensions, but you can adjust that as you prefer to more closely match pit crews version.  |
Posted By: Scene One
Date Posted: Dec/24/2017 at 9:59pm
|
The software I use, which is Aspire, is able to import vectors from files with any of the following file extention: .crv, .dxf, .eps, .crv3d, .pdf, .ai Or just give us dimensions and we will be good, it looks easy enough to draw and my son is very fast and good with all the programs. I showed him a picture of it today and he says it will be easy to do. Thanks B. |
Posted By: PlazinJavelin
Date Posted: Dec/25/2017 at 8:32pm
|
I looked up Aspire and I bet just pics with dimensions would be easiest. Check your private mail for a couple of drop box links to pics.
|
Posted By: Scene One
Date Posted: Dec/25/2017 at 8:58pm
What you sent will work great Thank you!!! |
Posted By: petter
Date Posted: Jan/02/2018 at 8:57am
|
Is it someone that can share the dimensions of the bushing, I would like to try making a printout on my 3D printer at work, I will create a model and can share the 3d printer ".stl" file here if the function will be acceptable. /Peter ------------- Peter Olsson Javelin 1971 Saab 9-3 Aero 2008 Bmw 528 Touring 1999 Volvo C70 convertible 2001 |
Posted By: Scene One
Date Posted: Feb/18/2018 at 4:13pm
Ok we finally got a break with the CNC to mill up a couple of bushings. My son and I decide to cut them in foam first to resolve any issues that came up to start with. In doing so we found that there was also play where it was riveted onto the bracket so to help solve this we made it fit perfectly into the recess so there would be no movement at all. I had in my shop a piece of delrin from a past project that was 1 3/4" thick enough to make a couple pieces up. After our foam test cuts we made a few adjustments and cut a pair but found out that they were to tall when I went to assemble for the curve of the rod. So I reduced the length to overall 1 1/4". I also found that the metal rod they slid on seemed uneven so I sanded it with a random orbital sander and then polished on a wire wheel and it was much improved. We also came up with a new design for the wear bushings such that they snap in place very easily. After which I installed them in my car and they worked fantastic with just a slight movement in the window after installed 100% better. It also seemed easier to adjust the window alignment unless it is just all the practice I am getting.  check out the photos and feel free to offer suggestions. If everyone is happy I can mill some up. check out the photos and feel free to offer suggestions. If everyone is happy I can mill some up.     
|
Posted By: Woosterkevin
Date Posted: Feb/18/2018 at 4:32pm
| Looks really good. I am interested in a set when you very some made. |
Posted By: pacerman
Date Posted: Feb/18/2018 at 5:02pm
|
Me too. Joe ------------- Happiness is making something out of nothing. |
Posted By: SST343
Date Posted: Feb/18/2018 at 5:12pm
| I’m in - sign me up. |
Posted By: AMXAL
Date Posted: Feb/18/2018 at 6:32pm
| Awesome work,I would like a set too when available. Thanks Al |
Posted By: Mopar_guy
Date Posted: Feb/18/2018 at 7:06pm
Those look good Buster.  I see you found out the same thing I did about making the bushings to long. I use Loctite silicone grease on everything to make it slide even nicer. And for those of you who are going to do this, if the guide tube isn't nice and smooth, the bushings won't slide right so use some fine emery cloth on the tube to smooth it out while you have it apart. I see you found out the same thing I did about making the bushings to long. I use Loctite silicone grease on everything to make it slide even nicer. And for those of you who are going to do this, if the guide tube isn't nice and smooth, the bushings won't slide right so use some fine emery cloth on the tube to smooth it out while you have it apart.------------- " http://theamcforum.com/forum/hemilina_topic95889.html" rel="nofollow - Hemilina " My 1973, 5.7 Hemi swapped Javelin |
Posted By: pit crew
Date Posted: Feb/18/2018 at 7:43pm
|
Great job Buster. To get good contact on the tube we went shorter on the length and a little tighter on the clearance. That reduced any bind issue. Your side guides look great. I opted to use a cotter pin to make changing them a little easier but I love your design. Be sure you have good clearance at the top of the rod. The upper mounting can be a little close when you roll the window all the way up. I did not rivet the bushings in but used stainless steel screws with ny-lock nuts. I did clean up the guide rod and touched it up on the buffer before putting it back in. Congrats my friend. I think you have a hot product to sell. Put me on your customer list as soon as you are ready.  ------------- 73 Hornet - 401EFI - THM400 - Twin Grip 20 |
Posted By: Fluffy73
Date Posted: Feb/18/2018 at 7:43pm
|
I'd definitely be in for a pair as well!
------------- I am genetically incapable of being Politically Correct. |
Posted By: Scene One
Date Posted: Feb/18/2018 at 8:37pm
price will be based on material and shipping cost to get it and to send it to whoever wants them. I have no intentions of getting rich on the AMC community. To produce as shown I would need 1 1/4" and 3/8" stock. The supplier you forwarded me Ken seams to be the best pricing I have found. I will leave this post ride for a week or so then have a better idea how many to make then price accordingly. If someone needs them asap. please let me know I don't want to hold up anyone's project. All interested please Post here or PM. me with exactly your needs and quantities. B.P. |
Posted By: kirkwood
Date Posted: Feb/18/2018 at 8:42pm
|
I'll take 2 sets. Let me know how much and where to send the money. Thank you for taking this on! ------------- AMO Newsletter Editor |
Posted By: Shannock
Date Posted: Feb/19/2018 at 8:13pm
|
Hi, you can add me to the list, I'll take two, also, Thanks, Tom ------------- Tom Davies Rhode Island 1971 Javelin SST |
Posted By: AMXAL
Date Posted: Feb/19/2018 at 9:59pm
|
I am definitely in for 2 doors worth ( wasn't sure if we were talking a set being a car worth or just one door) in any case I would like enough to do 1 car. Thanks,Al |
Posted By: Samuelsc360
Date Posted: Feb/20/2018 at 7:43am
|
Me too. ------------- 1971 SC360 1973 Ambassador Sedan 360 1973 Hornet X 360 1973 Javelin AMC 401 1975 Sportabout X 258 |
Posted By: White70JavelinSST
Date Posted: Feb/20/2018 at 9:30am
|
deleted and re-posted under new subject ------------- 70 Javelin SST, second owner, purchased 1972 |
Posted By: garweb3
Date Posted: Feb/20/2018 at 9:51am
|
I would like a set(both doors) also. ------------- 1974 Javelin AMX 1980 Spirit AMX 1987 Jeep Comanche Sportruck |